PW2013STL
Active member
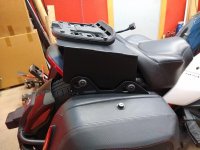
I liked the idea of adding a top box to my F3s using the rack from the F3 police model, but when I ordered that rack I was informed that it was on back order until December 19th or later. I decided to make my own using 1/4" aluminum plate.
I used 6" x 24" cut in have for the sides and 12" x 24" for the top. I also placed 1 1/2"OD x 3/4" ID x 5/8" thick aluminum spacers stepped drilled to fit on the frame brackets where the hand holds were mounted. This provided a larger support surface for the back of the side plates (I believe in over kill).
All material was purchased from McMaster-Carr.
I cut the 6" x 24' in half as they do not sell a 6" x 12" I then drilled the mounting holes and bolted them on. I then placed the 12" x 24" plate on top and using a marker made the edge lines for cutting it down to fit the angle shape. I also marked the side angle on the side plates.
After cutting all the pieces, and since I do not weld I cut some angle aluminum I had and bolted the 3 pieces together and laid out the placement for the box mount. I noticed that the top plate was over the seat area so I made a cut to clear that. Once all the holes were drilled for the top box mount I than took it to a weld shop and had the 3 pieces welded together.
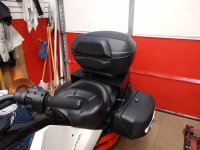
I finished up with sanding and painting.
I added a brake light under the back mount and LED running/turn/brake light to the top box and ran those wires out the front to a quick disconnect so I can remove the box and carry it into the room at night.
I used 6" x 24" cut in have for the sides and 12" x 24" for the top. I also placed 1 1/2"OD x 3/4" ID x 5/8" thick aluminum spacers stepped drilled to fit on the frame brackets where the hand holds were mounted. This provided a larger support surface for the back of the side plates (I believe in over kill).
All material was purchased from McMaster-Carr.
I cut the 6" x 24' in half as they do not sell a 6" x 12" I then drilled the mounting holes and bolted them on. I then placed the 12" x 24" plate on top and using a marker made the edge lines for cutting it down to fit the angle shape. I also marked the side angle on the side plates.
After cutting all the pieces, and since I do not weld I cut some angle aluminum I had and bolted the 3 pieces together and laid out the placement for the box mount. I noticed that the top plate was over the seat area so I made a cut to clear that. Once all the holes were drilled for the top box mount I than took it to a weld shop and had the 3 pieces welded together.
I finished up with sanding and painting.
I added a brake light under the back mount and LED running/turn/brake light to the top box and ran those wires out the front to a quick disconnect so I can remove the box and carry it into the room at night.

 hyea:
hyea:")