• There were many reasons for the change of the site software, the biggest was security. The age of the old software also meant no server updates for certain programs. There are many benefits to the new software, one of the biggest is the mobile functionality. Ill fix up some stuff in the coming days, we'll also try to get some of the old addons back or the data imported back into the site like the garage. To create a thread or to reply with a post is basically the same as it was in the prior software. The default style of the site is light colored, but i temporarily added a darker colored style, to change you can find a link at the bottom of the site.

@46K

Pandy

Member
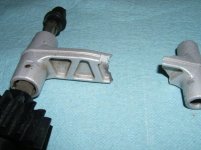
At 46000 miles, and on the BRP of all places, the windshield support decided to snap. So, as noted on various posts, it would appear that the gizmo in question is not sold as a separate piece. Looks like the entire windshield support has to be purchased. I'm going to try an in situ fix, and failing that, take the piece out ( with dire warnings from Scotty and the tech manual) and have it welded. If that holds, I can pinch the pennies back to purchase the entire WSM. Oh, mine snapped at the windshield side, but I will look for cracks further down as well. I expect this to be ugly. By the way, Pyder is a 2011 out of the crate on 1 March 2011. Glad it held up this long. Patrick
 

Attachments

  • DSCF1588.jpg
    DSCF1588.jpg
    43.9 KB · Views: 61
Last edited:
Teddy suggests calling your dealer, they should cover it under Warranty

With as many of these that have been broken, including 2 for us, both of ours were covered under Warranty, so I would be inclined to think that yours should be as well.

For a quick fix, you can take a hose clamp and some duct tape to it, and it will hold for as long as need be if you do it right, just doesn't look all that pretty :shocked: but it works ;)

 
Windshield Arm

I had my first one break the day before I was going to Colorado. I took it off and had it welded at a shop. My second just broke two weeks ago and I ended up putting the one I had welded back on and it is still working. I have 27,000 and have been told the second one won't be covered under warranty. It only has about 5,000 miles on it. I am going to check into that a little more.
 
I had my first one break the day before I was going to Colorado. I took it off and had it welded at a shop. My second just broke two weeks ago and I ended up putting the one I had welded back on and it is still working. I have 27,000 and have been told the second one won't be covered under warranty. It only has about 5,000 miles on it. I am going to check into that a little more.

Are the 2013's affected by this as well? or did BRP fix the problem.
 
I haven't heard of any breaking on a 2013 but it still a little early for that. If you are concerned I would suggest that you not ride with the windshield all the way down. Keep it up about 1/4" and that should keep the parts from rubbing against each other.
 
Bummer..!!

and you were doing so well...hope they will warranty it and if not have it welded, will not look great but is way cheaper...good luck..!! :thumbup:
 
I haven't heard of any breaking on a 2013 but it still a little early for that. If you are concerned I would suggest that you not ride with the windshield all the way down. Keep it up about 1/4" and that should keep the parts from rubbing against each other.
:agree: keep it off the bottom just a wee bit...
It couldn't hurt! :thumbup:
 
If your talking about the center link that attaches to the windshield bracket and it broke about in the middle I helped a spider owner fix his and it is better than new. I took a piece of aluminum plate and cut two fillers to fit in the cavity on either side. I then embedded the parts in JB weld. I cut the parts to fit well so only a slight bit of JB weld oozed out but when dry I filed it flush then painted the parts to match the existing aluminum color. I wish I had taken pictures because the repair was near perfect.

If you send me a picture of where your broke I can see if this will work for you.
 
A few have received the bad part (under warranty) a couple times now. It does not hurt to ask. This is a well known problem. So far, knock wood here. :thumbup:
 
TO the bluestratos reply, that was plan A until I saw the replies about welding. So, to those who have had theirs welded, did you command the WS all the way down before removing the gearshaft? If not, how were you sure of the indexing when done? Also, did you leave the casting on the gearshaft or remove it? I plan to have it welded and filled on both sides with weld if that is practical. If not, it will be a hybrid TIG/JB weld fix. I might look about and see about duplicating the part in billet form. Pictures to follow, just haven't been back out to the garage. ...Patrick
 
Make a Bumper for the Arm

Cut a piece of rubber of some kind and glue it onto the underside of the arm. That will prevent the arm from resting fully on the rest. Don't know if this will prevent it from breaking but it can't hurt.
 
I'm going to have to look at this when I do my winter tear-down. I normally ride with the windshield all the way down. What part rubs? If it cracks the arm, it probably bounces or bangs continually against something. Where can I find info about removing the gear shaft and "indexing"? Is it covered in the service manuals?
 
Where can I find info about removing the gear shaft and "indexing"? Is it covered in the service manuals?
On page 736 in the 2011 BRP SM it states ........"Do not remove windshield motor from windshield base.If the windshield motor needs to be changed,replace windshield base with WPM module and windshield motor as an assembly."

I assume the shaft is in that assembly.

Others here may know of a way to adjust it.


Not the question I asked. :gaah: That section of the manual tells you not to do it. I'm asking more specifically what I see in Cincy's picture above where he has the gear and shaft removed. Is this documented anywhere and are there any special things to look for in getting it back in the correct position? Although I have been into the Spyder far enough to see the motor assembly, I have not had motor assembly removed or taken apart.
 
If you want to play the game as BRP has written it out; there's no taking that piece out to do anything with it... :shocked:
Replace the enitre unit, and lighten your wallet by a very considerable margin! :yikes:
So anybody who has found a workable "Plan B"; how'd you do it? :thumbup:
 
Hi,

I study how the mecanism work and i know how to make a workable bracket. My friend at University maybe it's will take longer to make the first parts, i see it drawing in 3D, the parts and taking measurement with micrometer and i tell him to not take to much time making it beautiful. He want the parts look like original and making easy to change. Working with him on some project , he come hysteric when it come time to make thing for somebody other then him.(He said : I put my name on it.) It will be easy switching the gear and the magnet switch from the old one to the new one placing it side to side and making mark with permanent ink and switching to the new parts. We will put mark on new parts so you will know on which angle to put the gear and magnet. You put it back and it will work like normal windshield . To my concern i don't want to sell something who does not work at home.

But today dealer put new assembled windshield on my RTS 2010 no warranty till march 2012 they understand the customer this time when i call to Valcourt it's take 2 weeks to respond.
When it's time to make it human to human and they understand the situation.


I would like to thanks:yes: BRP for backing his product even without warranty. :bowdown:. It's more than Best warranty it's about security ,reliability and human customer service. And be the first one to by first edition 2010 rts i remember her that i feel like a tester.


If you want to play the game as BRP has written it out; there's no taking that piece out to do anything with it... :shocked:
Replace the enitre unit, and lighten your wallet by a very considerable margin! :yikes:
So anybody who has found a workable "Plan B"; how'd you do it? :thumbup:
 
If you look toward the center and bottom, youll see a V notch it sits on when lowered

I'm going to have to look at this when I do my winter tear-down. I normally ride with the windshield all the way down. What part rubs? If it cracks the arm, it probably bounces or bangs continually against something. Where can I find info about removing the gear shaft and "indexing"? Is it covered in the service manuals?


Personally, I'd suggest to NEVER ryde with the shield all the way lowered or raised, just raise or lower all the way then a little bump of the button in the opposite direction just to make sure the bracket isn't resting with metal against metal while your ryding ...... seems logical to me :rolleyes:

And just to throw this out there, at this years (2013) Owners Event, Teddy & I did a totally unscientific study and looked at a total of something like 17 RT Windshield brackets that their owners left in the mid position so it was easy to see, and out of those 17, 6 had a noticeable crack in them :shocked: We could only locate 2 of the Owners to alert them to this fact :dontknow: And I fear from this little looksie that we did, this is a much greater problem than most early model year (2010-2012) RT owners have a clue about & expect to see this more and more as time progresses :mad:

BRP did change the mounting hardware (Screw/Bolts instead of just clips) along with plastic spacers to prevent metal from metal contact, and they also redesigned the shields, making them smaller and also adding in the 2 holes that match the WindShield Bracket in an effort to help reduce so much pressure against the shields.

I have no clue if they actually changed this cast-aluminum dog-bone bracket or not, but with the other changes, it would seem logical there would be much less stress on the bracket. I'm also not sure if they changed the actual way it rests with metal against metal in the all the way lowered position, but that (at least to me) would seem like the biggest problem to this design. So the suggestion that another poster made about adding a 'cushion' to the bottom so there can't be metal against metal also (IMHO) seems logical, especially if your going to ryde with the shield being all the way lowered.


As for indexing, I can't really provide any advise for ya, cause I knew my application here was only going to be temporary while the shop ordered the new motor/assembly to replace it, so I just did what I needed to do to make our broken part useable and guess I just got lucky, cause after I made our temporary fix using a hose clamp and duct-tape around the dog-bone, I just put everything back together the same way I took it apart, and I had no issues with it not working correctly ;)
 
electric windshield

yes the arms are braking on the 13's also. mine is still good nut the dealer said they do brake
 
Fugly but fixed

My welder finally came through for me and did thisDSCF1592.jpgDSCF1594.jpgre installed shaft and confirmed proper motion, now to clean and remount windshield. Patrick
 
Back
Top