Removed all the body panels. Summary: Panel bolts and nuts where missing along with some plastic washers. Recommend you take your panels off to inspect work performed.
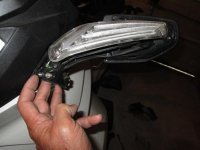
Removing the mirrors was baffling until I read billybovine's "how-to" in an ST thread. Manual got it wrong. Thanks much for the post! Here's a picture to show the ball mounts at the bottom of the mirror following the rap to release them:

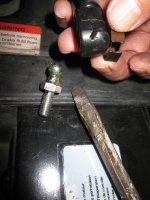
Removing the seat shock was tricky. I couldn't figure out how the spring clip on the shock worked from the service manual, so I tediously removed the nut and bolt at the bottom of the seat to the shock. I then removed the clip from the top of the shock and ball bolt. I found the spring locks the ball bolt into the head of the shock. Getting that back on with free space was difficult and I believe it would be worse with the cramped area under the seat, so I will reinstall by using the self locking nut and ball bolt; much easier. Here's a pic:

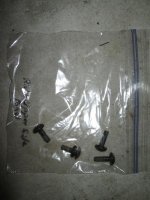
As I removed the panels I found 2 torx panel bolts and nuts just missing from shop maintenance and several plastic washers where damaged or missing. I ordered replacements. I also found an unattached bolt stuck behind the right rear body panel. No telling where it came from. I organized the connectors in labelled baggies so I'll be able to get them all back in place.

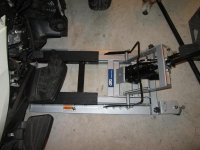
Bought an OTC 1545 Motorcycle Lift to get under the Spyder. It works smoothly lifting and lowering and has a safety bar preventing the hydraulic jack from slipping. It's low and easily fits under the Spyder. It's solid. Of all the review this was the best moderately priced lift. http://www.amazon.com/OTC-1545-Motorcycle-Lift/dp/B000OCHCIW?ie=UTF8&*Version*=1&*entries*=0

Figuring out the process was tedious and the manual is sketchy but patience and some critical posting here won out and this will be easy in the future. hyea:
hyea:
Next Brakes.
Removing the mirrors was baffling until I read billybovine's "how-to" in an ST thread. Manual got it wrong. Thanks much for the post! Here's a picture to show the ball mounts at the bottom of the mirror following the rap to release them:
Removing the seat shock was tricky. I couldn't figure out how the spring clip on the shock worked from the service manual, so I tediously removed the nut and bolt at the bottom of the seat to the shock. I then removed the clip from the top of the shock and ball bolt. I found the spring locks the ball bolt into the head of the shock. Getting that back on with free space was difficult and I believe it would be worse with the cramped area under the seat, so I will reinstall by using the self locking nut and ball bolt; much easier. Here's a pic:
As I removed the panels I found 2 torx panel bolts and nuts just missing from shop maintenance and several plastic washers where damaged or missing. I ordered replacements. I also found an unattached bolt stuck behind the right rear body panel. No telling where it came from. I organized the connectors in labelled baggies so I'll be able to get them all back in place.
Bought an OTC 1545 Motorcycle Lift to get under the Spyder. It works smoothly lifting and lowering and has a safety bar preventing the hydraulic jack from slipping. It's low and easily fits under the Spyder. It's solid. Of all the review this was the best moderately priced lift. http://www.amazon.com/OTC-1545-Motorcycle-Lift/dp/B000OCHCIW?ie=UTF8&*Version*=1&*entries*=0
Figuring out the process was tedious and the manual is sketchy but patience and some critical posting here won out and this will be easy in the future.
hyea:Next Brakes.