youngers
New member
good day every one , { the end of great days of riding is getting closer ... get in as much as possible and stay safe } o kay back too the leak . I posted on another thread , that I had a leak the clutch fluid { type 4 } leaked out , thought it was some where from the clutch reservoir hose too the clutch assist assembly ... { the s m 5 doesn`t have assist the s e 5 has it } so that threw me off ... had a friend come over , needed 4 sets of eyes and 2 heads to find leak , and we finally found the cause ------ 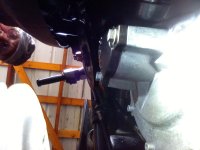 --------- this is the friend looking down on the diaphragm cover on the right side of the cycle , the leak is coming from inside here , we took the diaphragm assembly apart , and this is what we had found , a little explanation if I may , the bike sat for couple years , as too have only 5500 miles on a 2012 , so what we think had happened , was the inner O -ring had dry seized too the cylinder wall , the lower part of the cylinder , the rubber O - ring was kind of chewed up , and looked as though it rolled and un-rolled in one movement . here is the photo of the 3 pieces in side a diaphragm housing , before you have too take off t he bigger retainer housing , that holds the meat of the clutches -------
 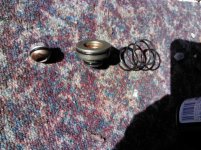 diaphragm housing the spring , is located behind the larger plunger with a large and small O -ring , and the 17 millimeter nut too the left is what hold all together ... here is the larger O -ring that was chewed up ------
 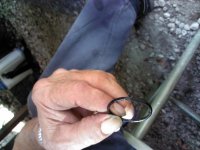 ---- if you can you can click on the photo and hopefully you can see the rolled edge and the rough edges where this thing was dry sealed and just finally gave way ! { when I lost all the fluid the 1st time it was quite black , like something disintegrated and worked it way through the system , we cleaned and flushed the whole system , and had too clean the ports in the clutch reservoir too get it too flow easy again , must have pulled something up from bottom we guess } so now we have the rings assemble apart cleaned the plunger and 17 m.m nut with w-d 40 then coated with the type 4 brake fluid then assembled the o-ring too the plunger and nut after we soaked these O-rings in the type 4 fluid ... now we are too the center of the rest of the problem , the housing where the original O -ring sealed it self too the wall , look like the wall had scaring , { real fine scratches around the area of travel } ---------------
 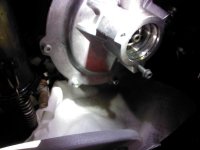 --if you will notice it looks like two groves in the housing , { the one near the out side is the original grove , the 2 nd one inside is were the O -ring was stuck and broke free which in turn must have rolled a bit , the item in the center of the tube area is the 5 millimeter allen screw which runs too through the clutch plate assembly .. { so make sure this does not turn , if possible , a little will be o kay just roll it back , we had this one turn a bit too break the 17 m.m. nut free but rolled it back too position } so with the wear spot on the inside cylinder we tried to use a hone , but it is too narrow , for a good bore hone , so I had too get a very fine piece of emery cloth , { really fine sand paper 600 too 800 grit I forget , but it was almost smooth too the feel } I rubbed the area where the 2nd wear spot ring was at , until it was gone and a nice almost mirror finish was in its place , wasn`t total mirror but a dang lots better than when we started , { okay not sure where to put this foot note : so here it is --- when you break loose the 17 millimeter nut that holds all the other in place , you will find that the plunger and spring will not fall out , here is where a friend come in handy , have them depress the clutch , and be ready too catch the plunger and spring assembly the oil will pop this out easy, and oil will or might spray I bit .. that is how we got them apart } 17 millimeter metric off set wrench , and a 5 millimeter metric allen wrench you might have too give the off set wrench a couple good wacks too break the nut loose ... after we sanded the rough spots all around the plunger travel area , sprayed W- D 40 over the inside , wipe clean then rubbed type 4 brake fluid over the inside and reassemble the spring into the plunger and the nut over that assembly , { king of press with thumbs , working top and bottom ,then left side right side , at same time this will walk the assembly in it took us 4 times press this way and then just slide right in ... had too flush and bleed the system again , and re assemble the cycle { here is the good part ------> 2 part O -ring large one that was chewed up , the one on the 17 m.m nut --- price is under 10.oo u.s. dollar that is right 9.61 for these . we did have to buy wrench at 17 dollars ---- total time too take skins off start 11 a.m. Friday finish 4 p.m. that is take off skins and look for leak and diagnose the problem , reassemble 11 am Saturday too 4 30 p.m. and that is with dinner ! :roflblack: we were starving ! so if you folks need some service like this I will do it for 800 dollars but wait you can keep the old parts :roflblack: { seriously though , if you do not have an idea of how wrenches work and things fall apart , and what too look for , do not try this by your self , or with some one that also does not know what too do , I have been tearing things up for over 50 years I got practice ! ------
  ------- looks fun huh !!!!! so have fun folks it is really really cheeper if you can do it your self ....
 --------- this is the friend looking down on the diaphragm cover on the right side of the cycle , the leak is coming from inside here , we took the diaphragm assembly apart , and this is what we had found , a little explanation if I may , the bike sat for couple years , as too have only 5500 miles on a 2012 , so what we think had happened , was the inner O -ring had dry seized too the cylinder wall , the lower part of the cylinder , the rubber O - ring was kind of chewed up , and looked as though it rolled and un-rolled in one movement . here is the photo of the 3 pieces in side a diaphragm housing , before you have too take off t he bigger retainer housing , that holds the meat of the clutches -------
  diaphragm housing the spring , is located behind the larger plunger with a large and small O -ring , and the 17 millimeter nut too the left is what hold all together ... here is the larger O -ring that was chewed up ------
  ---- if you can you can click on the photo and hopefully you can see the rolled edge and the rough edges where this thing was dry sealed and just finally gave way ! { when I lost all the fluid the 1st time it was quite black , like something disintegrated and worked it way through the system , we cleaned and flushed the whole system , and had too clean the ports in the clutch reservoir too get it too flow easy again , must have pulled something up from bottom we guess } so now we have the rings assemble apart cleaned the plunger and 17 m.m nut with w-d 40 then coated with the type 4 brake fluid then assembled the o-ring too the plunger and nut after we soaked these O-rings in the type 4 fluid ... now we are too the center of the rest of the problem , the housing where the original O -ring sealed it self too the wall , look like the wall had scaring , { real fine scratches around the area of travel } ---------------
  --if you will notice it looks like two groves in the housing , { the one near the out side is the original grove , the 2 nd one inside is were the O -ring was stuck and broke free which in turn must have rolled a bit , the item in the center of the tube area is the 5 millimeter allen screw which runs too through the clutch plate assembly .. { so make sure this does not turn , if possible , a little will be o kay just roll it back , we had this one turn a bit too break the 17 m.m. nut free but rolled it back too position } so with the wear spot on the inside cylinder we tried to use a hone , but it is too narrow , for a good bore hone , so I had too get a very fine piece of emery cloth , { really fine sand paper 600 too 800 grit I forget , but it was almost smooth too the feel } I rubbed the area where the 2nd wear spot ring was at , until it was gone and a nice almost mirror finish was in its place , wasn`t total mirror but a dang lots better than when we started , { okay not sure where to put this foot note : so here it is --- when you break loose the 17 millimeter nut that holds all the other in place , you will find that the plunger and spring will not fall out , here is where a friend come in handy , have them depress the clutch , and be ready too catch the plunger and spring assembly the oil will pop this out easy, and oil will or might spray I bit .. that is how we got them apart } 17 millimeter metric off set wrench , and a 5 millimeter metric allen wrench you might have too give the off set wrench a couple good wacks too break the nut loose ... after we sanded the rough spots all around the plunger travel area , sprayed W- D 40 over the inside , wipe clean then rubbed type 4 brake fluid over the inside and reassemble the spring into the plunger and the nut over that assembly , { king of press with thumbs , working top and bottom ,then left side right side , at same time this will walk the assembly in it took us 4 times press this way and then just slide right in ... had too flush and bleed the system again , and re assemble the cycle { here is the good part ------> 2 part O -ring large one that was chewed up , the one on the 17 m.m nut --- price is under 10.oo u.s. dollar that is right 9.61 for these . we did have to buy wrench at 17 dollars ---- total time too take skins off start 11 a.m. Friday finish 4 p.m. that is take off skins and look for leak and diagnose the problem , reassemble 11 am Saturday too 4 30 p.m. and that is with dinner ! :roflblack: we were starving ! so if you folks need some service like this I will do it for 800 dollars but wait you can keep the old parts :roflblack: { seriously though , if you do not have an idea of how wrenches work and things fall apart , and what too look for , do not try this by your self , or with some one that also does not know what too do , I have been tearing things up for over 50 years I got practice ! ------
  ------- looks fun huh !!!!! so have fun folks it is really really cheeper if you can do it your self ....
