• There were many reasons for the change of the site software, the biggest was security. The age of the old software also meant no server updates for certain programs. There are many benefits to the new software, one of the biggest is the mobile functionality. Ill fix up some stuff in the coming days, we'll also try to get some of the old addons back or the data imported back into the site like the garage. To create a thread or to reply with a post is basically the same as it was in the prior software. The default style of the site is light colored, but i temporarily added a darker colored style, to change you can find a link at the bottom of the site.

Horn Area

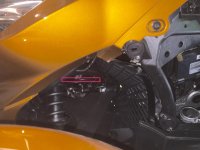
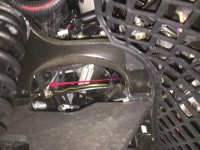
Nice installation! I just used the stock horn mount and drilled out the hole to accept the Wolo's bolt. I notice you have a 2011. Your comment about the wiring length does not apply to my 2014. I had to add length.

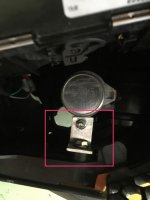
This is how I did my Wolo Bad Boy air horn.
I did it differently than most but did use a bracket I had laying around in the garage. Simple 90 degree bracket and I bet you could find something similar at a hardware store.

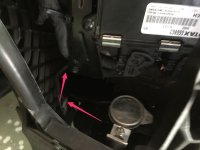
FYI, for those that say the stock horn wire harness is too short, this is not true. Simply unhook the harness from the clips on the frame and you get PLENTY of harness length to put it almost anywhere!


Bob
 
Stebel Horn

Does anyone know if I can simply buy a:[h=1]SUPER LOUD Stebel Nautilus Compact Twin Air Horn; Universal for Cars, Trucks, Boats, ATVS, Motorcycles and Scooters[/h]
for the replacement of the stock 2014 RT horn. Is there any modifications or wiring kits needed for the replacement? I have never switched out a horn before, so any help or videos would be helpful!
 
I will be installing the CAT bypass within the next week or so and by looking at the size of what will be replaced, I should have enough room for a small air tank and or compressor in that space. I am very much interested in mounting a couple of trumpets in the left air scoop of my RT. Got that idea at Spyderfest from the vendor installing modified mufflers and setup outside next to misty mountain sheepskins. Wish I could remember their name cause they offered to sell me the kit.
 
I am very much interested in mounting a couple of trumpets in the left air scoop of my RT. Got that idea at Spyderfest from the vendor installing modified mufflers and setup outside next to misty mountain sheepskins.
I'd be hesitant to install anything inside the air scoop that could impede the flow of air to the radiator. You have a 2013 RT, right? It needs all the air that you can push through there. See here for my install. http://www.spyderlovers.com/forums/showthread.php?70716-Wolo-Trumpet-Horn-Install-on-13-RT-Part-1

I see I commented on your plan back in that thread! :D

Yes you did, however I do not have a heat problem on the left side, and should it become a problem there are a few other options available for mounting
 
This was a very easy to do thing.

The pull off covers on the side there is ample room for a Horn on each side
any installation was easy it probably took me less than an hour to hook up these
horns.


I went ahead and bought the wiring harnesses for the horns because it just made it
easier.

This goes to my auxiliary accessories panel that I put in for power that goes directly
to the battery. Over the years I've learned on these Spyders is to keep everything

separate electrically.

On the wiring harnesses to the horns which each carry 30 amp fuse it's basically
all plug-and-play you plug-in the prewired spade connections to the Horn button wires
that you pull off the original Horn.

You then splice in the other two relay controls from the other wiring harness to the
same two wires you just plug into your original Horn connection, that's it. They both
come on together and it sounds like a tractor-trailer Horn because of the 300 MHz.

.

Nexus,

Thank you for this detailed description. I am installing my FZ-1 Fuzeblock and a Stebel horn this weekend and have a couple of questions about your description. First, concerning the two horns you refer to are you talking about the Stebel and the existing Can-Am horn? So as far as the push button is concerned are you saying you splice the two horns together so they both go off when you hit the button on the handlebar?

Also, as I said, I am installing my FZ-1 Fuseblock on my bike which has an inline fuse between the battery and the FZ-1. You refer to using the wiring harness for the Stebel to connect to the accessory panel (FZ-1 in my case) which also has an inline fuse. That means there is a fuse between the horn to the FZ-1, a fuse in the FZ-1 panel itself, and then a final fuse between the FZ-1 and the battery. Seems like overkill on the fuses to me. Is that how it is done or am I missing something?

Thanks again for your post and any additional help you can give.

-iSpyder
 
Follow-up post about Stebel horn and FZ-1 Fuse block

I emailed the folks at fuzeblocks.com about if one should wire the Stebel Nautilus Compact horn to the FZ-1. Here is their response:

"You are correct in your analysis that the FZ-1 is not designed for the draw of the horn. We suggest you wire the horn straight to the battery because each circuit on the FZ-1 has a 10Amp max. Putting a 20A fuse in the circuit will compromise the integrity of the block.​

Thanks for checking and please let us know if you have any other questions,​
Fuzeblocks"

As suggested by the pros, I wired my horn directly to the battery with an inline fuse (used the harness kit Nexus suggested - good investment). By the way, I agree with others, pretty easy to install on the 2014 RTS. Plenty of room.

Hope that helps someone in the future!

Ed
Did you use the relay that came with the horn? And what size fuse did you use. I am assuming you put it inline on the wire going to the positive side of the battery?
 
Did you use the relay that came with the horn? And what size fuse did you use. I am assuming you put it inline on the wire going to the positive side of the battery?

I purchased the wiring harness kit that Nexus posted a picture of earlier in this thread (Universal plug-n-play wiring harness - SNPNP). It comes with everything pre-wired including the relay. Made it a breeze to connect and has an extra layer of shielding over the wires. The hardest part (which was still pretty easy) was creating a little mounting bracket. I just used some stiff 1/2" aluminum to cut to size, bend, and drill holes for the screws. Worked well.

Oh and the wiring harness comes with the inline fuse as well. You are correct...it goes to the positive.

Hope that helps! Let me know if I can answer any other questions...good luck!

Ed
 
Last edited:
I purchased the wiring harness kit that Nexus posted a picture of earlier in this thread (Universal plug-n-play wiring harness - SNPNP). It comes with everything pre-wired including the relay. Made it a breeze to connect and has an extra layer of shielding over the wires. The hardest part (which was still pretty easy) was creating a little mounting bracket. I just used some stiff 1/2" aluminum to cut to size, bend, and drill holes for the screws. Worked well.

Oh and the wiring harness comes with the inline fuse as well. You are correct...it goes to the positive.

Hope that helps! Let me know if I can answer any other questions...good luck!

Ed
Thanks for the info Ed. Yep I know the kit well. I used one for my 2 wheeler.
 
Am I Missing Something?

I went to install my horn on my 2014 RTS and the bolt that came with the horn had a square head that seated itself in the horn's mounting bracket. Without using the old mounting brackets (2 of them) from the OEM horn, how can I mount the new Stebel horn to the existing frame? I cannot understand how you can tighten down the horn to the existing frame??? Am I missing something? I read a thread on using a new longer bolt, with several lock washers and nuts (which made perfect sense given the conditions) but I've also read some of your posts that said mounting to the existing threaded opening in the frame was a piece of cake... Which I'm having a hard time understanding how you can do that??? I also read that drilling out the bracket's smaller opening would work too... And I can see how that would work as well. Again, just hung up on simply using the equipment given without modifying something? Can someone give me a step by step on modifying nothing and just unbolting the old and reboltng the new? And have it tight enough where the thing won't bounce off.
 
What I did

I went to install my horn on my 2014 RTS and the bolt that came with the horn had a square head that seated itself in the horn's mounting bracket. Without using the old mounting brackets (2 of them) from the OEM horn, how can I mount the new Stebel horn to the existing frame? I cannot understand how you can tighten down the horn to the existing frame??? Am I missing something? I read a thread on using a new longer bolt, with several lock washers and nuts (which made perfect sense given the conditions) but I've also read some of your posts that said mounting to the existing threaded opening in the frame was a piece of cake... Which I'm having a hard time understanding how you can do that??? I also read that drilling out the bracket's smaller opening would work too... And I can see how that would work as well. Again, just hung up on simply using the equipment given without modifying something? Can someone give me a step by step on modifying nothing and just unbolting the old and reboltng the new? And have it tight enough where the thing won't bounce off.

Hi Brian,

I swapped out the stock horn on my 2014 RTS with a Stebel. I made a simple L shaped bracket out of some stiff aluminum and drilling holes in each end for the bolts. I don't remember the exact details as I just eyeballed the size I needed. I bought the aluminum from Home Depot for pretty cheap and it was long enough for a couple of mistakes :D (although I didn't need it!)

To do the 90 degree bend, I just put it in my bench vice and used a hammer to beat the bend into it...

I hope that helps!

Ed
Hey Ed,
Yeah, I think the bracket bent at a 90 and some holes for bolts will work like a champ... Just glad I wasn't missing something on the existing brackets or hardware that came with the Stebel.

I never messed with electrical items on this RT, so I'm a little intimidated by wiring directly to the battery...I bought the wiring kit so hopefully that will make it easier. Besides popping off the side panel, do I have to take off more Tupperware to get to the battery for the horn wiring? A few pointers and or tips would also be appreciated.

Thanks again!

The kit will make it really easy. Basically going to the battery using the "path of least resistance" is the best. If I recall, I just pulled the 'vent panel' off (same one you did to get to the horn) and then ran the cable straight back and then left turn to the battery. Just be careful of places it can get pinched or press against something hot. I just tried to follow where other cables go. I will see if I can snap a picture or two tomorrow and post them for you. Not sure I can get a good shot or not but I'll give 'er a try...

Ed
Thanks again! Where are you at in Georgia? Atlanta area? Maybe I can swing by, if you're close, for some help... Thanks for the pointers.
 
Thanks again! Where are you at in Georgia? Atlanta area? Maybe I can swing by, if you're close, for some help... Thanks for the pointers.

I am down in the Marietta area. Maybe we can meet up somewhere in between. It would give me an excuse to ride!! :clap:

In the meantime, I tried to shoot some pictures. See if these will help:

Here is a shot of the bracket I made:
attachment.php


The following show the path I went to the battery:
attachment.php
attachment.php
attachment.php


Picture 1: from horn back toward battery
Picture 2: zoom out to show from horn compartment toward battery
Picture 3: zoom in to show from horn compartment toward battery

In picture 3, there is another cable already running toward the battery so I just basically followed it there and fished it in to the battery compartment and hooked it up from the front battery access via the trunk. Finally, I just zip tied the cable I ran to the existing cable.

Hope that helps you out!

Ed
 

Attachments

  • bracket.jpg
    bracket.jpg
    22.1 KB · Views: 75
  • Cable_from_horn.jpg
    Cable_from_horn.jpg
    39.3 KB · Views: 77
  • to_battery_zoom_out.jpg
    to_battery_zoom_out.jpg
    44.1 KB · Views: 77
  • to_battery.jpg
    to_battery.jpg
    60.5 KB · Views: 80
I am down in the Marietta area. Maybe we can meet up somewhere in between. It would give me an excuse to ride!! :clap:

In the meantime, I tried to shoot some pictures. See if these will help:

Here is a shot of the bracket I made:
attachment.php


The following show the path I went to the battery:
attachment.php
attachment.php
attachment.php


Picture 1: from horn back toward battery
Picture 2: zoom out to show from horn compartment toward battery
Picture 3: zoom in to show from horn compartment toward battery

In picture 3, there is another cable already running toward the battery so I just basically followed it there and fished it in to the battery compartment and hooked it up from the front battery access via the trunk. Finally, I just zip tied the cable I ran to the existing cable.

Hope that helps you out!

Ed
Wow, we're just a short ride away from each other... I work in Marietta, just off the south loop near I-75.

These pictures and pointers are great, and when my back gets better, I'll try and tackle this horn installation again.
 
Back
Top