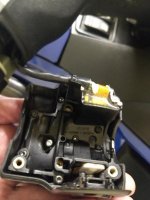
Well, I got brave and took the right control module apart to get inside.
I was able to get the control working again by stretching the springs when I had them out.
I am sure there is wear on the contacts as well, but, that little white circuit board is not replaceable.
Hoping to find springs as these are probably weak, and the contacts on the white circuit board possibly worn as well.
I have not yet been able to find replacement springs for this project, but stainless steel balls, or BB's are available, although I had to buy an assortment to get the ones I did need, but only a few bucks on ebay.
Taking photos of these as you go helps to remember how to re fit it all. I had no extra hands and could not manage a video or step by step photos.
Please note that these internal parts are NOT available from BRP, so be VERY careful not to lose anything, screws, stainless steel balls and springs. I am sure they are available somewhere, but not in my area. As previously stated, I did order a stainless steel ball bearing assortment from EBay and was glad I did as one of the little ball bearings got away in the disassembly/reassembly process.
Tricky since the right hand controls cannot be easily disconnected from the bike. Battery should probably be disconnected as well.
Note the kill switch must be in the OFF position for all of this to come apart well, and the oblong plastic switch cover that you see on the outside of the control must be carefully removed by using a couple of thin bladed screw drivers or similar to pop it off before disassembly.
The next step is to take out the four torx screws which secure the back cover to the right hand controls. One of them is deeply recessed. Then the cover can be gently removed. Note how the throttle lines up with all of the plastics so that assembly is not a problem.
Next step is to remove the two screws which secure the control to the handlebar assembly. These are on the back of the assembly and accessible since the back cover has been removed. On my unit, these two screws are brass and screw into brass fittings. There is a washer on each of these which you should save.
Next, with the controls exposed you will see small torx heads inside. Only the black ones need to be removed. If my memory serves me there are five of them, and a magnet or magnetized screw driver will be a huge help. I do have a photo of this which I will post later.
Now the fun. On the front of the now released controls, you will see the actual switch mechanism. This is where springs and stainless balls can easily be lost! There are three screws which hold the switch slide and rocker (for set decel, accel resume) are located. Since the entire control is still attached to the bike, I found this a challenge to deal with. Removing these screws will allow the last pieces of this to come apart, and the two springs will be pushing things apart. So carefully remove these screws and do not lose any springs or stainless balls. Using some sort of drop cloth under the work area is helpful.
While all this was apart, I used an electronic contact cleaner to remove and dirt and or residue. Don't allow the cleaner to get on the paint, it may cause some dulling.
Once apart, I stretched the springs as much as possible, and began to reassemble. Holding the switch mechanism with the springs and balls together while reattaching the switch slide/rocker mechanism with limited space and fingers was challenging, but, with patience and luck, possible. If the cruise switch is in the OFF position at this time, it helps as that spring and ball are not trying to slip through the hole in the control.
Then reassemble the switches to the control using the black screws, then reattach the controls to the handlebars being sure to align the throttle stop properly and reattach the back cover.
It is tedious and tricky, but if I can to it, most anyone can. There are only two sized or torx drivers (the screwdriver type with attached handle and shaft) are best, since some of these screws are recessed.
My cruise, which would not set (without turning the cruise quickly to OFF) is now working like new. I still hope to find some new stainless or chrome springs to have on hand.
The right hand control cluster is about $300 from BRP or parts houses, and the wiring harness goes deep within the bike, about five hours labor at a dealer, so this has saved a bunch of money for a few hours of tedious aggravation on my part. Well worth it!
If I find springs, and repeat this process, will try to have another person to take more photos and post.
I can not get a photo to upload and attach! Will try again later.


