• There were many reasons for the change of the site software, the biggest was security. The age of the old software also meant no server updates for certain programs. There are many benefits to the new software, one of the biggest is the mobile functionality. Ill fix up some stuff in the coming days, we'll also try to get some of the old addons back or the data imported back into the site like the garage. To create a thread or to reply with a post is basically the same as it was in the prior software. The default style of the site is light colored, but i temporarily added a darker colored style, to change you can find a link at the bottom of the site.

$80 Aux Lighting DIY

zuni

Member
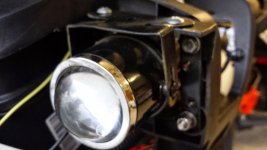
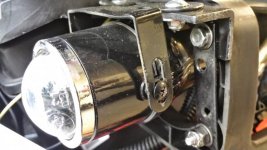
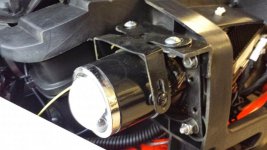
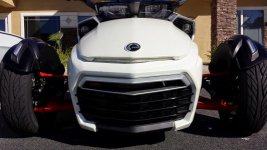
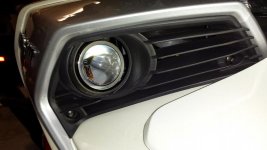
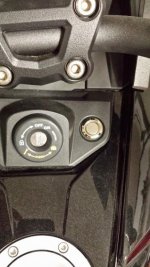
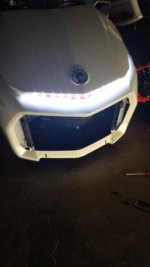
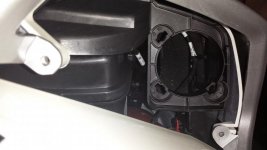
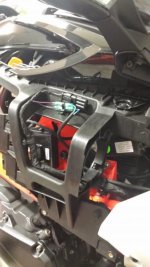
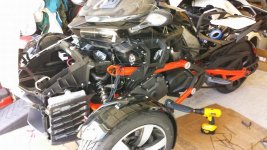
Not Can Am but fully functional (thanks in part to all the prewiring and relay installed at the factory) and all in for $80 including the factory heat shields. I only started this because when I picked up the bike in January the lights were not available and I was tolld it would be March or later so I was thinking interim solution but will be keeping this setup now. The projector housings currently contain H3 bulbs but are prepped for HID. Used a stainless steel waterproof switch attached to the factory wiring harness and made pigtails to go from the factory plugs to the lights. Need to get some photos but it is tough with just a cell phone camera. They light up better than the high beams.

CJ JAX
 

Attachments

  • 20150316_102029.jpg
    20150316_102029.jpg
    52.9 KB · Views: 627
  • 20150317_193544.jpg
    20150317_193544.jpg
    39.4 KB · Views: 666
  • 20150317_220026.jpg
    20150317_220026.jpg
    38.3 KB · Views: 614
Did you also wire the accent ( normally red ) under the frunk lid lip?

Tom
yes. It is only tacked in place in the picture. I want to put white heat shrink over all but the leds to clean it up. Did the same on my RT. the 5050 leds throw a bunch of light
 

Attachments

  • 20150126_134122.jpg
    20150126_134122.jpg
    15.3 KB · Views: 397
I got the lights from iJDMToys 60-071 for $50. I bought the wiring harness but did not use it since everything was already in place. The switch is a 19mm waterproof switch $8 from stargoods_2014 on ebay. I cut two pieces of 1"angle aluminum to mount the light brackets to the bike light mount locations. I would pull the panels and take some pictures but I have been banned from any work on it for a couple of weeks (didn't get it together until 9:30 Friday night with Saturday being the Owners Even in Daytona). We have had it since mid January and only have 600 miles on it between work and the lighting work I was doing. Thankfully we still have the Rt for wind therapy as needed.

CJ JAX

Thank you so much for sharing.:clap:

Did you order the two inserts/heat shields from BRP to go around the lights???
 
Last edited:
Thank you so much for sharing.:clap:

Did you order the two inserts/heat shields from BRP to go around the lights???

yes. I was looking at the parts diagram to get the price of the plastic plugs in case I didn't like the look and had to replace them. While I was looking I found the heat shields. I was surprised and commented when people were posting that it looked unfinished after the dealer installed the lights. I shared the info and BRP has corrected the kit to include them now. They were $8 each

CJ JAX
 
looks good. . . .

yes. It is only tacked in place in the picture. I want to put white heat shrink over all but the leds to clean it up. Did the same on my RT. the 5050 leds throw a bunch of light

. . . . I am putting red reflective tape on mine, and on the body frame bars too.

Tom
 
More Info

I received several PM's for more info on the install. I liked the iJDM light because of the option to change the bulb to HID. Others claim you can do it with theirs but I have heard that sometimes there is interference and the HID bulb does not fit.

1. The factory mounting location has three holes where the oem assembly attaches. Two on the bottom and one on the top. My first plan was to use the two bottom holes. I cut a 1' piece of aluminum angle and then using a hole saw cut away material to clear the light housing (photo). I made my mounting holes in the angle a little oversized to give myself some adjustment.

2. I attached the light bracket to the angle and mounted everything to the bike. When I assembly the body panels to check for alignment I found that the light bracket hit the louvered front panel with the heat shield (photo). I trimmed the back of the panel a bit but it did not clear the bracket. I ended up bending one leg of the bracket to clear the louvered panel. I worked but I didn't feel there was enough adjustment/alignment room.

3. I flipped the angle bracket and mounted to the top of the oem mount which you can see in the photo. There is only one mount hole so the choice is to drill another hole or use a flat 3" strip which you attach to the angle and use one of the existing lower holes.

4. The connector to the bulb is a 3 pin setup. I'm guessing it is because outside of the US they use the lights for the low beam and not aux. I had purchased a bunch of 2 pin and 3 pin connectors from amazon (http://www.amazon.com/Yiding-Waterp...Way+Waterproof+Electrical+Wire+Connector+Plug) when I was playing with the RT. I made a pigtail for all 3 wires because at the time I didn't know which I would need. Ended up that the black and the Gy/GN were all I needed.

5. I wanted to use the factory switch but when it priced out at $95 I decided to pass. I try to avoid making changes that I can't undo so rather than cutting off the factory connector for the aux light switch I used positaps which I sealed with a little silicone. I don't remember the wire colors at the moment but the connector is 4 wire in a row and the two outside wires control the signal to the relay.

That's it in a condensed version. Let me know if you have any specific questions and I will do my best.

CJ JAX
 

Attachments

  • 20150126_110042.jpg
    20150126_110042.jpg
    36 KB · Views: 381
  • 20150220_160159.jpg
    20150220_160159.jpg
    32.2 KB · Views: 388
  • 20150227_185317 (2).jpg
    20150227_185317 (2).jpg
    16.8 KB · Views: 267
  • 20150304_204053.jpg
    20150304_204053.jpg
    25 KB · Views: 243
  • 20150307_144156 (2).jpg
    20150307_144156 (2).jpg
    69.4 KB · Views: 415
Are their part numbers for BRP unwired connectors that are wired to their fog lights - would eliminate posi-taps/cleaner installation?

It would also be great to know what the pin numbers/colors are labeled for fog light connectors already in Spyder - maybe someone has an electrical drawing.
 
WHY-O-WHY

WHY DIDN'T YOU POST THIS 4 WEEKS AGO, BEFORE I PAID THE $400 FOR THE 'OEM' LIGHTS....
DANG DANG DANG....
:banghead: :banghead: :banghead:
VERY NICE JOB... CONGRATZ....
DAN P
SPYD3R F3-S
 
Nice writeup. How about some bracket pix to make things even easier for us? (installed and pre-install if you have them)


Sorry I thought this was attached. It was one of the ones I started with. I thought I would need the 1 1/2 X 1 !/2 angle but ended up cutting away so much I started over with the 1" angle. I would love to take more pictures but it is going to be a few weeks most likely. I promised the wife I would not remove any panels for the next 30 days. using the 1" angle it wasn't necessary to cut away the corner like you see in this picture. One of the previous pictures shows it installed. If you copy it you can probably enlarge it enough to see better.

CJ JAX
 

Attachments

  • 20150318_113618.jpg
    20150318_113618.jpg
    25 KB · Views: 193
Are their part numbers for BRP unwired connectors that are wired to their fog lights - would eliminate posi-taps/cleaner installation?

It would also be great to know what the pin numbers/colors are labeled for fog light connectors already in Spyder - maybe someone has an electrical drawing.


I purchased the connectors from amazon. See #4 in my earlier post.

This is a screen shot of the wiring for the aux light wiring.

CJ JAX
 

Attachments

  • AUX light wiring.jpg
    AUX light wiring.jpg
    52 KB · Views: 188
Installation showing bracket mounting

Here are a couple of shots showing the bracket mounting for the lights. It also shows the 3" strap that I used to make use of the existing mounting holes.

CJ JAX
 

Attachments

  • 20150321_191624.jpg
    20150321_191624.jpg
    35.1 KB · Views: 258
  • 20150321_191636.jpg
    20150321_191636.jpg
    51.3 KB · Views: 269
  • 20150321_191642.jpg
    20150321_191642.jpg
    49.2 KB · Views: 259
Back
Top