IdahoMtnSpyder
Well-known member
Jim's new style belt tensioner which is installed with one bolt through an existing hole, can be a pain to get installed properly. The problem is the hole in the frame is bigger than the 1/2" bolt he supplies and there's a fair amount of latitude for the tensioner bracket to move while tightening the bolt. You need to get the tensioner bracket up snug against the frame as he says to do in his instructions in order for it to track properly on the belt. In two, or maybe it was three, attempts to get the bracket to stay in the right place, only to have it move when I tightened the bolt, I knew there had to be a better way. This is what I came up with.
You will need to raise the bike off the floor a few inches. I run the front wheels up on ramps. An extra benefit of using this method is you do not need to remove any of the tupperware on the left side. You can do it all from underneath and through the slot in the metal side piece.
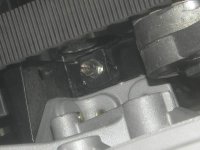
Go to the hardware store and buy a 1/2" grade 8 bolt 1/2" longer than the one included with the tensioner. I think that would make it 1 1/4" long. File the end 1/4" or so into a hex shape that will fit a 3/8" socket. Cut a slot in the end for a screwdriver. The pic below shows the bolt as I modified it after I installed it. I forgot to get a pic before I put it in.

Getting the bolt into the tensioner bracket is a challenge since the space is so cramped above the frame. I put the bolt through the frame hole and into the bracket threads. Then I used a screwdriver to turn the bolt until it extended below the tensioner bracket. Next I used a 3/8" socket on a 1/4" drive extension to turn the bolt until it was tight. By using the socket in this manner I was able to hold the tensioner in place and not have it move around. You can get the bolt tight enough this way so that the tensioner bracket will not move while you tighten it completely with a 3/4" box end wrench per Jim's instructions.
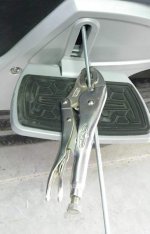
Now, the next challenge is to get that bolt really, really, tight so the tensioner won't move. Because of the cramped space you'll be working in, it's very difficult to get it tight like it needs to be. I solved that problem with a rod and vise grip wrench. In the two pics below you see a 1/4" rod with both ends bent. The one end works to push the box end wrench to loosen the tensioner mounting bolt. The other hook end is used to pull on the wrench to tighten the bolt. I stuck the rod through the slot for the passenger foot board. It lines up nicely with the end of the wrench. Put the vise grip on the rod tightly and hook the rod around the wrench. You can now pull the wrench very forcefully and thus get the tensioner mounting bolt very tight.


Hope this helps someone install their Smooth Spyder belt tensioner a little more easily than what Jim's instructions do.
You will need to raise the bike off the floor a few inches. I run the front wheels up on ramps. An extra benefit of using this method is you do not need to remove any of the tupperware on the left side. You can do it all from underneath and through the slot in the metal side piece.
Go to the hardware store and buy a 1/2" grade 8 bolt 1/2" longer than the one included with the tensioner. I think that would make it 1 1/4" long. File the end 1/4" or so into a hex shape that will fit a 3/8" socket. Cut a slot in the end for a screwdriver. The pic below shows the bolt as I modified it after I installed it. I forgot to get a pic before I put it in.

Getting the bolt into the tensioner bracket is a challenge since the space is so cramped above the frame. I put the bolt through the frame hole and into the bracket threads. Then I used a screwdriver to turn the bolt until it extended below the tensioner bracket. Next I used a 3/8" socket on a 1/4" drive extension to turn the bolt until it was tight. By using the socket in this manner I was able to hold the tensioner in place and not have it move around. You can get the bolt tight enough this way so that the tensioner bracket will not move while you tighten it completely with a 3/4" box end wrench per Jim's instructions.
Now, the next challenge is to get that bolt really, really, tight so the tensioner won't move. Because of the cramped space you'll be working in, it's very difficult to get it tight like it needs to be. I solved that problem with a rod and vise grip wrench. In the two pics below you see a 1/4" rod with both ends bent. The one end works to push the box end wrench to loosen the tensioner mounting bolt. The other hook end is used to pull on the wrench to tighten the bolt. I stuck the rod through the slot for the passenger foot board. It lines up nicely with the end of the wrench. Put the vise grip on the rod tightly and hook the rod around the wrench. You can now pull the wrench very forcefully and thus get the tensioner mounting bolt very tight.


Hope this helps someone install their Smooth Spyder belt tensioner a little more easily than what Jim's instructions do.
