• There were many reasons for the change of the site software, the biggest was security. The age of the old software also meant no server updates for certain programs. There are many benefits to the new software, one of the biggest is the mobile functionality. Ill fix up some stuff in the coming days, we'll also try to get some of the old addons back or the data imported back into the site like the garage. To create a thread or to reply with a post is basically the same as it was in the prior software. The default style of the site is light colored, but i temporarily added a darker colored style, to change you can find a link at the bottom of the site.

2013 Spyder RS - ST Handlebar Swap

hchays

New member
This swap will require a moderate mechanical ability. If your handy and have worked on motorcycles and/or cars you can handle this mod. The follow are the tools that you will need.
1. 10mm socket
2. 8mm socket
3. 7mm allen wrench
4. 5mm allen wrench
5. 3mm allen wrench
6. T-27 torx bit
7. straight screwdriver

First use the T-27 torx bit to remove the upper plastic body panel that covers the "backbone" and the side panel (where your knees would be).
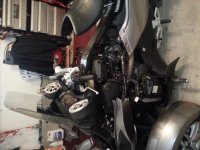
image.jpg


Next use the 3mm Allen wrench to remove the black plastic covers on the underside of the handlebars. This will allow access to the 5mm Allen bolts to remove the actual handlebars.
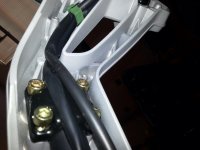
image.jpg

After you have unbolted the handlebars with grips, throttle and (sm5) clutch still attached you can now remove the (4) 7mm bolts that hold the center piece of the handlebars on.
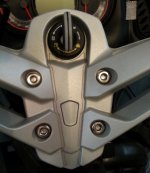
image.jpg

After you have removed the 4 bolts now turn the center piece over. Unplug the ignition switch by removing the rubber boot. The plug has (3) spot to squeeze to pull it off. There are (2) 8mm bolts that hold the black plastic piece that surrounds the ignition switch, remove them now.
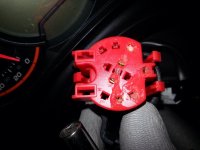
image.jpgimage.jpg

Now there are (2) 10mm bolts that bolt the ignition switch to the center handlebar piece, remove them. After the bolts are out push the ignition switch through the hole so that you can grab the black plastic trim ring for the ignition switch. once you grab the trim ring turn it counter clockwise and pull. Now the ignition switch will be separated from the center piece.


Tug on the wires to the throttle and controls to find the wire ties on the right side (above engine) that are holding the wiring harness down. Cut the (2) wire ties so that you have mor play in the wires. You are now ready to reassemble using the Spyder ST center piece.
 
Last edited:
great write up

great write up hubie. love the black bars. they look excellent. :thumbup:
 
great write up hubie. love the black bars. they look excellent. :thumbup:

Thanks, I like the look too. I finally got the pictures to upload to the thread. However it would only let me put up to 5 pictures on it. It's a pretty easy mod if you have much mechanical ability. There are only a couple of things that I stumbled across that would hold a person up from doing the mod. They both have to do with the ignition switch (I created a step for the ignition switch). I hope everyone enjoys the thread.
 
I have sm5. Will there be a problem with clutch and the cable length

I also have a SM5 and I had no issue with wires or clutch hydrolic line. Everything fits like it was designed to have the ST bars from the factory. The most difficult thing about the install was putting the left side plastic cover ( goes on the underside of the handlebar) back on. It wasn't bad just a tight fit, but that was the worst thing. From start to finish (even taking pictures) the whole job took me about 2 hours.
 
[QUE=hchays;766783]info also have a SM5 and I had no issue with wires or clutch hydrolic line. Everything fits like it was designed to have the ST bars from the factory. The most difficult thing about the install was putting the left side plastic cover ( goes on the underside of the handlebar) back on. It wasn't bad just a tight fit, but that was the worst thing. From start to finish (even taking pictures) the whole job took me about 2 hours.[/QUOTE]


Have you driven yet? How is the comfort compared to regular bars.
Thanks for all the Info:cheers:
 
I have only taken a very short ride, but the comfort is much better. It gives me a much more upright riding position which relieves a lot of stress on my back.
 
I went for a nice ride today. The handlebars work perfectly! I have no back or shoulder pain, now I am waiting on my Russell Day Long seat to be shipped next week. If your thinking of doing this swap, DO IT!
 
bars look excellent

saw the handlebars today, they look great, as if they were installed at the factory. the black is very sharp.:thumbup:
 
Thank you for this thread! My dealer did the swap this week and I pick up my bike tomorrow! Can't wait to try it out!!:bowdown:
 
parts list

Ordered my ST bars and will do the swap this weekend!

packbuckbrew-others-Do you have a parts list for this conversion?
Is it all the ST handle bar parts in the diagram "ST" box from BRP?
Does any seller sell it as a package?
Best place to buy? Forum supporting venders?
Thanks


[TABLE="width: 100%"]
[TR]
[TD="align: center"]
convert
[/TD]
[/TR]
[/TABLE]


You'll need to order the following parts from a BRP dealer.


(1) #115 comes in black or silver
(1) #94
(1) #95 SM5, #92 SE5
(2)#4
(4)#5 if you want to put new mounting bolts.
 
RS To ST Handelbar swap

Thanks for the handlebar swap info , I ordered mine today from my dealer and the part manager was surprised that the ST would fit, I've also ordered floor boards fro ISCI, I'll let you know how I make out.

Thanks again
 
2013 RS to ST Spyder handelbar swap

Just finished replacing 2013 OME RS handlebar's w/ ST bars, everything fit good, a couple tips if swapping bars, watch for a 3/16 x 3/4 " +- spring when taking the ignition apart ,--- be careful when taking the trunk & seat cables off from under the bars , maybe ( lubricate a bit before removing especially if you end -up removing them a few times ) --- the left plastic cover that goes under the new ST bars has a split on one side (it is supposed to be there according to my dealer (its not broken)

FYI -- Also finished installing new floor boards , not exactly a great experience , cost more the web site stated, got different design than ordered, two small important screws missing & to top it off they supplied the wrong instructions.
 
ST Bars

Thank You!!. Is BRP the only ones that sell the ST Bars? What is the difference between the Stock and the ST Bars. Do bring them closer to you, like the risers?
 
Back
Top