• There were many reasons for the change of the site software, the biggest was security. The age of the old software also meant no server updates for certain programs. There are many benefits to the new software, one of the biggest is the mobile functionality. Ill fix up some stuff in the coming days, we'll also try to get some of the old addons back or the data imported back into the site like the garage. To create a thread or to reply with a post is basically the same as it was in the prior software. The default style of the site is light colored, but i temporarily added a darker colored style, to change you can find a link at the bottom of the site.

2012 RT-S SE5: Rear Suspension (shock)

spacetiger

New member
Time to start looking at the rear suspension. The work on the front suspension can be found here:
http://www.spyderlovers.com/forums/showthread.php?60792-2012-RT-S-SE5-Front-Suspension

It may take a while to get the time to take apart the rear of the bike to pull the rear shock, but I thought I'd start with the rear disc (nylon washer) to see how much of the rear working range I am using. It is my hope I can get the rear spring alone to meet all my solo riding needs and use the air bag to assist with a passenger load.

In looking at the rear spring, I can see it is a progressive rate spring. So it will have a lower transitioning to a higher spring rate. I will not be able to quantify those rates until I pull the shock and put it on the weight machine and compress it.

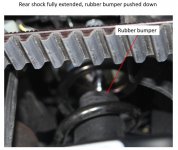
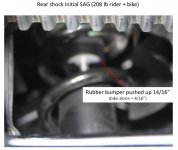
The working range looks to be about 2.5" like the front. With the disc (nylon washer) under the rubber bumper and both pushed all the way down (the rear wheel raised off the ground), I then lower the bike down, then back up. The disc is moved up 4/16". I then repeat the process except I sit on the bike while the rear wheel is on the ground. When I raise the rear of the bike, I can see the rubber bumper has been pushed up 14/16" (0.875") or 35% of the working range (0.875"/2.5"). So, even though I have not quantified the spring rates, I can see the spring is too soft by itself to adequately hold up the rear of the bike. I might get lucky and be able to add a spacer (like I did the front) to add additional preload to the spring so it is only using no more than 25% of the working range; we shall see.

While I wait for the time to take apart the rear, I will check the rear disc from time to time to see how much of the working range I use. I have a long ride coming, so it will be a chance to collect some good data.

Sorry the pics are not focused in the right spot, but you can see the necessary details.

Jerry
 

Attachments

  • 31 rear spring initial sag.jpg
    31 rear spring initial sag.jpg
    46.9 KB · Views: 288
  • 32 rear spring initial sag.jpg
    32 rear spring initial sag.jpg
    39.2 KB · Views: 279
Last edited:
wimpy wimpy wimpy

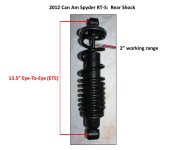
I rode the bike a bit with the disc installed on the rear shock so I could chart how much of the rear shock travel I was using. I rode solo at 208 lbs and set the air bag on middle setting. I could not believe the results, I was bottoming out. It was time to see what the rear shock was capable of holding up, so I removed the rear shock (pic 1). I thought I had a 2.5" working range, nope, its 2.0". You can see the rubber bushing is shoved into the top of the shock. It has been compressed so many times it is showing stress lines on the side.

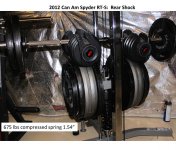
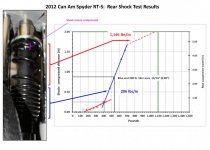
I took the shock out and put it in the weight machine. I had to find a way to put more weight on the rear shock as I knew it would be more stout than a single front shock. I kluged a way to add another 195 lbs for a total of 675 lbs. With that load, I was able to compress the spring 1.54" (pic 2).

With the data in hand, I plotted out the results, no surprise to see the results (pic 3). You can see after an initial compression, the spring settles into a 206 lbs/in compression rate (blue text/arrows) until the spring has compressed on the softer end. The pic on the left shows the tighter bound portion has fully compressed. If I could have loaded more weight, the curve would have tipped over to the higher rate (1,146 lbs/in). Unfortunately, the spring only operates at that rate for about 0.5" (shock has fully compressed by then) with an ultimate load of something like ~1,100 lbs max. This is why the bike bottoms out at the rear as I'm seeing this load on the front springs (I think the bike is close to a 56/44 weight distribution). Just sitting on the bike uses up 0.88". The rear spring is just too weak. I will try to add a spacer to shift the curve to the right, similar to what I did on the front springs. Its not the proper way to do things - I should replace the spring - but times are tight, so I'll use up part of the soft rate spring by inserting a [preload] spacer to compress the weaker portion of the spring leaving the higher rated end of the spring to work over more than the last 0.5" of the shock working range.

I'll post back the results after I modify the shock with a spacer.

Jerry
 

Attachments

  • 41.  rear spring measurements.jpg
    41. rear spring measurements.jpg
    28.3 KB · Views: 213
  • 42.  rear spring under load.jpg
    42. rear spring under load.jpg
    72.2 KB · Views: 227
  • 43.  rear spring test results.jpg
    43. rear spring test results.jpg
    55.6 KB · Views: 190
Last edited:
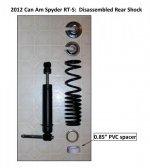
I disassembled the shock using 2 ratchet strap downs (rated for 1,500 lbs each) to compress the spring. The car coil compressor would not fit the bottom coils, so I needed another method that didn't require new tooling. To disassemble the shock and instal the 0.85" PVC spacer, I will have to compress the spring a little over 1 ". That translates to about 575 lbs, so I needed something strong to do this. The strap method surprised me. Pic 1 is the disassembled shock with the new spacer at the bottom of the stack. This is the order the parts will go back together.

The PVC spacer is a standard PVC item at Home Depot or Lowes. Cost 81 cents. It is plenty thick. It does taper a bit, but I think it is plenty thick/stout enough to carry the spring loads. I had to do a little sanding on the interior ring on the lip and on the ends to get a smooth surface interface. That's it.

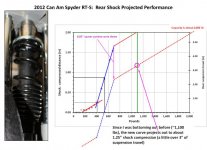
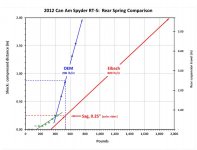
The projected performance looks promising. I do not think I will bottom out as there looks to be as much as 2,000 lbs capacity. The bike will not compress much at all (less than a 0.1") when I get on. The initial spring rate will still be the soft 208 lbs/in, but should quickly transition to the stiffer rate at about 700 lbs. If I am using about 1,100 lbs of capacity, it suggests I should expect to see the rubber bumper about 1.3" up with o.7" to go before bottoming out.

I'll post some pics once the spacer dries and I have assembled the shock.

Jerry
 

Attachments

  • 44.  disasembled rear shock.jpg
    44. disasembled rear shock.jpg
    28.9 KB · Views: 183
  • 45.  Projected performance of new spring curve.jpg
    45. Projected performance of new spring curve.jpg
    61.1 KB · Views: 137
Done for the evening

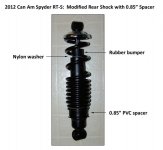
The shock is reassembled with the painted preload spacer (pic 1). It took 3 strap down straps to compress the spring, they did a nice job.

It is ready to go in the bike tomorrow. I'll post back after I get the shock in and have ridden for a few miles to report how my $1 mod worked out.

Jerry

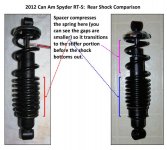
Edit: side by side comparison added.
 

Attachments

  • 46.  Modified rear shock with spacer.jpg
    46. Modified rear shock with spacer.jpg
    31.4 KB · Views: 150
  • 47.  compairson.jpg
    47. compairson.jpg
    52.5 KB · Views: 156
Last edited:
Cool stuff.... FYI I am 250 lbs and when I ride solo and hit a good bump on the freeway I can feel a hard point which obviously is the bottom out. Would be nice to get rid of that as it is hard on the back!

Bob
 
Cool stuff.... FYI I am 250 lbs and when I ride solo and hit a good bump on the freeway I can feel a hard point which obviously is the bottom out. Would be nice to get rid of that as it is hard on the back!

Bob

Well Bob - and all my fellow 2010, 2011, and other 2012 RT-S riders... the good news is the work has produced some good results, I can feel the difference but the bad news is I'm still bottoming out! And that's after adding a 0.85" spacer! That tells me the stock spring (same spring in the 2010, 2011, and 2012 RT-S) is TOTALLY useless. If every rider for these years put a nylon washer in and took a short ride, you can verify you are bottoming out. In fact, I bet you don't need a washer; you only need to look at the rubber bumper. It is is jammed in so hard at the top of the spring stopper, when you look, thats where you will find it. If you can get it down from the top, you will find it has stress marks on the side. That's a good sign the rubber bumper has taken a lot of pounding.

I don't think all is lost, the 2013 spring looks to be a much better spring. I think it will still need some work (spacer), but has a much shorter wimpy section, so I think it can be made to work and only costs $56.99 + shipping. And best of all, it should fit on the [2010, 2011, or 2012] shock.

Stay tuned.

Jerry
 
Last edited:
What's $59.99? The spacer or something else. I don't think I have the tools needed to install the spacer and compress that spring.

Bob
 
What's $59.99? The spacer or something else. I don't think I have the tools needed to install the spacer and compress that spring.

Bob

The 2013 rear spring is $59.99 + shipping cost. I think you can get a stiffer spring that doesn't require a spacer, but it will cost a lot more than $59.99.
The [PVC] spacer is $0.81 + tax.
The tool to compress the spring are tiedown straps; here is how it works: http://www.can-amforum.com/forums/atv-tech-tips/21171-easy-way-compress-ur-shock.html

The hardest part is removing the rear shock. You will need some jacks; one to raise the bike rear and the other to modulate the rear swing arm. That's it.

I'll post back how this works, so hold on a few weeks. While you wait, go get a package of nylon washers for $0.92 and put them on your shocks to see how much of your suspension you are using.

Jerry
 
Rear shock rebound...

Lately I've been getting a clank/clack on the rebound side of my rear shock. I have no evidence of the shock bottoming out, but it does occur on the rebound. When the Spyder is unloaded, if I push down on the rear, then pull up... that's when I get the noise. The RT is a 2010 with 28k. Should I replace the shock, shock and spring, or just bite the bullet and install an Elka?
 
Last edited:
Lately I've been getting a clank/clack on the rebound side of my rear shock. I have no evidence of the shock bottoming out, but it does occur on the rebound. When the Spyder is unloaded, if I push down on the rear, then pull up... that's when I get the noise. The RT is a 2010 with 28k. Should I replace the shock, shock and spring, or just bight the bullet and install an Elka?

After wearing out our 2nd rear stock shock, we went for the Elka, put it on in Springfield right before Spyderfest. Ride is better than it ever has been. No bottoming out any longer. Should have done it the first time stock shock went bad.
 
here is the tool I made to remove the rear spring
 

Attachments

  • 20141117_204125.jpg
    20141117_204125.jpg
    35 KB · Views: 129
  • 20141117_204141.jpg
    20141117_204141.jpg
    51.5 KB · Views: 139
Well, the project was going well until it came time to down load the pics... seems I forgot the memory card!! Oh well...

I had been riding on a 2013 rear RTS spring with a spacer to add additional preload, but I could see I was still bottoming out, so another spring was needed. I was looking at Eibach springs, but the rear oem spring is a long one and Eibach did not make a 2.25" ID diameter spring long enough with the necessary rating. For a while I considered going with 2 Eibach springs with a spacer in between them. Somehow, I never felt that was the right way to go.

Then I started looking at other oem shocks and realized our rts shock is quite long, so the potential shocks were few and I would still need to replace the spring. That is when I noticed many of the shocks were coil over shocks; that is, they had a threaded body so the spring could be a shorter spring. That is when I started looking for a coil over sleeve. Seems there are several out there, but finding one with a small enough ID to work on our oem shock body was tough. Aluminum ones with a small ID were made for 2.5" ID springs. I eventually found some steel ones made for smaller English cars with a 2" ID tube made for 2.25" ID springs. Unfortunately they were made of steel vs. aluminum. I ordered 2.

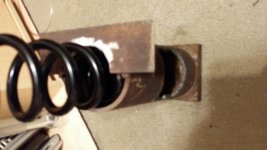
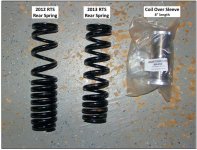
Pic 1. One of the rare pics taken with the phone, so I have a pic of the 2 oem springs and the 8" long spare coil over sleeve

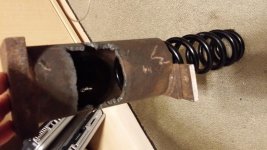
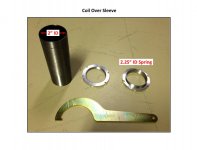
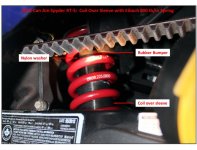
Pic 2. This shows the coil over sleeve in parts. I primed and painted the sleeve inside and out, then re assembled the rear shock. I used two aluminum strips 6" x 3/4" x 1/8" and taped them to the shock body. Then, I slipped the sleeve over the shock body and slid it down to the base. I caulked both ends of the sleeve to keep moisture out. Then, I slid the spring down after sanding the ends down a bit, and assembled the shock. Since I knew the preload weight I'd have to have to set the sag point, I compressed the spring 5/8" and set the mounting perch and lock nut. I had taken lots of pics... but there was no memory card in the camera, so you will have to use your imagination.

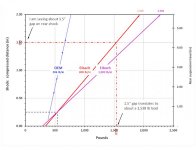
Pic 3. This shows the difference between the 2012 oem spring and the Eibach spring. The stock spring was toast close to a 800 pound load. It was so weak, the rubber bumper too a pounding as evident by the wrinkle lines out the outside of the bumper. I set up the new spring with 2 up riding in mind, so for a solo rider I would only have 0.25" gap (vs. a 0.50" gap = 25% of working range of the shock). With this current set up, I can hold up almost 2,276 lbs (338 lb preload + 1,938 additional lbs) before bottoming. That should be good for 2 up fully loaded Spyder.

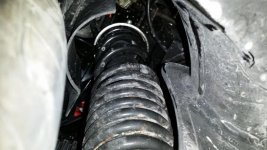
Pic 4. This shows the installed shock with new spring. I will monitor how the 800 lb/in spring holds up by monitoring the position of the nylon washer (under the rubber bumper). i'll report back on how this is working out.

All in all, it cost $65 for the spring and something like 50 GBP shipped ($76) for the sleeve.

Jerry
 

Attachments

  • 1. springs.jpg
    1. springs.jpg
    83.4 KB · Views: 140
  • 2. coilover sleeve.jpg
    2. coilover sleeve.jpg
    34.5 KB · Views: 113
  • 3. spring testing.jpg
    3. spring testing.jpg
    46.7 KB · Views: 83
  • 4. eibach spring installed.jpg
    4. eibach spring installed.jpg
    62.8 KB · Views: 129
Last edited:
Just replaced mine thought it'd failed cause it was wet after I got it off discovered it wet from brake fluid leaked from master cylinder. Oh well already bought a new unit now to swap the springs what a drama went to 3 independent shops supposed ly suspension expert none had compressor to swap spring had to pay the stealer an hour to swap it out
 
Wish I'd known where to get better spring or a similar unit off s different bike might work better something used even off eBay
 
Did you replace the rear spring or rear shock?

On the brake fluid, you should check your master cylinder. It could be that the exhaust heat has caused a problem. If you have a 2013, it should be covered under warranty. I used a heater furnance 1" thick blanket to cover the exhaust system. It is 1" thick and I think it insulates better than wrapping the pipes.

Jerry
 
Rode the bike about 30 miles this morning. When I came back, I measured about a 1.5" gap (nylon washer to shock body); that translated to almost 1,875 lbs (338 lb preload + 1,538 lbs) of force the shock spring is seeing. I know this sounds like a lot, but when you consider the weight of the bike + rider and this single spring has to carry about half of the weight + the spring is a much shorter distance from the swingarm pivot point (vs rear axle), than you can see the rear spring has to be very stout. When I was bottoming out before, I was unable to determine how large the forces the spring had to absorb; with the stronger spring in and keeping me from bottoming out, I can better estimate the loads I'm seeing. I am a 208 lb rider (without riding gear), so a heavier rider is going to generate slightly larger loads. If you ride 2 up and carry more stuff, you will generate even greater loads.

For now, I will stay with this spring. I mostly ride solo so this spring is about right for me. It leaves me with about 0.5" margin. I will check how this holds up after riding 2 up and will report back. BTW, the 1.5" shock range range I am using translates to about 4" of suspension travel. Oddly, I noted the slight front wheel wiggle at certain speeds is gone. The bike tracks nice and straight but I will look into getting a laser alignment.

For you heavier riders, I am adding a graph to show how a 1,000 lb/in spring would perform. I would guess this is the spring you should use if you are over 250 and ride 2 up.

For all of you staying with the (2012) oem spring, you should know that when you see the ~ 1,538 lb load, your spring is negating about 800 lbs, the remaining 700 or so pounds of force is coming up through the bike (tires, rubber bumper, frame, seat, your butt, your spine...). If you pull your rubber bumper down from the top, you will see stress lines out the outside of the rubber bumper - that is what megga pounds of force pounding away will do...

Happy and safe riding.

Jerry
 

Attachments

  • 5. spring results.jpg
    5. spring results.jpg
    39.6 KB · Views: 70
Last edited:
Back
Top