• There were many reasons for the change of the site software, the biggest was security. The age of the old software also meant no server updates for certain programs. There are many benefits to the new software, one of the biggest is the mobile functionality. Ill fix up some stuff in the coming days, we'll also try to get some of the old addons back or the data imported back into the site like the garage. To create a thread or to reply with a post is basically the same as it was in the prior software. The default style of the site is light colored, but i temporarily added a darker colored style, to change you can find a link at the bottom of the site.

Foxy's wrap is from Powersportswraps.com

mosslips

New member

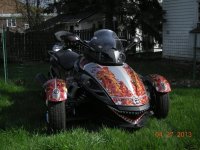
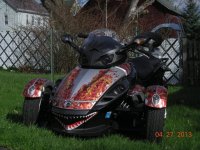
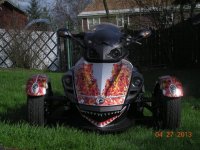
Thanks first to Pete at www.powersportswraps.com ! I found him here as one of the forum sponsors and fell in love with the what his wraps do for a Spyder!!!

I contacted him and he was exceptionally helpful to me because I have the full moon silver Spyder and I wanted the silver to show through and not to change the base color of my bike or not to have the base color show through between the pieces once applied. (I can be very particular at times...
:opps:)

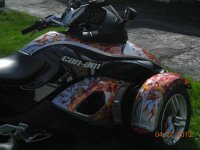
Anyway, Pete took the Black Hot Flame wrap and printed it on a transparent film for me and take a look at how great it looks!!!! Yes, the transparent film it is not as easy to install as his other wraps because it has to have a wet install, but once I started it was all good. Hubby and I took the parts off the bike and brought them in the house and we turned the upstairs bathroom into a workshop making it off limits while I put the wrap on with his help... one piece at a time and I only swore once. :yikes: Having the parts in the house we were able to control the temp and keep the pieces at 72 degrees while they cured.

Anyway, the wet install means just that, you spray the spyder parts with the solution as suggested for the process as well as the back of the film and then put the film on and it slides around until your happy with it's placement. Then you take the squeegee and push out all the solution, paying special attention to bubbles because they wont dissipate through the film so you have to squeegee them out. At times those dang bubbles can be quite pesky and so its not an easy install, but so well worth it!!! And hey, like I said, I only swore once... (working on the frunk)... I did do a lot of praying with that piece. :pray:

So enough of my talking... take a look at how good Foxy looks! Even my neighbor thought I sent the parts out for paint! :D
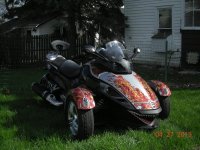

DSCN2063 forum.jpg DSCN2064 forum.jpg DSCN2065 forum.jpg DSCN2068 forum.jpg DSCN2069 forum.jpg


Last edited:
Sweet. How long did it take you?

Its hard to say how long, cause I did it in parts. I know that cleaning and prepping took some time but when it came down to the wrapping each piece seemed to move pretty quickly... the frunk being the hardest to do. I did the tail cover first... it was a small piece and I thought I would see how it would be to do it. It took around 15 mins. I did the tank next and I can't say how long it took... maybe a 1/2 hour maybe 45 mins? The more I did the easier it got and the quicker it went. After the tank I did the frunk... that was a challenge though cause it was 4 pieces and curved. Hubby and i think it was around an hour but I walked away once.. then the side panels which took a about an hour but the more curved the piece the more finesse I found I needed. A hair dryer helped quite a lot. It helped with the frunk too, but I got better with it on the side panels. The fenders took about 2 hours but again they are curved and those I had to complete the prep when I did them... well hmmmm. You know, I don't know how long it took. I just know I took them off and started on a weekend and put it back together the next weekend. It gave the pieces time in the house at least 3 days to cure and then back on. The tiger shark face took like 15 minutes... that was the easy part cause it isn't done as wet install. Def easier than a wet install, but all so very worth it.
 
Looks great:clap:! I've been toying with the idea of a realistic blue flame skin (different manufacturer/vendor) for my RSS. Did you put the skin on yourself, or have it professionally done? If you did it yourself, how difficult was it, and how long did it take? TY!

I did it myself. See my post to bruiser for more of the details.
The transparent film used was a wet install so it was a bit harder but so very much worth it to have my silver show through.
 
Hey stranger !!! It Looks great Lisa......... I'm supposed to have the coolest Spyder in our city, but now I'm not so sure. Nice job !!!!!!! :thumbup: Tell hubby we said hello and hope to see you guys soon.
 
Hey stranger !!! It Looks great Lisa......... I'm supposed to have the coolest Spyder in our city, but now I'm not so sure. Nice job !!!!!!! :thumbup: Tell hubby we said hello and hope to see you guys soon.

Hey there!!!!!
Don't worry... you still have the coolest Yellow Spyder in our city! :D

And I know... I am always gone far too long from places I like to be like here. Work still eats me, but hey, now I have an Assistant Director of Nursing and she rides. A Harley that actively marks it's territory, but its nice to see both bikes in the parking lot. Nothing like the sun on a bike to bring a smile to a face.
 
:2thumbs: That looks fantastic!
36_1_55.gif
4_17_211.gif
4_17_6.gif
 
wish you was closer to me to do mine that's just perfection if I ever seen it great job

Yeah, your just a bit south of us here in NY. lol


Edited, cause I realized I read you lived in Florida... not Fort lawn south. My eyes are funny sometimes. lol
 
Last edited:
Back
Top