• There were many reasons for the change of the site software, the biggest was security. The age of the old software also meant no server updates for certain programs. There are many benefits to the new software, one of the biggest is the mobile functionality. Ill fix up some stuff in the coming days, we'll also try to get some of the old addons back or the data imported back into the site like the garage. To create a thread or to reply with a post is basically the same as it was in the prior software. The default style of the site is light colored, but i temporarily added a darker colored style, to change you can find a link at the bottom of the site.

How do you removing/fit a dash switch?

GeoffCee

New member
How do you remove/fit a dash switch?

I've discovered during a net search that the manufacturer of the dash switch panel and switches on the RT is Carling. I can't figure out how these switches are removed. :shocked: In particular I'd appreciate hearing from anybody who has added a switch to the panel. Thanks.
 
Last edited:
I've discovered during a net search that the manufacturer of the dash switch panel and switches on the RT is Carling. I can't figure out how these switches are removed. :shocked: In particular I'd appreciate hearing from anybody who has added a switch to the panel. Thanks.
Removal of the switch has to be done from the underside of the panel, you have to take the glove compartment off to get at this. The switches are held by a butterfly Like wing on each end of the switch. Push these in and push the switch out through the top. Use care when doing this it can get fiddly.
 
Use care when doing this it can get fiddly.

As can working on so much of the Spyder's innards.

Now I have to discover how to remove the glove box.

Thanks for the info, having tried to remove one of the switch blanks with no success I needed a shove in the right direction. :f_spider:
 
As can working on so much of the Spyder's innards.

Now I have to discover how to remove the glove box.

Thanks for the info, having tried to remove one of the switch blanks with no success I needed a shove in the right direction. :f_spider:

Lots of plastic from both sides has to come off to get the glove compartment off. hopefully you have a spyder service manual but even if you don't take lots of pictures. I have the seat off of mine so it makes it just a tad easier but not something that you have to do to make it work. the glove compartment is held on by 4 bolts but you will have to remove a bunch of zip ties to get that thing to move easily into a position to work on. A couple of blankets or towels help to keep the things that can scratch the paint at bay.
 
Teddy wants me to follow along with this thread so I can learn how to

I have an extra lighted toggle switch for the RT that I want to add in to the blank spot on the dash cluster to be able to switch all the additional LEDs that we plan on installing sometime in the future. I'm not very mechanical /electrical and when I looked at the ends of the plug, I'm lost in knowing how to wire it, its like nothing I've ever dealt with in the past. With my back out right now, I can't make it out to the garage to take a picture of it so y'all can see what I'm talk'n about. If anyone knows what I'm talk'n about, please feel free to share how the wiring to the switch would work. Once I get surgery done & can walk again, this is one of my first mods to get done. Thanks fellow Spyderlovers, you ALL are what make this site so great :firstplace:
 
...when I looked at the ends of the plug, I'm lost in knowing how to wire it, its like nothing I've ever dealt with in the past.

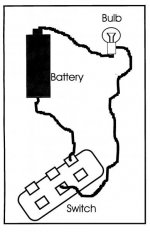
A simple way to get a functional understanding of an unknown switch and its contacts (lugs) is to take the bulb from a hand torch and solder a pair of wires to it, one to the brass body of the bulb and the other to the solder contact. You then run one of its wires to either the pos or neg side of a battery and connect another wire to the battery's free terminal.

Using the free wire from the bulb and the free wire from the battery you connect these to a pair of the switch's terminal lugs (crocodile clips are handy here) and see how operating the switch makes or breaks the circuit (turns the bulb "on" or "off"). If you make a rough diagram of the switch body you'll soon know which lugs to connect to for the result you want. :)
 

Attachments

  • img009.jpg
    img009.jpg
    27.1 KB · Views: 35
Last edited:
Back
Top