SpyderWolf
New member
So how many gaskets are needed to do this install? 1?, 2?, or 3?.
Y
You need 2 of them, one for each side.
So how many gaskets are needed to do this install? 1?, 2?, or 3?.
Y
There is a 3rd gasket, after the two pipes merge into one, gasket part number is 707600350 or 707600547....Are people finding that gasket also needs replacement, and is there a better brand to use than OEM?
There is a 3rd gasket, after the two pipes merge into one, gasket part number is 707600350 or 707600547....Are people finding that gasket also needs replacement, and is there a better brand to use than OEM?
 opcorn:
Sure it was. Now you have better gaskets at minimal cost, and you know you are good for a long time.. One less thing to worry about.Just a follow-up FYI on my exp.
When I got to the BRP gaskets they both looked a little overly "smooth" but 100% intact. Of course since I was already there I pulled them both out and replaced with the Honda's. Spyder had 8,000 hard earned, hard ridden miles on it at swapout but after reading the threads surely I expected them to be at least a little fried. :dontknow:
Makes me wonder if it was worth all the effort.
Sure it was. Now you have better gaskets at minimal cost, and you know you are good for a long time.. One less thing to worry about.
I'm in the process of replacing my y-gaskets, I've got all the parts and I have dropped the muffler and the Y-pipe. I removed the electrical connection for the o2 sensor so not to worry about putting weight on the wire.
Now, when I picked up my new gaskets and straps, I was talking to a mechanic who said that he used, Permatex (sensor safe) Ultra Copper High Temp RTV Silicone, on the new gaskets to prevent premature burn out. He also stated that in the three years on doing this he has had no complaints from customers or had to replace any. He works not only on Spyders but Harley's, Honda's, Victory, and custom bikes.
I was wondering if anyone here has used this product on their seals?
Done! Used a crescent wrench to widen the female ends of the pipe, this allowed the gasket to slide in with no mallet needed, and anger management was not required.I use to use it on the larger exhaust joint below. Works well.
Use the Honda gaskets up high and I don't think you'll have to worry about them again.
.
 I coated the inside of the gaskets with Permatex and they slide on effortlessly. I'll give it a run tomorrow to check for leaks and reduced heat.:chill: My left gasket was almost completely burned out. Right one and the lower one were in great shape. Heat wrap is the next project. After I install my new LED rear side markers. Waiting for fedex to show.:gaah:Now!!
Done! Used a crescent wrench to widen the female ends of the pipe, this allowed the gasket to slide in with no mallet needed, and anger management was not required.
Great post Wacky Dan but I don't think the service manual had a misprint. 13 Nm equals 115 pounds force inch. Maybe you confused it with pounds force foot wich would be 9.6. In that case you could have over torqued it.
Tools: Metric sockets, Socket extensions, Pry bar (optional), ATV lift or ramps, and either wood blocks or floor jack to support Y manifold.
Oh... And a big rubber mallet and anger management. * Very important.
A second pair of hands is required for only five minutes towards the end of the install. My wife was able to do this no problem.
Parts: Either the BRP Y gaskets or the Honda GL 1800 Gaskets. The Honda Gaskets will last longer according to others here that have used them. They are also cheaper. Part number for the Honda GL1800 gasket is 18392-MAM-000
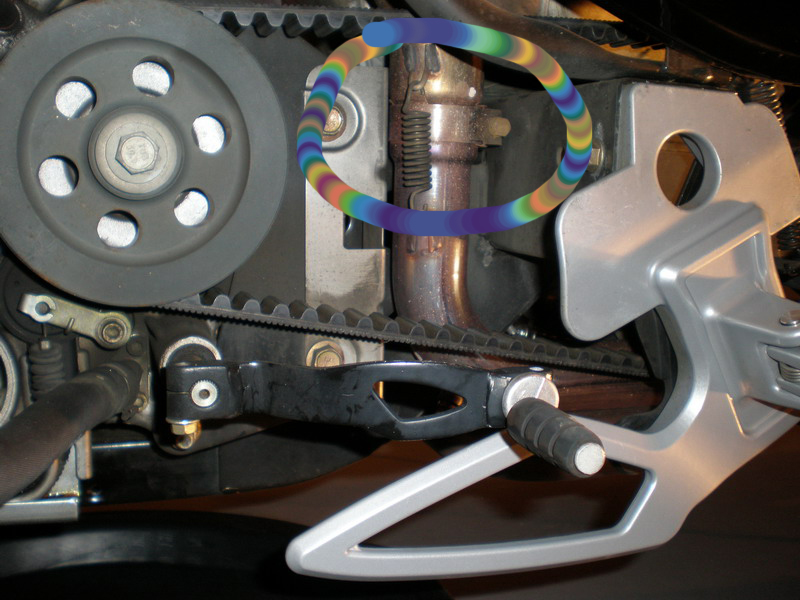
First... This is what we are talking about below in the picture. You will need to remove the lower kick panels on both sides for the best access. I found that to be easiest, though getting the pipes back together was a challenge. Left side and then right side in pics below.
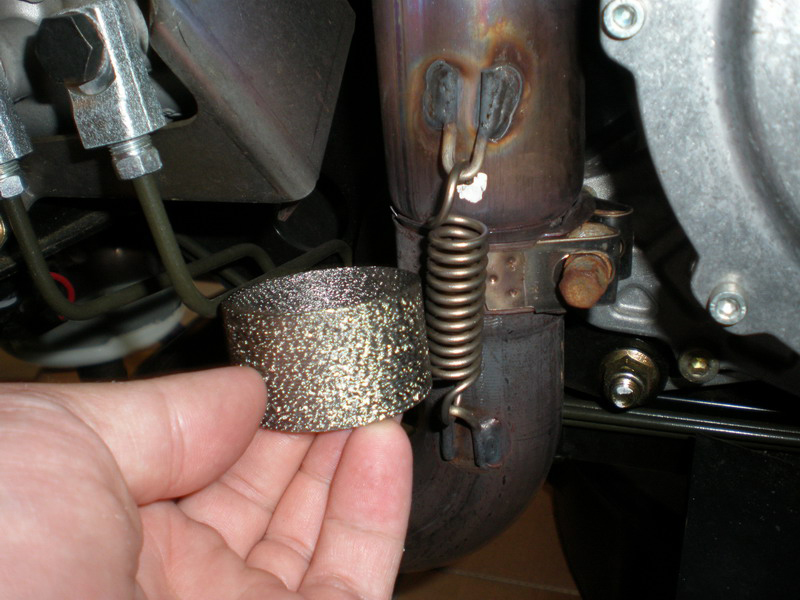
This is what we need to get in there. A new Gasket on the left and right side.
You will need to have the Spyder elevated several inches to do this comfortably.
Before you start attacking the pipes, have a floor jack or stack of wood handy to support the entire Y pipe manifold from underneath.
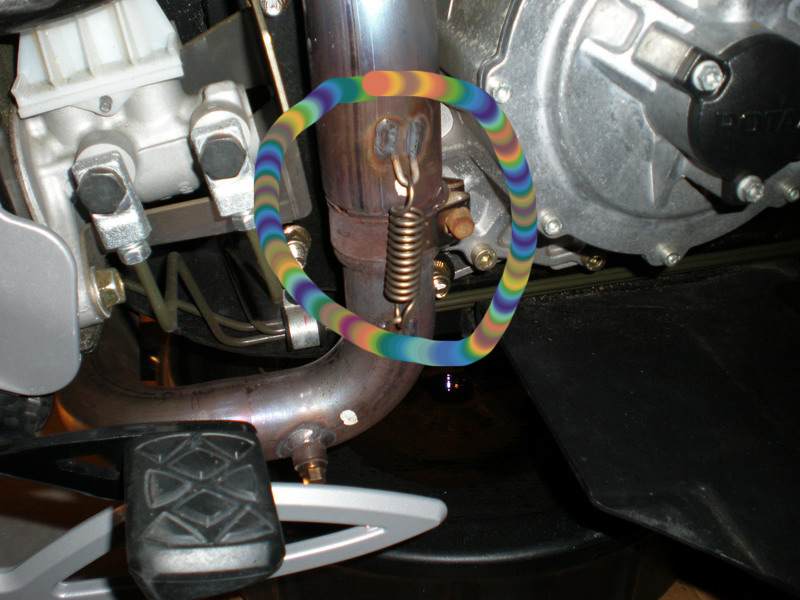
To start disassembly, you will need to remove the spring on each side. I used a pair of vice grips but others have used some sort of hooked tool.
You then will want to loosen the 10mm bolt on each clamp assembly in the pictures above.
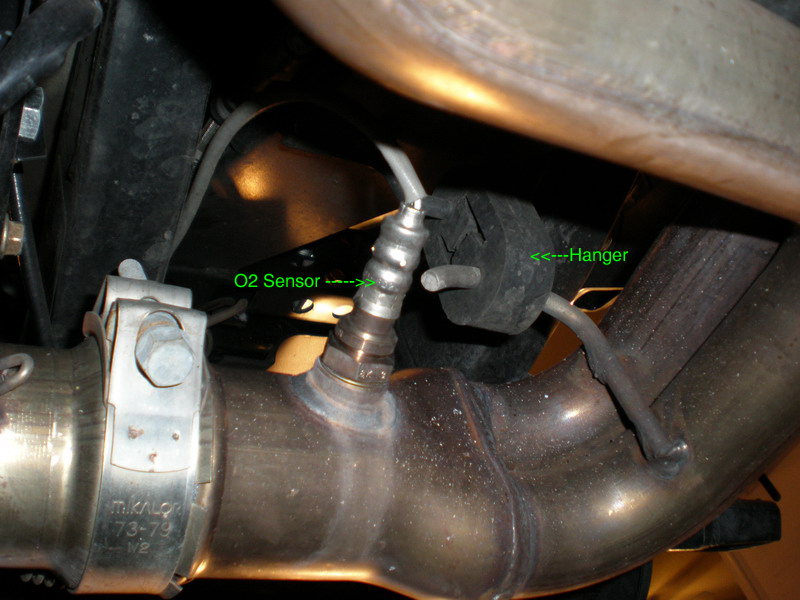
You will need to unhook the rubber exhaust hanger that is supporting the whole assembly. it is easier to slide it off the top hook. Please make sure you have blocking in place to support the pipes, as you do not want to put pressure on the O2 sensor wire harness which feeds back up above the swing arm.
Hanger and O2 sensor are noted in the following pics:
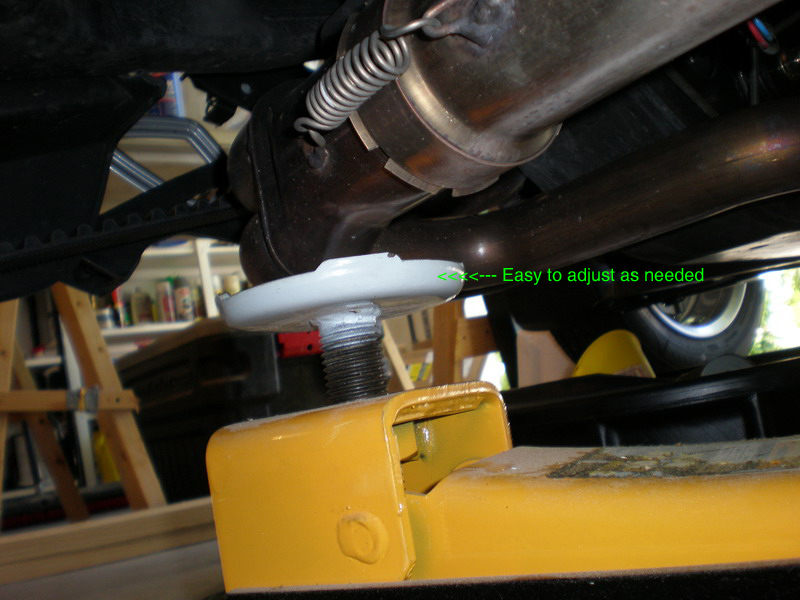
Picture with the jack in place to support the whole assembly as I worked it loose. Floor jack was nice as I screwed the white plate on the jack up or down as I needed play... You could do the same with multiple wood boards in a stack.
Once you have the jack in place, you can loosen the muffler bolt found here:
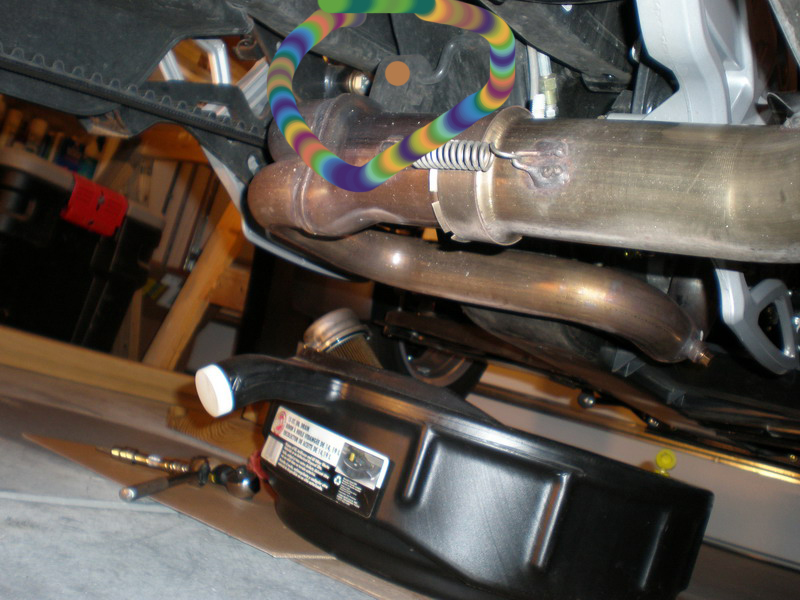
Now you can fully loosen the pipe clamps if you haven't already and work the Y manifold free from the headers.
Once they are free, you will need to pull the old gaskets out. I found pulling them out to be a challenge. The left side was in great shape and was the hardest to pull out. The right side wasn't terrible, but it wasn't in as good shape as the left side and pulled out rather easily. In fact, I was surprised by the right side. I thought it would have been in worse shape than it was. You will probably find that the old gaskets are baked onto and into the female ends of the Y-Pipe.
No you can take the new gaskets and place them on the male ends of the header pipes which is the header side of the connection. It should look like the picture below.
That is about it. A second pair of hands is handy. Let me say that getting the pipes up over the new gasket and fully seated required some anger, some light prying, and the application of anger via a large rubber mallet. Once I had the lower pipe on one side started by hand, I used the mallet to smack that side from the bottom of the manifold. Got one side up half way, had my wife hold it to make sure it didn't slip, and then worked on the other side. Used the mallet to fully seat them, partially tightened the clamps, and reinstalled the springs.
The service manual calls for 13 Nm or 115 pounds of torque. Pretty sure that 115 is a misprint as that is way different than 13Nm. I set the torque wrench at 15 pounds and finished tightening. The weird thing is that as the gaskets compress a bit and it screws with the torque wrench actually working normally. Just had to be careful.
EDIT AND NOTE ABOUT TORQUE ON THE CLAMPS ( FROM BILLYBOVINE) : Great post Wacky Dan but I don't think the service manual had a misprint. 13 Nm equals 115 pounds force inch. Maybe you confused it with pounds force foot wich would be 9.6. In that case you could have over torqued it.
After all that, make sure the rubber hanger is put back in place, and the muffler bolt is tightened again!
Start up the bike, let it run for 5 minutes or so. You will smell the new gaskets "cooking" in. After that I put the wrench back on the clamps for another 1/4 turn or so.
I think that sums it up. This wasn't hard at all. I already had the bike torn down for oil change and plug changes so this was a good time to do these and upgrade to the honda parts.
My biggest pain was just getting the pipes back together as they don't line up nicely, though yours might versus mine. I could do this in under an hour now that I've done it once.
I hope this helps those that don't understand what the Gaskets are or where they go and some of the steps in photos needed to get them done. If I missed something, let me know.
Increased heat on thighs, especially on right side; Louder exhaust; possible exhaust popping or "backfiring"; visible leakage upon removal of body panels.What are the symptoms that you need to replace these gaskets. I have 7,500 miles on my RS SE5.
Thanks