• There were many reasons for the change of the site software, the biggest was security. The age of the old software also meant no server updates for certain programs. There are many benefits to the new software, one of the biggest is the mobile functionality. Ill fix up some stuff in the coming days, we'll also try to get some of the old addons back or the data imported back into the site like the garage. To create a thread or to reply with a post is basically the same as it was in the prior software. The default style of the site is light colored, but i temporarily added a darker colored style, to change you can find a link at the bottom of the site.

Has anyone seen or have info on this electric Ryker shifter mod?

I followed the BLR Tuning video and moved the factory shifter a couple of notches on the splines so that it's positioned back toward me, made all the difference in the world, wish I'd done it day one.

Sarah

Curious what magic double-jointed Allen wrench you used to get up in there to loosen/tighten the bolt - especially after you repositioned the lever more to the rear? I was able to get the bolt loose and out, but if I'd repositioned the lever, I couldn't see a way to get it tightened back up. Relaced the bolt and moved on to something else.

:dontknow:
 
I found it was easier to get at after I removed the airbox.

A 5mm screwdriver bit and hook a 1/4" wrench on the end will get in there.
I have a small Mastercraft kit that has a small gear wrench with a bunch of bits.
 
Last edited by a moderator:
A 5mm screwdriver bit and hook a 1/4" wrench on the end will get in there.
I have a small Mastercraft kit that has a small gear wrench with a bunch of bits.

Thanks to both.

Already figured the airbox would have to come off. That's what I have my air horns attached to, but they'll come off with it (the highway pegs have been removed).

IMG_2422.jpg

Also, I do have a small Chapman set that has a miniature ratchet for those types of bits, so I may get lucky and find the right one.
 
Last edited:
We just happen to have a 5 mm allen key cut down to a nubbin.

Sarah

Thanks again.

Yeah, I’ve had a 5mm that I’d cut the short arm down awhile back, and that’s what I used to loosen, and s-l-o-w-l-y back the bolt out originally, but didn’t do anything with the long arm to get up in behind the remainder of the airbox molding. By that time my knees and back were killing me from having to stand on my head and crawl around on the floor to get at an angle where I could see what I was working on. It’s kinda rainy this morning so may make an effort to try the Chapman set (that does have a 5mm bit) to get the lever off and re-situated a couple of splines to the rear.

Note to self: Winter project will involve slightly widening my bike lift to accept the Ryker’s wide front end. I added OEM extensions to it when I first got it when I built the garage, so I think can add 6 or so inches on either side to accommodate the wider track of the beast. Saw a picture where someone had put one up on a similar lift and the center of each front tire was (precariously) perched right on the edge. No thanks!

Garage in 2011:
 

Attachments

  • garage 04-07-11 Bridgeport 023.jpg
    garage 04-07-11 Bridgeport 023.jpg
    86.9 KB · Views: 18
Last edited:
Thanks again.

Yeah, I’ve had a 5mm that I’d cut the short arm down awhile back, and that’s what I used to loosen, and s-l-o-w-l-y back the bolt out originally, but didn’t do anything with the long arm to get up in behind the remainder of the airbox molding. By that time my knees and back were killing me from having to stand on my head and crawl around on the floor to get at an angle where I could see what I was working on. It’s kinda rainy this morning so may make an effort to try the Chapman set (that does have a 5mm bit) to get the lever off and re-situated a couple of splines to the rear.

Note to self: Winter project will involve slightly widening my bike lift to accept the Ryker’s wide front end. I added OEM extensions to it when I first got it when I built the garage, so I think can add 6 or so inches on either side to accommodate the wider track of the beast. Saw a picture where someone had put one up on a similar lift and the center of each front tire was (precariously) perched right on the edge. No thanks!

Garage in 2011:

That's a nice shop! Are you a machinist, gb?

Sarah
 
Last edited by a moderator:
That's a nice shop! Are you a machinist, gb?

Sarah

Thank you.

Oh boy! Self-taught wanna be, but not a professional. My career path is somewhat muddled and swapped back and forth from electronics/electrical, to combination electrical/mechanical, back to electrical, and eventually mechanical again... all at my own discretion.
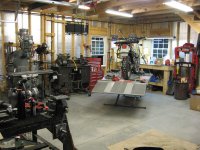
I built the garage to work on bikes, and to do a little welding/machine work that fell into areas I was comfortable with when I retired in 2011. Always interested in machine work, a mill, lathe, and welding equip. were high on my list of must-haves when I built the garage. That was an early shot, and things have changed in there quite a bit now.

The Chapman tool worked pretty well. I was able to shift the lever back, but just how many splines is a question. I suspect 1, because the lever didn't want to go back on the shaft initially and I had to force the gap open a little so it would slide on. That initial position was too much, so I removed it, shifted its position and put it back on. We'll leave it where it is right now, and if I'm not comfortable with it, we'll play with it again.

If you're not familiar with the tool, it's a kit that contain a selection of various 1/4" drive bits made by the Chapman Company. They make a number of them and mine is their Kit No. 7331. The little ratchet holds the various bits. Insert them one way to loosen a fastener, insert them on the opposite side and it will tighten them. I've had this set for around 30 years, and it's come in handy plenty of times.

IMG_2485.jpg
 
Last edited by a moderator:
Nice little outfit, thank you for the particulars. Hope you get the shift lever just where you want it. The factory position was a constant frustration for me, so I've been eternally grateful for the BLR Tuning how-to video. Bill takes the time to show the details and dumb things down, exactly what I need.

Sarah

Happy with it so far. Have added a Show Chrome Reverse Lever Cover (extender), which give me better purchase/control with my foot.

Next up is making a little platform to cover the pillion section of the Ultimate seat, so that an Igloo cooler will sit there a little more stable. Will be picking up several bags of oysters next week, and I usually use the trailer I towed behind my Connie to carry it. That bike is basically parked now, so that I can sell it.
 
Last edited by a moderator:
gbyoung2, how did you force the gap open.
Having a devil of a time getting mine back on.
tried a screwdriver, but no dice.
Might help if my hand worked right.
 
gbyoung2, how did you force the gap open.
Having a devil of a time getting mine back on.
tried a screwdriver, but no dice.
Might help if my hand worked right.

Try putting a thin flat kitchen knife into the gap, then put a bolt into the threaded side, and do it up so that it forces the gap open. You shouldn't need too much pressure to prise it open enough. The gap should remain wide enough when you remove the bolt to fit it over the spine easily. Small increments at a time should do the trick.
 
Last edited by a moderator:
Try putting a thin flat kitchen knife into the gap, then put a bolt into the threaded side, and do it up so that it forces the gap open. You shouldn't need too much pressure to prise it open enough. The gap should remain wide enough when you remove the bolt to fit it over the spine easily. Small increments at a time should do the trick.

Excellent tip, thank you!

Sarah
 
Back
Top