• There were many reasons for the change of the site software, the biggest was security. The age of the old software also meant no server updates for certain programs. There are many benefits to the new software, one of the biggest is the mobile functionality. Ill fix up some stuff in the coming days, we'll also try to get some of the old addons back or the data imported back into the site like the garage. To create a thread or to reply with a post is basically the same as it was in the prior software. The default style of the site is light colored, but i temporarily added a darker colored style, to change you can find a link at the bottom of the site.

2017 F3 - What coolant antifreeze type/colour for the equivalent?

Isopedella

Well-known member
About to do the coolant change on my F3.
The book says PN 219 702 685 or equivalent.

So what should I look for in regard to colour or or type of coolant for the equivalent? :dontknow:
Orange long life for alloy engines? 50/50 mix.
I'm in New Zealand so specific brands, well probs not available locally.
But the coolant type and colour should be available.

Iso
If you can get PRESTONE products they make what BRP is now using in the cooling system ..... The Prestone is called DEX-COOL ... and I've mixed it with the BRP stuff, and it works fine.... I also buy it "NOT pre-mixed" and add the correct amount of DISTILLED water ... GM veh's use this also ..... Mike :thumbup:
 
Last edited by a moderator:
Cheers.
Do you know the properties of your local at all?
Like colour and coolant "type"?


For instance I have located this. Type two. Red. and also says Type A Organic Additive Technology (OAT) I'm confused.


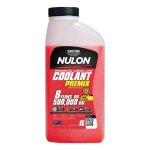
Nulon Red Premium Long Life Coolant Premix 1 Litre
Size 1 Litre
Colour Red
Type Type A Organic Additive Technology (OAT)
Premix/Concentrate 50% Premix
Temperature Range (50% Mix) Freeze -37°C, Boil 128°C
AS Claims AS 2108-2004 Type A
ASTM ASTM D1384, ASTM D2570, ASTM D2809, ASTM D3306, ASTM D4340, ASTM D4656, ASTM D4985, ASTM D5345
BMW BMW (UK)
Chrysler Daimler Chrysler MS-7170, Daimler Chrysler MS-976
Ford ESE M97-B18C, ESE M97-B44A, ESE M97-B44D, WSS-M97B44-D
General Motors GM 1825M, GM 1899M, GM 6277M
Honda Honda All Season Type 2, Honda Longlife Coolant Type 2
Madza Mazda MES MN 121D
Mitsubishi Mitsubishi ES-X64217


coiolant    SCA_225664_hi-res.jpg
 
Supplementary.

What's the total volume of liquid required. So I know how much to buy.

I guess I could drain and measure, but I thought someone may know right off. Book doesn't seem to say, least I haven't located the info.

I'm guessing 4 US quarts or so.
 
Last edited by a moderator:
Sorry don’t have volume amount do know DO NOT MIX colors. Dilute with some water is fine, mixing BAD
 
According to pg. 163 of the English version of the Operator's Guide, the volume of the cooling system is 4.2L or 1.1 U.S. Gal.
 
I went down and the Bloke fed in the info and came up with this.

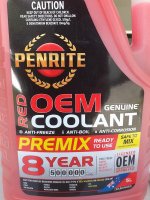
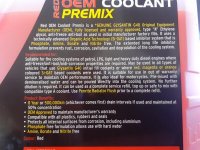
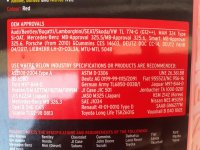
Penrite Red Type A (Si-OAT). Its premixed. Looks to be the same colour as whats in there now.
c 1 20231111_120519.jpg c 3 20231111_130856.jpg c 2 20231111_120710.jpg

So its lunch, then search out the hose under the battery, or the tap if it moves nicely I guess.

Ta for the pointers.

Iso
 
.....

So its lunch, then search out the hose under the battery, or the tap if it moves nicely I guess.

Ta for the pointers.

Iso

Back a while, many Spyders had issues with that tap, and unless someone else comes up with better info, especially on the later models, I'd seriously suggest you AVOID using the tap if at all possible!! :lecturef_smilie:

If you break it off even just trying to undo it, you've created a fairly expensive problem for yourself! :gaah:

Yep. I hear ya. Probs just go for the hose. No worries. Correct coolant ya reckon Peter? made in Aus I see.
 
Supplementary.

Whats the total volume of liquid required. So I know how much to buy.

I guess I could drain and measure, but thought someone may know right off. Book dosnt seem to say, least I haven't located the info.

Im guessing 4 us quarts or so.

Yep, 1 gallon. Drain your system and do as BK911 said. Simple simple, not complicated. Mine is an RT but I'm guessing an F3 should have a skid plate like an RT. Take it off and drain the system by removing a lower radiator hose. Do it safely and good luck.
 
FWIW, While your radiators are positioned different from mine, my service manual says to remove the lower Right (as you sit on the bike, of course) radiator hose. I had to remove one body panel on the underside and changing it wasn't a difficult job at all. My service manual says to begin with a cold engine, remove the coolant overflow tank cap, the lower R radiator hose and drain the entire system. Replace the hose and fill until the fresh coolant reaches the Cold level line on the tank, do not put the cap on the coolant tank, but start the engine and let it run until the coolant reaches normal operating temperature (a couple of cyclings of the fans). Turn off the engine and let it return to a cold state, top off the coolant level in the tank until it reaches the Cold level mark securely reinstall the tank cap.
 
And you may want to take it out for a ride that has some hill in it and keep an eye on it for a few miles in case you have some trapped air in the system, it may burp a bubble and you may have to add more to the system.:2thumbs:
 
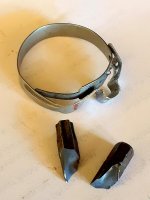
So....job complete. Coolant drained via the remove hose clip method, wrecked it to get it off. Replaced with a SS one.
Put the tightening nut facing down for next time on the clip so its available from below. No battery removal.

Misplaced one of the nuts from the battery along the way, managed to salvage one from an older one.
Located the nut when I was cleaning up - of course.

Then continued on with oil and HCM filters.
Both sump plugs really tight. Broke my tool. :gaah:

20231112_152347.jpg

The previous owner took it to the shop for a service.
Think Rattle Gun Jimmy did the job. Torques... Hell No ... Who needs them. Good Onya Mate.

Went looking for my replacement Mag plugs I ordered a while ago, no luck. :gaah:.
So I replaced the slightly beat up plugs and torqued them, lightly, so I can get them out again.
One more time - please, then thats it.

Took it for a spin, checked for leaks, checked fluid levels. :thumbup:

Been an up and down day but the job is done. But shes all tickety boo now.
Air filter and plugs on the horizon I guess.
And look at the time. Bang on Brown O clock. Perfect. :cheers:
 
Back
Top