• There were many reasons for the change of the site software, the biggest was security. The age of the old software also meant no server updates for certain programs. There are many benefits to the new software, one of the biggest is the mobile functionality. Ill fix up some stuff in the coming days, we'll also try to get some of the old addons back or the data imported back into the site like the garage. To create a thread or to reply with a post is basically the same as it was in the prior software. The default style of the site is light colored, but i temporarily added a darker colored style, to change you can find a link at the bottom of the site.

Done - Rear Tire Replacement on my 2020 RT!

BamaJohn

Active member
Note: This is NOT intended as instructional, but only how one guy was able to do this job on a budget. I have no affiliation with any product used.
I'm not casting aspersions toward dealers, I just need to do as much maintenance as possible on my rides.
Ok, enough on that......


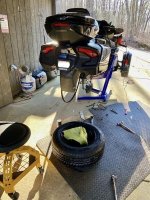
After 9800 miles, my OEM Kenda rear tire was down to the wear bars, and I didn't like the way it rode or wore, so bought a General Altimax RT43 215/60R15 for $119.95 + local tax. A local auto tire shop exchanged the tires for $15, and the job of removal/reinstall of the wheel was done in my carport. A local Spyder shop quoted $300 to mount my tire, so doing it myself paid for half the Big Blue lift.

Points to ponder:
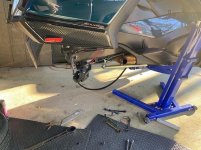
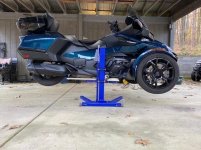
The Easy Rider Big Blue lift allowed me to get the Spyder high enough that the following was achieved:
Did NOT have to remove the rear shock bolt;
Did NOT have to touch the alignment adjusters, so no belt alignment or tension required;
Did NOT have to remove the rear fender flap;
DID remove the muffler;
After breaking loose the rear axle nut, and removing the axle bolt, I was able to raise the Spyder enough to slide the tire out on the left side.

I had read of some having trouble with the rubber dampeners in the wheel but I sprayed them with silicone spray and had no issue with them or the sprocket going in place...guess I was lucky.

The learning curve of a first-time job took some extra time, but the next rear tire change will be done much more efficiently. :popcorn:

Note: I had a friend help with the reinstall for a couple of hours, and getting 166 ft lb of torque on the axle nut took all I had! The "click" of the torque wrench was a welcomed sound!
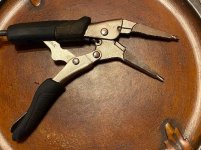
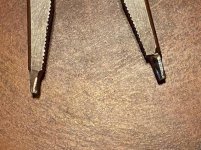
Note 2: A tool to rotate the brake piston inward is needed to gain clearance for the pads to slide over the rotor. I had no such tool, so sacrificed a small pair of locking needle-nose pliers by grinding down the jaws to fit the holes in the brake piston....worked fine in a pinch, but I suspect BajaRon's tool would be better! :rolleyes:
 

Attachments

  • IMG_6958.jpg
    IMG_6958.jpg
    80.2 KB · Views: 111
  • IMG_6957.jpg
    IMG_6957.jpg
    63.3 KB · Views: 111
  • IMG_6955.jpg
    IMG_6955.jpg
    60.6 KB · Views: 134
  • IMG_6954.jpg
    IMG_6954.jpg
    66.6 KB · Views: 134
  • IMG_6908.jpg
    IMG_6908.jpg
    57.3 KB · Views: 133
Last edited by a moderator:
I don't have the big blue lift, but I do mine the same way. As you said if done with a bit of planning the alignment and belt tension won't change a bit. A spray of Windex window cleaner on the rubber dampeners will work if you don't have any silicon spray on hand.
 
And yes Ron's caliper reduction tool makes retracting the rear caliper so much easier than using needle nose pliers.

Just curious how did you get the axle bolt out without removal of rear shock bolt to allow relaxation of belt tension??

Al in Kazoo
 
Last edited by a moderator:
Good job. Is the Big Blue Lift more stable and better than say an HF or other lift - I think the other one is an OTC? And where did you get it? Is there anything you don't like about it? I am getting ready to buy a lift, any advice would be appreciated. THANKS
 
Last edited by a moderator:
Question, When you reinstalled the rear wheel, did you have any issues with the wheel moving away from the adjusters as you tightened it down ?
 
And yes Ron's caliper reduction tool makes retracting the rear caliper so much easier than using needle nose pliers.

Just curious how did you get the axel bolt out without removal of rear shock bolt to allow relaxation of belt tension??

Al in Kazoo

Good question. After breaking loose the axle nut then removing the brake caliper and speed sensor, I raised the Spyder about 2" off the ground and used a phenolic hammer on the nut end of the axle (with the nut still on it, flush with the shaft end). After the shaft was even with the swing arm, I used a long socket to further drive the shaft out... it was pretty easy. Then, I raised the bike enough for the wheel to drop down and eased the belt off the sprocket... I was surprised it worked, but it did. Did the same in reverse to put the belt back on. Ran the bike in gear while it was lifted about 3" off the ground for the belt to self-align & to make sure I had brakes. :thumbup:
 
Last edited by a moderator:
Good question. After breaking loose the axle nut then removing the brake caliper and speed sensor, I raised the Spyder about 2" off the ground and used a phenolic hammer on the nut end of the axle (with the nut still on it, flush with the shaft end). After the shaft was even with the swing arm, I used a long socket to further drive the shaft out... it was pretty easy. Then, I raised the bike enough for the wheel to drop down and eased the belt off the sprocket... I was surprised it worked, but it did. Did the same in reverse to put the belt back on. Ran the bike in gear while it was lifted about 3" off the ground for the belt to self-align & to make sure I had brakes. :thumbup:

This all seems like a lot of trouble to avoid removing one bolt through the lower shock mount. Then the swing arm drops down, all tension on the belt and axle shaft is gone and there is also no need to remove the muffler.
 
Last edited by a moderator:
Question, When you reinstalled the rear wheel, did you have any issues with the wheel moving away from the adjusters as you tightened it down ?


No...I'd read that some folks have that issue. On the tightening, a buddy held the bolt head of the axle bolt with a 36mm socket and 24" handle, and I had a 16" long 36mm spanner that ratcheted on the nut end. Lying on the ground, I was able to ratchet the spanner to get a good bit of torque on the nut PUSHING UPWARD FROM THE REAR, then finished it off with the ratcheting torque wrench the same way. (obviously, the Spyder was lowered to the ground to do the heavy work, then raised a bit for test running).
 
This all seems like a lot of trouble to avoid removing one bolt through the lower shock mount. Then the swing arm drops down, all tension on the belt and axle shaft is gone and there is also no need to remove the muffler.

Thanks. I didn't do it this way to avoid anything, just reporting on one person's results. The whole job is pretty interesting, isn't it?
 
And yes Ron's caliper reduction tool makes retracting the rear caliper so much easier than using needle nose pliers.

Just curious how did you get the axle bolt out without removal of rear shock bolt to allow relaxation of belt tension??

Al in Kazoo

Once the wheel is off the ground I rotate it backwards while pulling the belt off the pulley. Takes a few spins, but the belt will come off. After the wheel is installed I start the belt and rotate the wheel forward and the belt goes back on. Caution is required so you don't pinch a finger or worse, but heck of a lot quicker than messing with adjusters and alignment. Wheel on and belt at same tension and alignment as it was before it came off. Changed rear tire twice and never have taken out the shock bolt.
 
Last edited by a moderator:
Once the wheel is off the ground I rotate it backwards while pulling the belt off the pulley. Takes a few spins, but the belt will come off. After the wheel is installed I start the belt and rotate the wheel forward and the belt goes back on. Caution is required so you don't pinch a finger or worse, but heck of a lot quicker than messing with adjusters and alignment. Wheel on and belt at same tension and alignment as it was before it came off. Changed rear tire twice and never have taken out the shock bolt.

That is how I have done it also. I also run a ratcheting strap from the rear wheel to a strong point up front, usually the right-side foot peg, tighten it down so the axle wont creep when tightening it down. Since I am usually working alone that is what I do.

G
 
Last edited by a moderator:
Congrats on your tire change Xwingnut. It certainly gives satisfaction to be able to change out these common wear items of tires and brake pads when needed. It also gives the opportunity to clean around the rear wheel, and prolong the life of the axle spacers and seals by cleaning and inspecting as well as the brake caliper/piston area. As I grow older and slower, I make time to have a gallon, plastic ice cream tub with warm water, dish soap and brush available to scrub up some of the road grime. Newspaper, old rags, and spray bottle with simple green or the like gives ample cleanup, and soak to the axle spacers, and then wipe down and reassembly with a thin film of red bearing grease on the axle and spacers/ seals. As others suggest, a little silicone or windex allows the cushion blocks to seat back easier, and the Orings to mate back in place.

Good job and you're ready for more Myles of Smyles!
 
Note: This is NOT intended as instructional, but only how one guy was able to do this job on a budget. I have no affiliation with any product used.
I'm not casting aspersions toward dealers, I just need to do as much maintenance as possible on my rides.
Ok, enough on that......

So, Thanks for sharing your version of the rear wheel removal. It's interesting on the different ways it can be done. I would be curious to hear how a shop that does it all day long, and where time is money, performs the job.
I'm also interested in what you think of the Big Blue lift. How solid is a Spyder on it?
 
Last edited by a moderator:
A Job Well Done

:coffee:... Thanks for your report on the Rear Tire R/R. All good information and Tips.
I have learned a lot of things on this Forum.

Stay Healthy and Safe. .....:thumbup:
 
Last edited by a moderator:
..... I'm also interested in what you think of the Big Blue lift. How solid is a Spyder on it?

Surprisingly, quite stable. The lift (configured for a Spyder) comes with an L-shaped bracket that bolts to the lift at the right-side floorboard bolt hole.... the right-side floorboard is removed before using the lift, allowing the lift to get in close to the frame, and the support arms to be properly placed. Obviously, all heavy wrenching is done PRIOR TO, AND AFTER lifting.

I'm about to do an oil change and will post a photo of the security bracket in place within the next week.
 
Last edited by a moderator:
Once the wheel is off the ground I rotate it backwards while pulling the belt off the pulley. Takes a few spins, but the belt will come off. After the wheel is installed I start the belt and rotate the wheel forward and the belt goes back on. Caution is required so you don't pinch a finger or worse, but heck of a lot quicker than messing with adjusters and alignment. Wheel on and belt at same tension and alignment as it was before it came off. Changed rear tire twice and never have taken out the shock bolt.

I'll have to try this on my next tire change. Have always taken the shock bolt out as I didn't think you could dismount/mount the belt with tension on it.

Al in Kazoo
 
Back
Top