• There were many reasons for the change of the site software, the biggest was security. The age of the old software also meant no server updates for certain programs. There are many benefits to the new software, one of the biggest is the mobile functionality. Ill fix up some stuff in the coming days, we'll also try to get some of the old addons back or the data imported back into the site like the garage. To create a thread or to reply with a post is basically the same as it was in the prior software. The default style of the site is light colored, but i temporarily added a darker colored style, to change you can find a link at the bottom of the site.

ECU removal

Nemesis

New member
I am interested in getting the ECU reflash offered by Monster Fuel Injection. I have a 2015 Spyder F3S. The ECU removal instructions provided by Monster Fuel Injection is very abbreviated and geared mostly towards removal of the ECU in an RT, not an F3. I tried removing the ECU and after two hours and no success, gave up on the effort.

I was wondering if any of you have experience in removing the ECU and whether you could direct me to a video showing the process, or perhaps step-by-step instructions?

Thanks!
 
It is easy there are pics on there web sight
If you need help I can send you pics of when I did mine
You will love it. It really makes the f3 fast the way it should be
 
It is easy there are pics on there web sight
If you need help I can send you pics of when I did mine
You will love it. It really makes the f3 fast the way it should be

Please share!

Did you choose stage 2 upgrade? Also, what RPM limit do you recommend? Any other specific instructions I should give when I submit the reflash form?
 
I am definitely keeping up with this post. I want to do the same thing to my F3T. I have stock exhaust right now. Don't want something too loud, but just want as much performance as I can have. Mostly in the lower rpm's.
 
panel removal

You need to remove the left side panel that says can-am. After that the ecu removal is straight forward / 3-10 mm screws and two harness connectors.
1. remove the left small cover over the air filter.
2. remove only the three push locks along that top edge. take a small screw driver and try to push up the center of the push locks.
3. remove a total of four allen screws. Two are where your left shin bone is on the side of the panel. two are located under the can-am logo up front.
4. lift up the panel from the bottom and slide slightly forward.
5. the ecu is right there with three 10 mm screws. even a cave man can get the screws out.
6. To get the harness clips off look at the web site as there is a small hard to see nub that has to be depressed before you can rotate the locking cam.

I own two ECUs, stage one and stage two. There is more power in the upper rpm range with stage two flash which requires and air box modification and cost more.
So unless you spend a lot of time above the 7,000 rpm range you would be hard pressed to notice any flash difference.
I went back to the stock exhaust, and the stage one flash. My opinion is stage one is smoother off the line.
I let an active Army friend from Germany who has an F3L drive my stage one flashed F3L for 1,200 miles. He was stunned at what a difference there is from his F3L
He called it a total hot rod as he thrashed it for four days.
God Luck and Enjoy
Dennis
 
I am definitely keeping up with this post. I want to do the same thing to my F3T. I have stock exhaust right now. Don't want something too loud, but just want as much performance as I can have. Mostly in the lower rpm's.

On my side, I never compare stage 1 and 2. I went directly to stage 2 on my 2016 F3T.

So far, I'm really pleased with it. Not even louder than a completely stock one (side by side comparison).
 
There is one bolt, I believe the upper of the three that is a PITA to get out. I used a box wrench and could only turn it about 1/8th of a turn at a time due to accessibility. A slow process but it will come out real easily. Unlock the clips on the ECU like Dennis said and it comes right out. I've had mine for about 8-9 months now (before stage 2 was available) and I'm very pleased with it. Noticeable improvement in roll on power delivery and acceleration, more fun to ride. I just replaced my rear tire with a 75K mile 215/60 rated tire on my 2016 F3-Ltd SE6 (would not recommend, 75K rubber too hard, get a lower rated tire) and it will light up the tire ALL through 1st gear with a nice fishtail. The patch on my jacket says it all "dang I got old fast'. Who wants to grow up?:ohyea: Just don't look at yourself in the mirror.
 
There is one bolt, I believe the upper of the three that is a PITA to get out. I used a box wrench and could only turn it about 1/8th of a turn at a time due to accessibility. A slow process but it will come out real easily. Unlock the clips on the ECU like Dennis said and it comes right out. I've had mine for about 8-9 months now (before stage 2 was available) and I'm very pleased with it. Noticeable improvement in roll on power delivery and acceleration, more fun to ride. I just replaced my rear tire with a 75K mile 215/60 rated tire on my 2016 F3-Ltd SE6 (would not recommend, 75K rubber too hard, get a lower rated tire) and it will light up the tire ALL through 1st gear with a nice fishtail. The patch on my jacket says it all "dang I got old fast'. Who wants to grow up?:ohyea: Just don't look at yourself in the mirror.

Glad your loving the Flash ….. You didn't name the tire - WHY , also what psi were you using ….. Thanks …. Mike :ohyea:
 
The bolt at the top of the ecu on the 2015 f3(s) is easily accessible by cutting out a small notch enabling a 10mm socket with a short extension to easily reach the screw. Ask me how I know. Removing, yeah it was a chore but replacing after doing the notch thing was a piece of cake. Could have saved myself time and some aggravation.
 
You need to remove the left side panel that says can-am. After that the ecu removal is straight forward / 3-10 mm screws and two harness connectors.
1. remove the left small cover over the air filter.
2. remove only the three push locks along that top edge. take a small screw driver and try to push up the center of the push locks.
3. remove a total of four {allen} TORX screws. Two are where your left shin bone is on the side of the panel. two are located under the can-am logo up front.
4. lift up the panel from the bottom and slide slightly forward.
5. the ecu is right there with three 10 mm screws. even a cave man can get the screws out.
6. To get the harness clips off look at the web site as there is a small hard to see nub that has to be depressed before you can rotate the locking cam.

I own two ECUs, stage one and stage two. There is more power in the upper rpm range with stage two flash which requires and air box modification and cost more.
So unless you spend a lot of time above the 7,000 rpm range you would be hard pressed to notice any flash difference.
I went back to the stock exhaust, and the stage one flash. My opinion is stage one is smoother off the line.
I let an active Army friend from Germany who has an F3L drive my stage one flashed F3L for 1,200 miles. He was stunned at what a difference there is from his F3L
He called it a total hot rod as he thrashed it for four days.
God Luck and Enjoy
Dennis

Only noted because I'd like to meet the idiot who called for t25 screws that are NOT MAGNETIC! They're all over this bike and they are all a pita.
 
You need to remove the left side panel that says can-am. After that the ecu removal is straight forward / 3-10 mm screws and two harness connectors.
1. remove the left small cover over the air filter.
2. remove only the three push locks along that top edge. take a small screw driver and try to push up the center of the push locks.
3. remove a total of four allen screws. Two are where your left shin bone is on the side of the panel. two are located under the can-am logo up front.
4. lift up the panel from the bottom and slide slightly forward.
5. the ecu is right there with three 10 mm screws. even a cave man can get the screws out.
6. To get the harness clips off look at the web site as there is a small hard to see nub that has to be depressed before you can rotate the locking cam.

I own two ECUs, stage one and stage two. There is more power in the upper rpm range with stage two flash which requires and air box modification and cost more.
So unless you spend a lot of time above the 7,000 rpm range you would be hard pressed to notice any flash difference.
I went back to the stock exhaust, and the stage one flash. My opinion is stage one is smoother off the line.
I let an active Army friend from Germany who has an F3L drive my stage one flashed F3L for 1,200 miles. He was stunned at what a difference there is from his F3L
He called it a total hot rod as he thrashed it for four days.
God Luck and Enjoy
Dennis

Thanks for the instructions! Any pictures you could add? I’m sure there are others who have struggled with this. The top bolt on the ECU seemed to be behind a support structure... I wasn’t able to get to it.
 
Tough bolt

Thanks for the instructions! Any pictures you could add? I’m sure there are others who have struggled with this. The top bolt on the ECU seemed to be behind a support structure... I wasn’t able to get to it.

I forgot that I only install my ECU with the two easy bolts. Stays in place just fine.
 
Hi Blueknight, didn't want to hijack this tread too much. Sorry, forgot to mention the tire. I installed a Kumho Solus TA11 215/60R15 94T BW and running 20 PSI. In a few years, LOL, when I wear out this tire I'll install one with about a 40K mile rating for better traction. In the meantime I'm having fun lighting up the tire whenever I want, maybe I'll wear it out early. In spite of the hard rubber it griped very well in the mountains (Maggie Valley area last month) when pushed hard. I've yet to ride it in the rain yet though.
 
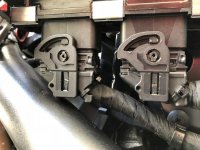
Once you get the two cables/clamps exposed, you will see this.......the clamps just LOOK difficult to remove, as you can see by the various ways I have tried. As you are looking at the clamps, rotate them clockwise a quarter turn....you can then pull the connectors down to remove them.....but make sure that an exuberant assembler hasn’t cable tied part of the clamp to the cable (like they did to one of mine)....
A2B83937-459A-4C58-84B0-309058F49B48.jpg
 
I removed mine Monday morning to send it off. It was not difficult but the top bolt just took longer having to use an open end wrench. The cable harnessess have a small locking tab that needs to be pushed while you swing the latch to the right. You just need the ecu loose to turn it and see the tab on the left side.
Im just getting stage one with a 8600 RPM limit.
 
Ooooops. Forgot about the tab, AY. Thanks for adding that rather important info :thumbup:

Pete
 
I am interested in getting the ECU reflash offered by Monster Fuel Injection. I have a 2015 Spyder F3S. The ECU removal instructions provided by Monster Fuel Injection is very abbreviated and geared mostly towards removal of the ECU in an RT, not an F3. I tried removing the ECU and after two hours and no success, gave up on the effort.

I was wondering if any of you have experience in removing the ECU and whether you could direct me to a video showing the process, or perhaps step-by-step instructions?

Thanks!
Hey did you ever get your ECU removed and RE-MAPPED...if so tell us your results?
 
Back
Top