Bump Skid Installed No issues
First off everyone thank you for your helpful tips. For the next person doing this job here are a couple additional things that I think would be useful:
- I used a new brad point wood bit for drilling thru all the plastic. It has a very pointy tip that starts the hole well
- I used a battery powered drill on low for drilling thru all the plastic and went slowly. I also taped off the drill bit to act as a stop so I couldn't go to deep (thanks to someone in the string above for that suggestion)
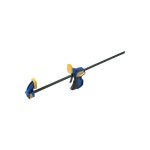
- Before I drilled all the holes thru into the plastic lip I took two Quick Grip bar clamps - sort of look like a large c clamp but with rubber protectors on the ends and put them below the bump skid and up the front onto a lip on the grill. I then slowly tighten those up. that brought the bump slid right up to the bottom of the frunk so that I didn't have to try and hold it up while drilling. I believe it also ensured that the hole angles matched those on the bump skid perfectly.
- I did small pilot holes or at least started them and then took off the bump skid when drilling into the frame at the back of the bump skid. I used a brand new steel drill bit. I drilled the rest of the way thru the frame after removing the bump skid as it was easier to see what I was doing. I did a 1/8 inch hole first and followed with a 1/4 - took very little time to drill thru the metal.
- the clips went on easily with just using my hands to push the frunk lip a bit to allow the clips to clear the plastic pan under the frunk
- attached the two original bolts that you use at the start to secure the bumpskid as a drilling guide. Only put these in 1/2 way. Then I put all the other bolts in loosely. I once again used the Quick Grip clamps again to suck the bump skip up to the frunk and then tightened everything up from the center outwards. Whole thing took about 1 hour to do and about 3 hours sweating the details in advance
")
I am sure I could have done the above without the grip ads but they just seemed to make things easy to align and each bolt went in without a fight.
If anyone has any questions let me know.
PS: I really like the look as it seems to finish off the frunk area with that low spoiler look that I happen to like. May not be everyones cup of tea but hey beauty is in the eye of the beholder. It is very well made and finished product in my opinion.