• There were many reasons for the change of the site software, the biggest was security. The age of the old software also meant no server updates for certain programs. There are many benefits to the new software, one of the biggest is the mobile functionality. Ill fix up some stuff in the coming days, we'll also try to get some of the old addons back or the data imported back into the site like the garage. To create a thread or to reply with a post is basically the same as it was in the prior software. The default style of the site is light colored, but i temporarily added a darker colored style, to change you can find a link at the bottom of the site.

SpyderPops LED Blinker and Spyclops on an F3 Limited

dsvogel

Member
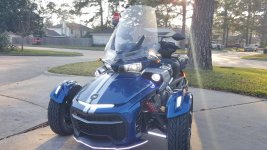
SpyderPops LED Blinker and Spyclops (and LED Headlights) on an F3 Limited

Summary
The SpyderPop's F3 Turn Signal/Blinker LED wires are going to be too short to reach the 2-pin disconnect on an F3 Limited, as it is inside the mirror housing. I was able to "fix" this problem by doing the following:


  1. This solution works if you are buying both items AND you are installing Spyclops to come on with the ENGINE, not with the key. Otherwise, plan on buying some 18gauge (or thinner) automotive wiring.
  2. Installed the Spyclops FIRST
  3. Cut off the excess wiring from the Spyclops that you don't need and save. Strip wire ends and install
  4. Cut the excess wiring in half. This will give you enough to extend the blinker wires.
  5. Remove the existing shrink tubing from the blinker wires. You may have to unsolder or cut the existing blinker wires to separate. Insert the excess wire to lengthen.

Loooong version
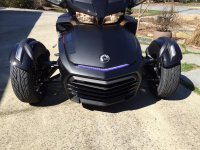
I just traded my 2013 RTS for an F3 Limited and was immediately missing the LED blinkers I had put on my mirrors for drivers in my blind spots. I also like the accent light idea under the front lip of the frunk, but wasn't as impressed with the BRP option (nor the price). I also wanted to support these guys that have contributed so much to the Spyder community.

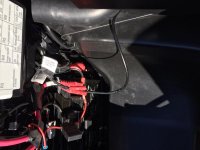
The connection for the wires is a little different on the F3 Limited because of the unique mirrors and the location of the 2-Pin quick disconnect plugs. For tinkering (farckle-ing ??), these mirrors are MUCH easier to work with. The tupperware on the back of the mirrors now just pulls right off, as they are simply held with three metal retention clips. I was so afraid I was going to break something, but they are super-simple to pull off.

Now, unlike my RTS, the 2-Pin disconnect is not hanging loosely in the arm or just inside the body. the F3T has a nice "holder" inside the mirror, right under the blinker. This means that the wire and plug-n-play insert wiring isn't quite long enough to reach the plug. I'm not sure how the non-Limited F3 mirrors are, but I'm guessing something similar to the RT's?

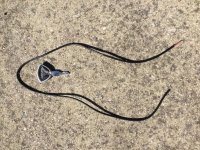
IF you also buy the Spyclops accent light, and IF you install the Spyclops to come on with the engine (using the Customer Accessory wires), then you will have enough wire left over to extend the blinker wires and make a clean install. Otherwise, I think you'll need to buy some 18 ~ 22 gauge wire to extend the leads. I looke for a while, but couldn't find another 2-pin connection anywhere else. If you want to have the Spyclops come on with just the key, then you will use all of the included length of wire.

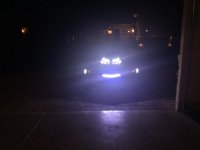
Overall, I love the look of both of these items. The Spyclops is quite a striking look. Those LEDs get very, very warm to the touch, so I used this to my advantage to help them seal to the body. Because of this, I also think it better to have them on only when the engine is running, and therefore I'm more likely to be moving = air flow.


I've lurked on here so long, I thought it was time to contribute something!

Let me know if you have questions! ;)
 
Last edited:
Pics

Huh, pictures didn't upload. Here's some pics to go with that description...

attachment.php


Accessing the Customer Accessory wire. I had to remove the tape, and cut off the wax-dipped ends, then strip those wires before hooking into them...
attachment.php


And for reference, this is how much wire became excess for extending the LED wires for the blinkers...
attachment.php
 

Attachments

  • IMG_0190.jpg
    IMG_0190.jpg
    95.5 KB · Views: 590
  • IMG_0194.jpg
    IMG_0194.jpg
    52.1 KB · Views: 581
  • IMG_0192.jpg
    IMG_0192.jpg
    100 KB · Views: 577
Yep!

Funny!! I thought the same thing. :roflblack: Started researching LED headlight options this weekend after seeing how nice the Spyclops looked. I don't do a lot of night driving, but would want the same throw/distance of light. Some reviews I've seen seemed indicate you lose some distance with LED headlights. I might still go that route for all the daylight driving I actually do.
 
Wow! That looks fantastic, MMMII! My LED Headlights are in the mail. :clap: That definitely looks better than the stock headlights.

Which headlights did you go with?
 
Ditto! After reading and reading and reading, decided to go the XDs. Arriving tomorrow! :yes:

After seeing your pic, I'm even more excited for the look.
 
attachment.php


Xenon Depot as well for headlights. They do not have lamps for the BRP fogs.

The signature light above the grille is BRP. Fog lamp rings and a-arm DRLs are Tric-LED as are the fender lights. Bumpskid is Spyderpops.
 

Attachments

  • 20160131_165206.jpg
    20160131_165206.jpg
    72 KB · Views: 339
Ditto! After reading and reading and reading, decided to go the XDs. Arriving tomorrow! :yes:

After seeing your pic, I'm even more excited for the look.

Here are some unsolicited words of wisdom (aka learn from my screw up):


  • The rubber housing on the old bulb might need to be pried off with a flat head. You will want to re-use it.
    • I couldn't get it off easily so I put them to the side - put everything back together and then finally found a thread that talked about re-use.
    • So I opened it up again and put the rubber boot on.

So far, that's opening the F3 up twice... :banghead::banghead:


  • After my night test ride, I found that there was now more light from the LED's shining up (at stop signs and such) that appeared might be blinding to other drivers. This got me on the chip about bulb orientation where I searched and found only 2 pics one with the bulb orientated one way and another pic of the bulb orientated another. Since that was no help, I posted the question in another thread and didn't get any response.... My thought process said, if there is a wrong way to insert the bulb and if I think light is bleeding up... it might make sense to reverse the orientation of the bulb to see if light shines down (because of the shroud).

If you are keeping count at home, this would be my third time opening the F3 up....:banghead::banghead::banghead:


  • After this test ride, I didn't see much difference (other than the time it takes me to get to the headlights is dramatically reduced). I decided to email XD. Their first response was to say that you can only insert the bulb one way... That triggered a second email to tell them no, in fact you can insert the bulb so that the wire is up or the wire is down.:lecturef_smilie: They responded that as long as the LED's are at 3 and 9 o'clock there should be no difference.

Not sure yet but I think I might have to do some headlight adjusting as someone else had to do after LED installation. Very curious what your results will be before I start aiming the headlights.

If you run into problems getting to the lights shoot me a message, I'm somewhat of a pro now.:roflblack:
 
Such good info, I updated the thread title!

Thanks for showing your XD headlights, jcthorne! Good to see a daylight example, and they look so nice. Really like all the lighting you've done, actually. There's gotta be a term for those of us that spend as much time researching and thinking and modding our Spyders as we do riding them (and even thinking about mods while riding!). It's a sickness, I know, but don't wanna be cured. ;)

MMMII, thank you for taking the time to share your insights on installing the headlights. Good to know about the rubber boot. Also, I know some others have mentioned the LEDs appearing to point up, so it's good to know your experiences with this so far. I plan to study the orientation of my stock headlights, especially the cover/shade over what I assume is the low beam filament. I also plan to install the first LED and then do a side-by-side comparison of the light patterns and heights on my garage door with the stock bulb. I also know best laid plans can still result in :banghead:.

I appreciate the offer for help, and plan to tackle this on Saturday. I'll post how this goes.
 
attachment.php


Xenon Depot as well for headlights. They do not have lamps for the BRP fogs.

The signature light above the grille is BRP. Fog lamp rings and a-arm DRLs are Tric-LED as are the fender lights. Bumpskid is Spyderpops.


Nice!!!!! Very nice!!!
 
Thanks for showing your XD headlights, jcthorne! Good to see a daylight example, and they look so nice. Really like all the lighting you've done, actually. There's gotta be a term for those of us that spend as much time researching and thinking and modding our Spyders as we do riding them (and even thinking about mods while riding!). It's a sickness, I know, but don't wanna be cured. ;)

MMMII, thank you for taking the time to share your insights on installing the headlights. Good to know about the rubber boot. Also, I know some others have mentioned the LEDs appearing to point up, so it's good to know your experiences with this so far. I plan to study the orientation of my stock headlights, especially the cover/shade over what I assume is the low beam filament. I also plan to install the first LED and then do a side-by-side comparison of the light patterns and heights on my garage door with the stock bulb. I also know best laid plans can still result in :banghead:.

I appreciate the offer for help, and plan to tackle this on Saturday. I'll post how this goes.

I also have the Limited and am curious how the heatsinks are going to fit. A few pics would be nice...
Rick
 
Ug.

So when I read the owners manual, the instructions for changing the headlight bulb on a F3T or Limited shows half the steps of the base F3S. Basically you remove the lateral service panel, reach in, and do the swap. Easy peasy, right? Yeah, not so much.


First of all you have to have exceptionally thin forearms and small hands, then you must navigate around all the wiring and frame pieces. You will be halfway up your arm before you reach the back of the headlight. I was able to get the old bulb out, but installing these LED bulbs has proved exceptionally challenging. Because of the design of the LED bulb you must install the rubber boots on the lights before putting them back in the headlight. This makes it nearly impossible to get the retainer clips back around the light. I could leave the boots off, but I'd be afraid of what the inside of the headlight housing would look like after a year of riding.

Unfortunately the owners manual doesn't show how to remove the dash, which I think would make it easier to work with these bulbs, though I imagine it would be a lot of effort. I've already spent several hours trying to install these, and I'm beginning to think it's not worth it. :banghead::banghead::banghead:

Anyone have a better way to get it these headlights on the Limited's?
 
Funny!! I thought the same thing. :roflblack: Started researching LED headlight options this weekend after seeing how nice the Spyclops looked. I don't do a lot of night driving, but would want the same throw/distance of light. Some reviews I've seen seemed indicate you lose some distance with LED headlights. I might still go that route for all the daylight driving I actually do.

I have the LED headlights from xenon depot and they have the same throw/distance as the stock incandescent bulbs, my husband still has the stock lights, and we went out into the street in our dark neighborhood and compared distances.

The color is different and my headlights really light up reflective street signs more than his.
 
xenon depot

Did you find the need to adjust the headlights after the install of your LED's?

I got some led headlights that I got from xenon depot. I had to adjust mine down some. Easy to do even after you put all the top back on. You can get to the adjusters from taking off the service panels.
 
Did you find the need to adjust the headlights after the install of your LED's?

I didn't. We compared mine to my husband's side by side down the street and aimed at the closed garage door etc and everything looked the same other than color and mine are slightly brighter.
 
Back
Top