-
There were many reasons for the change of the site software, the biggest was security. The age of the old software also meant no server updates for certain programs. There are many benefits to the new software, one of the biggest is the mobile functionality. Ill fix up some stuff in the coming days, we'll also try to get some of the old addons back or the data imported back into the site like the garage. To create a thread or to reply with a post is basically the same as it was in the prior software. The default style of the site is light colored, but i temporarily added a darker colored style, to change you can find a link at the bottom of the site.
You are using an out of date browser. It may not display this or other websites correctly.
You should upgrade or use an alternative browser.
You should upgrade or use an alternative browser.
2 hour Farkle
- Thread starter easysuper
- Start date
Cruzr Joe
New member
About a hour ago decided to check out Spyderpops website and I am sure I saw a similar accessory to the one you have fitted on their website. Fantastic looking accessory you have just fitted :thumbup:
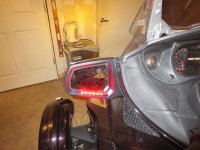
Is this a Brake or turn signal light?
Some differences between his and Spyderpops (Spyderpops are Turn Signals/Emergency Blinkers)
1) Spyderpops goes on top Because: A) it will not collect water. B) The LED's are pointed out, not up (or) down, which prevents the light from reflecting in the mirror and obscuring your view. C) Spyderpops are Amber as opposed to red. D) Spyderpops are longer.
This is not meant to be critical, just pointing out some differences
Cruzr Joe
Last edited:
Chupaca
New member
Nicely done..!!
looks to be red leds. If wired to the turn signal it will be operational to turn signal and four way. Amber would have been better seeing as they are visable from behind and red is not the turnsignal color most commonly used. But as a signal to the driver it's great to let you know whats on...:2thumbs:
looks to be red leds. If wired to the turn signal it will be operational to turn signal and four way. Amber would have been better seeing as they are visable from behind and red is not the turnsignal color most commonly used. But as a signal to the driver it's great to let you know whats on...:2thumbs:
easysuper
Active member
After looking at many different signal lights it appered to me that the color between red and yellow is about 50/50 as for reflecting up, down, sidways, T tried it in all positions and liked this the best, as for water intrusion , water gets inside the mirrior no matter what, the thing to do is make sure you heat shrink all conections as any conection should be, I did this install on my 2013 and on my wifes also and now on my 2014, both of the last installs have had ample oppertunity to fail and have not, I just like to do some of these things myself and save the money for fuel to ride. Or for some of that great Pork Belly they sell at Costco.
Cruzr Joe
New member
After looking at many different signal lights it appered to me that the color between red and yellow is about 50/50 as for reflecting up, down, sidways, T tried it in all positions and liked this the best, as for water intrusion , water gets inside the mirrior no matter what, the thing to do is make sure you heat shrink all conections as any conection should be, I did this install on my 2013 and on my wifes also and now on my 2014, both of the last installs have had ample oppertunity to fail and have not, I just like to do some of these things myself and save the money for fuel to ride. Or for some of that great Pork Belly they sell at Costco.
I too make some of my own mods, like i said, i was only pointing out the difference, not judging one way or the other, if everybody did it the same it would not be "our own" Spyder, good luck.
Cruzr Joe
Bob Denman
New member
:clap: :thumbup:
How much "Fun" was it; fishing the wiring out from the housing?
On the first mirror that I did; it was only a fifteen minutes struggle...
But the OTHER side... took over an hour! :banghead:
How much "Fun" was it; fishing the wiring out from the housing?
On the first mirror that I did; it was only a fifteen minutes struggle...
But the OTHER side... took over an hour! :banghead:
Cruzr Joe
New member
:clap: :thumbup:
How much "Fun" was it; fishing the wiring out from the housing?
On the first mirror that I did; it was only a fifteen minutes struggle...
But the OTHER side... took over an hour! :banghead:
That's cause you were fishing without a license. :roflblack::roflblack::roflblack::roflblack:
Anonymous
Last edited:
easysuper
Active member
:clap: :thumbup:
How much "Fun" was it; fishing the wiring out from the housing?
On the first mirror that I did; it was only a fifteen minutes struggle...
But the OTHER side... took over an hour! :banghead:
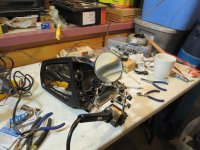
It only took 2 hours start to finish , fishing the wires out only takes about 2 minutes , the striping of the wires and soldering takes the longest as I dont cut the factory wires just strip a small section then solder on the splice, then shrink tube, fun stuff for old eyes, total cost was about $12.
Cruzr Joe
New member
It only took 2 hours start to finish , fishing the wires out only takes about 2 minutes , the striping of the wires and soldering takes the longest as I dont cut the factory wires just strip a small section then solder on the splice, then shrink tube, fun stuff for old eyes, total cost was about $12.
Try using posi-taps no wire cutting, no soldering. (Google Posi-taps for more info)
Cruzr Joe
easysuper
Active member
Try using posi-taps no wire cutting, no soldering. (Google Posi-taps for more info)
Cruzr Joe
Tried them once on a trailer Joe, I just like the no-fail connection of a soldered splice, the little tiny barb on a posi-tap does not give me a warm and fuzzy.
Bob Denman
New member
That's cause you were fishing without a license. :roflblack::roflblack::roflblack::roflblack:
Anonymous
When I do that; it normally involves a fair amount of nightfall, and some dynamite! :yikes:NorCalBud
New member
Besides the....
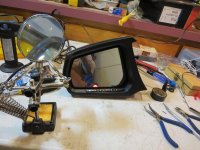
Besides these being a less expensive way to go....I really like how they light up the back of the housing as well as being seen from the front.
I have the TricLed version of this Mod in amber, which I like, but after seeing how those are glow, I might have to add some more!
Nice Job!
Besides these being a less expensive way to go....I really like how they light up the back of the housing as well as being seen from the front.
I have the TricLed version of this Mod in amber, which I like, but after seeing how those are glow, I might have to add some more!
Nice Job!
Fatcycledaddy
Active member
It only took 2 hours start to finish , fishing the wires out only takes about 2 minutes , the striping of the wires and soldering takes the longest as I dont cut the factory wires just strip a small section then solder on the splice, then shrink tube, fun stuff for old eyes, total cost was about $12.
If you don't mind me asking, how do you fish the wires through? Did you separate the front and back housing as I saw on another post, or just fish the wires through somehow?:dontknow:
I removed my mirrors last night to add some LED's but thought I would hold off untill I asked what was the best way to do it.
Thanks
Cruzr Joe
New member
If you don't mind me asking, how do you fish the wires through? Did you separate the front and back housing as I saw on another post, or just fish the wires through somehow?:dontknow:
I removed my mirrors last night to add some LED's but thought I would hold off untill I asked what was the best way to do it.
Thanks
You do not have to take the mirror apart, just drill a small hole in the thin plastic web to allow the wires to not get pinched. I will see if there is a video out there to assist you, if i find it i will post a link or maybe someone else can post a link, it is fairly simple.
Cruzr joe
GOZFST
New member
Where did you get them?After looking at many different signal lights it appered to me that the color between red and yellow is about 50/50 as for reflecting up, down, sidways, T tried it in all positions and liked this the best, as for water intrusion , water gets inside the mirrior no matter what, the thing to do is make sure you heat shrink all conections as any conection should be, I did this install on my 2013 and on my wifes also and now on my 2014, both of the last installs have had ample oppertunity to fail and have not, I just like to do some of these things myself and save the money for fuel to ride. Or for some of that great Pork Belly they sell at Costco.
easysuper
Active member
Where did you get them?
I got them at Auto Zone
GOZFST
New member
ThanksI got them at Auto Zone
Similar threads
- Replies
- 21
- Views
- 2K
- Replies
- 11
- Views
- 1K