TommyBwell
New member
I have heated gloves but commonly get caught when it is just a bit chilly and I don't want to put my jacket liner and gloves on. I think I will put some on.
My heated grips have been fitted by dealer. I will let you know my opinions of heated grips when my F3-S is delivered to me Friday. Not long now before she arrives and me posting pics of her for you.:yes::yes::yes:
Picked up the heated grips from the local dealer today and just finished reading the instructions for installation, and all I can say is wow, they shouldn't have even bothered putting them in the box.. It reads like an IKEA manual, vague pictures with NO explanation on what is required. I.E. shows a picture of the old handgrips with a picture of a garbage can, absolutely no info on how to get them off. On top of that it doesn't even tell you what panels need to be removed in order to access the wiring... Needless to say I'm very disappointed in this and may need to take it in. I will be pulling a bunch of panels first to see if I can sort this out.. fingers crossed.
Picked up the heated grips from the local dealer today and just finished reading the instructions for installation, and all I can say is wow, they shouldn't have even bothered putting them in the box.. It reads like an IKEA manual, vague pictures with NO explanation on what is required. I.E. shows a picture of the old handgrips with a picture of a garbage can, absolutely no info on how to get them off. On top of that it doesn't even tell you what panels need to be removed in order to access the wiring... Needless to say I'm very disappointed in this and may need to take it in. I will be pulling a bunch of panels first to see if I can sort this out.. fingers crossed.
Picked up the heated grips from the local dealer today and just finished reading the instructions for installation, and all I can say is wow, they shouldn't have even bothered putting them in the box.. It reads like an IKEA manual, vague pictures with NO explanation on what is required. I.E. shows a picture of the old handgrips with a picture of a garbage can, absolutely no info on how to get them off. On top of that it doesn't even tell you what panels need to be removed in order to access the wiring... Needless to say I'm very disappointed in this and may need to take it in. I will be pulling a bunch of panels first to see if I can sort this out.. fingers crossed.
Has anyone installed the Heated Grips from BRP on their F3 yet? I am on the fence about them, as I am not sure how difficult they are to install..(kind of scary thinking about removing the hardware from the handlebars for someone of my limited ability)
I'll let the dealership do it if I Have too, but would prefer to do it myself.
Any experience / advice that can be offered would be greatly appreciated.
My heated grips have been fitted by dealer. I will let you know my opinions of heated grips when my F3-S is delivered to me Friday. Not long now before she arrives and me posting pics of her for you.:yes::yes::yes:

I wish someone would start posting videos on some of these F3 accessories installs!!!!!!
Been trying to install grips on a F3-T and I'm at a standstill due to the extremely poor installation instructions. BRP should be embarrassed by these instructions, haven't seen such poor ones ever!
How do you take off the black panels on either side of the gas tank? Looks like I need to take off the console too, any suggestions.
After reading and viewing all the information on the grip installations I decided to add something from a tinkerer's point of view. I ride year round in South Jersey when permissable. I do use heated gloves and an added source of warmth never hurts especially when its in the thirties and twenties, then add in the wind chill factor.
August, 2017 Heated Grip Installation 2015 F3
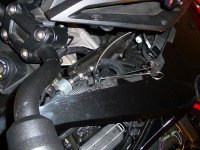
To install the heated grips on the F3 you will have to take apart the right & left handlebar controls. You will have to remove the front fairing and right side panel, which is where the connectors are located. Protect the left side panel as you will have to lay the left handlebar control on something when you remove the left handle bar completely to fit the heated grip wiring in the slot.
It helps to have a shop manual/CD which can help you with the removal & install. If you do not, just keep like parts and screws together & do one grip at a time. One other tip, have some good lighting which will help to locate those elusive connectors on the right upper side. Use the pictures from others members who took on this task. I took pictures of the pictures and they were helpful.
I removed the right side panel first. It has four T-25 screws and plastic push connectors that you will have to pry up to remove. Set these items aside and together.
I next set out to remove the left handlebar. Remove the metric hex head 5mm bolt that holds the end cap on. The control, it has five 3mm metric hex head screws that hold it together. You have to remove the two bolts T-25 torx that hold the master cylinder in place to get to one of the control screws. I set all these items on the protected left side cover. There is another cover that helps hold the cables in place on the handlebar. It has two metric hex head bolts 5mm that will have to be removed. I placed this cover with the other parts for the left handlebar. Once this was done I pulled out the slotted left metal handlebar I fit the heated grip into place & on the bar. I began to reassemble the parts. I used the picture in the instructions to put the wire from the grip in the correct position during reassembly.
The right throttle side is similar except when you remove the end cap there is a spring and a spacer inside. Watch how they come out. They go back in the new heated grip the same way. There is a small hold inside the grip where one end of the spring fits into so it is flush and you can reinstall the end cap. You will have to remove the (4) 3mm screws that hold the controls together and two 5mm bolts that hold the cover in place. This cover holds the cables in place. Remove the right throttle grip and put the new wired grip on. I took this right side wire and then the left side wire from the grip and put them in the connectors on the right side of the bike as per the pictures from BRP. (This is where using extra lighting helps you to see what you are doing.) The right side cable has an extra plug that goes in the place of the old plug from the old throttle. (No instructions) The wires are the same color. Once the three connectors are put in place, take the right side wiring and fit it into the black braided cover that holds the other cables for the right side. Turn the handlebars to their farthest point both right and left so that you have enough cable and nothing is stretched too far. Install the push handlebar switch per the pictures & plug it in. Test the switch to see if it heats the grips. Install cable ties on the new grip wires where needed for support and neatness. If it works start to reassemble covers and fairings.
The above is from a tinkerer who likes to do things for himself and is grateful to all the members that share their advice, pictures and knowledge on any subject.
After reading and viewing all the information on the grip installations I decided to add something from a tinkerer's point of view. I ride year round in South Jersey when permissable. I do use heated gloves and an added source of warmth never hurts especially when its in the thirties and twenties, then add in the wind chill factor.
August, 2017 Heated Grip Installation 2015 F3
To install the heated grips on the F3 you will have to take apart the right & left handlebar controls. You will have to remove the front fairing and right side panel, which is where the connectors are located. Protect the left side panel as you will have to lay the left handlebar control on something when you remove the left handle bar completely to fit the heated grip wiring in the slot.
It helps to have a shop manual/CD which can help you with the removal & install. If you do not, just keep like parts and screws together & do one grip at a time. One other tip, have some good lighting which will help to locate those elusive connectors on the right upper side. Use the pictures from others members who took on this task. I took pictures of the pictures and they were helpful.
I removed the right side panel first. It has four T-25 screws and plastic push connectors that you will have to pry up to remove. Set these items aside and together.
I next set out to remove the left handlebar. Remove the metric hex head 5mm bolt that holds the end cap on. The control, it has five 3mm metric hex head screws that hold it together. You have to remove the two bolts T-25 torx that hold the master cylinder in place to get to one of the control screws. I set all these items on the protected left side cover. There is another cover that helps hold the cables in place on the handlebar. It has two metric hex head bolts 5mm that will have to be removed. I placed this cover with the other parts for the left handlebar. Once this was done I pulled out the slotted left metal handlebar I fit the heated grip into place & on the bar. I began to reassemble the parts. I used the picture in the instructions to put the wire from the grip in the correct position during reassembly.
The right throttle side is similar except when you remove the end cap there is a spring and a spacer inside. Watch how they come out. They go back in the new heated grip the same way. There is a small hold inside the grip where one end of the spring fits into so it is flush and you can reinstall the end cap. You will have to remove the (4) 3mm screws that hold the controls together and two 5mm bolts that hold the cover in place. This cover holds the cables in place. Remove the right throttle grip and put the new wired grip on. I took this right side wire and then the left side wire from the grip and put them in the connectors on the right side of the bike as per the pictures from BRP. (This is where using extra lighting helps you to see what you are doing.) The right side cable has an extra plug that goes in the place of the old plug from the old throttle. (No instructions) The wires are the same color. Once the three connectors are put in place, take the right side wiring and fit it into the black braided cover that holds the other cables for the right side. Turn the handlebars to their farthest point both right and left so that you have enough cable and nothing is stretched too far. Install the push handlebar switch per the pictures & plug it in. Test the switch to see if it heats the grips. Install cable ties on the new grip wires where needed for support and neatness. If it works start to reassemble covers and fairings.
The above is from a tinkerer who likes to do things for himself and is grateful to all the members that share their advice, pictures and knowledge on any subject.