Picked up the Aux lights yesterday at Louis Powersports in Greenville, TX yesterday. It sure looked like a straight-forward installation. Remove the side panels, install the lights, install the switch, and you're good to go! I figured maybe 45 minutes, tops. 3 1/2 hours later, the job was done. As a result of this being not quite a straight forward installation, I thought I'd post a few pictures about the installation.
First, the light kit and switch...
The three threaded bolts with the clips on them install into three slotted holes. The clips are then turned 90 degrees to lock into place.
The Can Am techs must have a special tool that allows them to easily turn those clips the 90 degrees, because with the light housing frame still attached to the Spyder, there is no room to work in there. The clips do not turn by hand, let alone easily. After A LOT of frustration and trying several tools to turn those clips - screwdrivers, pliers, channel locks, 13 mm socket, needle nose pliers, I finally was able to get one to engage. But that was it.
I pulled the other bolts/clips back out and got out the razor blade. I cut a tiny chamfer at the end of each "flat" on the clip, as well as chamfered the corner of the slot, best I could. Not a great picture, but I chamfered the outer edges of the top of the "T" in the picture below. The chamfer on the clip and in the edge of the slot allowed the clip to engage the slot at an angle. Otherwise, the clip had to be in there perfectly.
I also backed the clips all the way to the end of the bolt, which allowed for the light to extend well out in front of the frame when installed. This gave me room to get a screwdriver in from the front side to work the ear on the front of the clip around to the locked position. (See next post)
- Carl
2017 Can Am F3-L (current ryde)
2015 Can Am F3-S (previous ryde)
2012 BMW K1600 (previous ride)
2016 Can Am F3-T (wife's)
DID YOU GET THE 'TRIM' PACKAGE WITH IT.....???????
mine were installed by the dealer, and had more than 1/2" space between the lights and the Tuperware....
i cut the centers out of the 'dummy' plugs, and reattached them and they look much better... showed it to my dealer the next day, and found out a week later that BRP forgot to add the trim parts... my dealer said they'd get'm for me....
Dan P
SPYD3R F3-S without trim...
'dummy' with center removed...
'dummy' installed... the trim kit, is actually exactly like my 'dummies'...
With the clips moved all the way back, it pushes the light forward, away from the housing frame.
This gave me room to use a screwdriver to rotate the clip using the ear on the forward side. Once all were locked in place, I used the power screwdriver to "screw in" the light adjustment bolts from the front side and pull the light back to the frame. I left about 0.75" clearance from the back of the light mounting bracket to the housing frame, then adjusted for aim direction, best I could. The installed light came out in this position:
The next thing I planned to install were the heated handgrips. As others have mentioned, the installation instruction for those is pretty vague - a single picture of the upper dash tupperware indicating that it should be removed, and an icon indicating to refer to the shop manual. Oh well... I wish I had looked at the handgrip installation and light installation at the same time. If the aux light housing is one of those pieces removed to install the heated handgrips, it would have been much, much easier to install the lights. I'll save the handgrips installation until next weekend.
I would love to see what tool the Can Am techs have to rotate those clips. The installation instructions only say to remove the single side panel. They were pretty silent in telling how to get those clips easily rotated into the locked position! For the price we pay for the light kit, it seems that they could include the tool (I could see a purpose-built socket that fits over the backside lobes), if there is such a thing.
- Carl
2017 Can Am F3-L (current ryde)
2015 Can Am F3-S (previous ryde)
2012 BMW K1600 (previous ride)
2016 Can Am F3-T (wife's)
DID YOU GET THE 'TRIM' PACKAGE WITH IT.....???????
Yes - I got the additional trim pieces, along with a supplemental letter saying to add the missing parts to the kit (which they did) and to replace the instruction sheet with Revision 1, March 2015. I don't think I got the revised instruction sheet, as the instruction sheet included made no mention of installing the trim pieces.
By the way, the instruction sheet estimates the installation time at approximately 1 hour. With the right tool, maybe...
- Carl
2017 Can Am F3-L (current ryde)
2015 Can Am F3-S (previous ryde)
2012 BMW K1600 (previous ride)
2016 Can Am F3-T (wife's)
I had the dealer install my lights last Saturday. Everything looks good except that the lights are aimed really high. If I park in front of my garage and back up about 20 feet, when I turn on the aux lights, a pillar of light in the middle of the bike appears up the side of my house (both stories!)
I'll try and take a pic tonight.
Is there a way to aim them? My wife was moving her car last night and I was facing her on the bike and turned them on. I thought she was going to kill me. The lights completely blinded her.
You can aim them very easily if you remove the side panels. Each of the three attach bolts can be adjusted - Philips head screwdriver from the light side, flathead screwdriver from the back side. The access won't be quite as easy from the back side, but it should be do-able.
Sent from my iPhone using Tapatalk
- Carl
2017 Can Am F3-L (current ryde)
2015 Can Am F3-S (previous ryde)
2012 BMW K1600 (previous ride)
2016 Can Am F3-T (wife's)
We just did 3 sets and it took 40 min. for all three sets. I cut a slot in a socket for the first two sets I did weeks ago but in the move the socket got lost so we just used needle nose pliers this time. I don't recommend backing out the locking nuts as that will mess up your alignment, they are factory set.
We just did 3 sets and it took 40 min. for all three sets. I cut a slot in a socket for the first two sets I did weeks ago but in the move the socket got lost so we just used needle nose pliers this time. I don't recommend backing out the locking nuts as that will mess up your alignment, they are factory set.
I like the idea of a slot in a socket. That would be perfect. First thing I tried was needle nose pliers. Those worked on one of the six. Maybe I didn't have a pair that was long and slender enough. I had a difficult time getting anything on the back side with enough room and mechanical advantage to get the locking nuts to turn. Definitely a learning curve with that installation! With the right tools and/or technique, it really should go quickly!
- Carl
2017 Can Am F3-L (current ryde)
2015 Can Am F3-S (previous ryde)
2012 BMW K1600 (previous ride)
2016 Can Am F3-T (wife's)
We just did 3 sets and it took 40 min. for all three sets. I cut a slot in a socket for the first two sets I did weeks ago but in the move the socket got lost so we just used needle nose pliers this time. I don't recommend backing out the locking nuts as that will mess up your alignment, they are factory set.
If you didn't back out the locking tabs---How did you get the lamps to the front of the housing--mine are approx 1.5" behind the lamp grill. 3 sets in 40 minutes---how long did it take you to do the first few sets before that last 3 in 40 min??
Thank you kindly for your help.
Darrell
2015 F3's , two 12 volt power outlets Orange & Black
It resembles the dummy trim piece removed to allow an opening for the aux light.
The instruction included with F3's Accessories are some of the worst I have ever seen. I wrote tech manuals with instructions for mainframe periferral equipment--i/e 500lb disk drives & 800lb reel to reel tape drives. If the current F3 manual writers were working with us---they wouldn't be working with us anymore :-(
Last edited by Wildrice; 06-12-2015 at 07:07 AM.
2015 F3's , two 12 volt power outlets Orange & Black
I had the dealer install my lights last Saturday. Everything looks good except that the lights are aimed really high. If I park in front of my garage and back up about 20 feet, when I turn on the aux lights, a pillar of light in the middle of the bike appears up the side of my house (both stories!)
I'll try and take a pic tonight.
Is there a way to aim them? My wife was moving her car last night and I was facing her on the bike and turned them on. I thought she was going to kill me. The lights completely blinded her.
Thanks
Ron
If your light pattern is a 'pillar of light' you have the lamps installed on the wrong side. Swap them left for right. it will turn each assembly 90 deg. The lines in the front lense should be vertical.
Sorry if this is a dumb question but do I have to remove a bunch of tupperware to get at the aux lights or can I just remove the silver cover over top of them?
Sorry if this is a dumb question but do I have to remove a bunch of tupperware to get at the aux lights or can I just remove the silver cover over top of them?
Just the side cover. The silver piece is part of the side panel. Four Torx bolts and a few push pins, if I recall.
- Carl
2017 Can Am F3-L (current ryde)
2015 Can Am F3-S (previous ryde)
2012 BMW K1600 (previous ride)
2016 Can Am F3-T (wife's)
I just got done installing my aux lights very easy job if you have 2 types of long needle nose pliers a straight pair and one with a slight angle to them. It took only 10 min to lock in both sides.
If your light pattern is a 'pillar of light' you have the lamps installed on the wrong side. Swap them left for right. it will turn each assembly 90 deg. The lines in the front lense should be vertical.
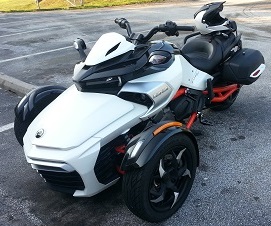
GAWD, i love that paint job......
i had 2 Corvettes, 1965 & 1998, both were NASSAU BLUE.... is your F3 that color....? sure looks like my Vettes.....
dp
SPYD3R F3-S
Ok I installed the lights and got them working and lined up. The only issue I'm having is now the neck around the key is loose. Any help or suggestions?
We just did 3 sets and it took 40 min. for all three sets. I cut a slot in a socket for the first two sets I did weeks ago but in the move the socket got lost so we just used needle nose pliers this time. I don't recommend backing out the locking nuts as that will mess up your alignment, they are factory set.
Installed. Working but...
Ok I installed the lights and got them working and lined up. The only issue I'm having is now the neck around the key is loose. Any help or suggestions?
Ok I installed the lights and got them working and lined up. The only issue I'm having is now the neck around the key is loose. Any help or suggestions?
They are all loose if you are talking about where the switch goes
GAWD, i love that paint job......
i had 2 Corvettes, 1965 & 1998, both were NASSAU BLUE.... is your F3 that color....? sure looks like my Vettes.....
dp
SPYD3R F3-S
Its Ford Blue Flame from the 2015 Pickups. Its a color shifting paint. In a dark garage is has a shade of purple/grey in it. The pic is what it looks like in bright sun. I thought it turned out well on the F3. Looks much better than on the pickups.
The Can Am techs must have a special tool that allows them to easily turn those clips the 90 degrees, because with the light housing frame still attached to the Spyder, there is no room to work in there. The clips do not turn by hand, let alone easily. After A LOT of frustration and trying several tools to turn those clips - screwdrivers, pliers, channel locks, 13 mm socket, needle nose pliers, I finally was able to get one to engage. But that was it.
Hey folks! This is my first post, but I actually have something to give back that I hope others find useful (just like I found the OPs post to be)...
I grabbed these at Home Depot for about $17. A little pricey for something that I have never needed to-date and am not sure that I will really ever need again (although, one other project comes to mind as I type this). But if your time and / or peace of mind is as valuable to you as mine are to me, then it is well worth the expenditure!!
Took me HOURS on the left side to get two of the clips locked in before buying these pliers. The last clip took me 30 seconds (it took longer to get the pliers out of the packaging). ALL THREE CLIPS on the right side took me less than 2 minutes.


 Reply With Quote