JT sells a RAM B-Ball-to-17mm adaptor needed for the TechGripper
Added a weatherproof 12V outlet for phone from Battery Tender. This is plugged into to the fused Battery Tender pigtail on the battery. The wire runs to the frunk, out of sight, behind the front fascia panel and the left service cover. This way I was able to add power to the cockpit area without removing the analog gages, and it keeps the lower cockpit area free of wires. I now use this outlet to plug in the Battery Tender. When riding, I stick a duel 2a USB charger in there to charge my phone and anything else.
LED turn signal lights for the inside of the mirrors. (Easy to see by me, and cars coming up alongside of me.)
Biketrinics CribCliker garage door opener. (Can't see this one, but it works well. Just flash the high-beams twice to open door.)
________________________________________
I was looking for a solution for where to secure my helmet when the frunk is loaded (like when stopping for lunch on an overnight trip). Came up with these handy hand-grip end helmet locks by Lidlox, a forum sponsor. They work really well. Here are pictures of them installed....
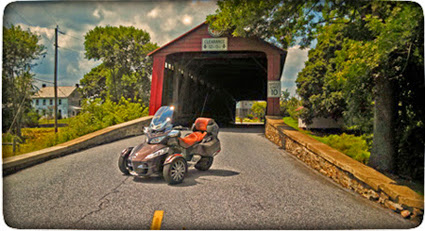
For riding and cornering stability, I've upgraded to the heavier BajaRon Anti-sway Bar, and replaced the plastic heim joint links with Ron's sturdier aluminum ones. These have made a HUGE difference in cornering stability. I no longer even need to consciously lean into normal turns anymore - just the tight ones.
..........
Ron's Shock Adjusters came on the market in early April of 2015, and I was one of the first to jump on these. I've always felt that my shocks were not doing the proper job for me. I did not know, until I recently discussed this with my dealer's service manager, that the first batches of shocks for the 2013 RT's were sub-standard. Apparently, early in the model year, they changed them for better shocks with more effective valving. So BRP agreed to replace mine under warranty. Since installation was included, this was the perfect time to also install BajaRon's new shock adjusters. The new shock with better valving has eliminated the porpoising (and occasional "bottoming out") I was experiencing. Ron's new shock adjusters, with their ability to adjust the compression of the springs, have raised my ride height by about 1.6", and has made a significant improvement to the quality and enjoy-ability of the ride. These adjusters have given me a firmer, more stable ride - especially in turns.
I have to say that the combination of the beefed up sway bar AND the shock adjusters have tremendously improved the Spyder's handling and enjoy-ability to a degree I would have never thought possible. I cannot recommend these two products enough. Also it's worth noting that while these mods from BajaRon improve the ride for just about everybody, the larger you are (or the heavier you load your Spyder) the more you need these, and the more you benefit from adding them.
Here are some pictures of the shock adjusters. My dealer installed them, at the same time as the new shocks, under warranty. They took the frunk off to do the installation. While that is not absolutely necessary, it does make the job significantly easier. These adjusters come in red and silver colors. I like the looks of the red ones on my brown Spyder.
Having the dealer perform the Rolo Laser alignment procedure (a while back) has also helped to eliminate any wandering as the spyder rides down the road.
The Missing Grill
I've always felt bad about the missing right side grill for the upper radiator outlet on the 2013 RT. The Spyder just seems "unfinished" without it. So I got this coffin grill that matches the OEM one on the left side. This one is made out of light-weight metal and powder-coated in flat black. I feel that the holes are large enough to allow almost as much heat to escape from the radiator as before the grill was added. They make a grill for the lower hole also, but I left that one open. These were sold by ESI Cycle Products, which now seems to be out of business. But see the updated information immediately below...
UPDATE: After the heat recall for 2013 RT's, I removed this after-market grill and replaced it with an actual right side radiator grill for a 2014/2015 Spyder RT. It more closely matches the left side grill, and also includes a block-off plate for the lower radiator vent hole, which helps to eliminate the heat to my right foot. This 2014/2015 part is easily installed on the 2013 RT after a little trimming along the bottom edge of the lower plate. It is BRP part number 705004803 "RH Grill", and costs just $18.99. You can see a picture of this new grill on my Spyder in this post below. Later, I covered the back side of this grill so as to block off all heat from these vents. That post is here.
Front Wear Bar
Also installed the chrome colored Wear Bar Accent "bumper" from Value Accessories...
It has four rubber scuff strips on the bottom, in case I run into anything like a curb, etc. You also get four more of these strips for future use.
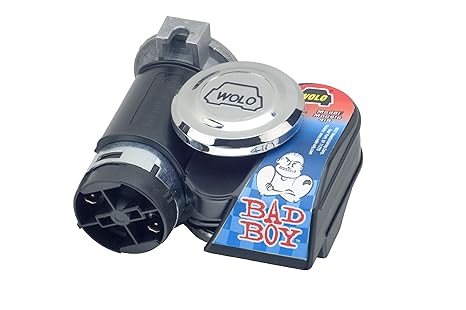
Bad Boy Air Horn
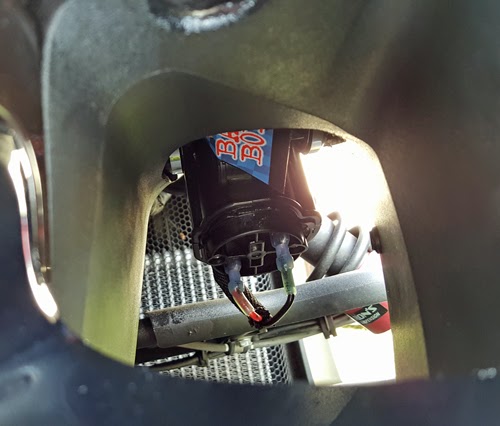
Also, I replaced the original meep-meep horn with a Wolo Bad Boy Air Horn. MUCH louder. I had it mounted in the nose on the left side, where the original horn was.
I used a horn relay, even though many folks here say it is not necessary. After checking the 2013 electrical schematics, I discovered that there are several different accessories running off the same fuse as the horn, including the heated hand grips. So I used the original horn button to operate a relay, which feeds power from the battery to the horn. (Click on the thumbnail attachment below for the wiring diagram we used.)
The horn is completely out of sight, mounted behind the left front panel under the fog light area. The only way you can see it, with the panels in place, is to shine a flash light directly up the left "nostril" of the Spyder's nose, and you can see it up there in front of the upper suspension arm and shock absorber. That's how I shot the flash picture below.
There is a black plastic casing inside that airway with a hole in the upper surface to for the original horn to stick through. We had to enlarge the hole to accommodate the larger horn, but it fit securely up in that space.
Click on the attached thumbnail below for the wiring diagram we used....
I've resolved the upper heat problem on my 2013 RT to what is now an acceptable level. Of course you're never going to stop it all, but at least it's to the point where I can ride for many hours now without my thighs getting cooked. Equally concerning is the need to limit the temperature that the fuel tank is subjected to - especially on the 2013 RT, which is noted for problems related to boiling fuel.
I know there have been a lot of posts about "taming the dragon" and I've read most of them. One of the better ones IMO was Jerbear's recent thread, "The Dragon is Dead".
After a good bit of thought, I decided to ignore the radiator area down by my my right foot. It's never bothered me all that much, as I ride with jeans, and don't ever wear light weight socks or shoes. More importantly, I've never liked the idea of installing a heat shield down there that would likely direct more heat into the engine compartment, or removing or cutting holes in the bottom pan. The heat that has always bothered me much more is the heat coming up around the side panels and the seat which tends to fry my thighs as I ride. So that's what I've concentrated on.
JT's filter replacement fix may be a good option for many and I almost went that route. But in the end, I decided against that as well. I didn't want to jeopardize my 3-year extended warranty (which, right or wrong, my dealer said would be the case), and I know I would not be happy with the louder engine noise, although many don't mind that - especially with JT's new muffler installed on the air filter.
So I basically worked with my dealer to accomplish three modifications...
First I had them wrap both exhaust headers with exhaust tape. The front header that runs all along the left side of the engine compartment is the one most responsible for the seat heat, and as you can see in the picture, it comes all the way back to the gas tank before it takes a 90 deg turn down to the cat.
Then I added heat reflective tape to the backs of both top side panels (the panels that go under the front of the seat and around the glove box). We were careful to leave the vents in those panels open, but covered everything aft of there back toward the seat. Also completely covered the backs of both and the black upper lateral panels that go under the seat and above the gas tank. We used heat reflective tape, rather than heat insulation, so as not to take up any more room behind the panels than necessary.
And finally we devised "double sided" heat tape shields (using basic heat reflective tape back-to-back) between the engine and the gas tank to block/reflect heat coming up around the tank to the seat area. Did this around the glove box as well, and where the two side panels come together in the middle. Also used this concept to block off all the open areas in the lateral panels under the seat - especially the openings for the helmet tabs and around the seat lock on the right panel.
At the same time, we did the ECM firmware update outlined in Warranty Bulletin 2013-9. Apparently what that does is to enrich the fuel mixture at idle and slow speeds to help reduce the heat coming up around the seat at slow speeds (like in city traffic).
The past two days, it's been in the 90's here, so I've taken some long rides to assess the results. Of course you are always going to feel some heat when you are sitting on top of a hot engine - especially while stalled in traffic. But for the most part, I've conquered the problem to the point that the remaining heat around the seat is down to where it is no longer objectionable. Before the mods, the four panels that we lined with reflective heat tape were always too hot to touch, and that is no longer the case. I believe that wrapping the headers is allowing a good bit of exhaust heat to flow out through the cat and muffler, thereby keeping both the engine compartment and the gas tank considerably cooler.
I've attached some pictures below for reference.
My next step is to order the Lamonster Cat Bypass Pipe from Pit Bull. I'll cover that with heat shielding exhaust tape before installing it, just like we put on the header pipes. That should make even more difference - especially toward reducing heat at the gas tank. See Message #9 below for more details.
Note: This "mod post" is a copy of an original post in the RT section. If you want to comment, or ask questions about this post, it's best to do it there so that all the comments will be together.
I've used a TPMS on my motorhome for years, and it has saved me a LOT of inconvenience and aggravation over the years. I've always wanted one for my RT, but didn't know they made them small enough to be used with rubber stems until I found out about the FOBO Bike system. As you can see in the picture below, the sensors are very small and lightweight, and should be no problem at all on the Spyder's short rubber valve stems.
After reading the comments in other threads - especially Finless Bob's thread here in the DIY forum (which includes another excellent Finless Video), I put in my order. Installation and syncing them up to my smartphone went flawlessly - and it's very accurate. Now it will no longer be a pain (on my way-too-old arthritic knees) to check the tire pressures on each tire before every ride, and even monitor the pressures on longer trips while riding. I'm lovin' this thing. I think it's going to be one of my favorite farkles before long.
Also I'm betting it'll pay for itself, maybe more than once, in longer tread wear over the life of the Spyder (because up until now, I have NOT been checking the pressures as often as I should).
Here is a screenshot of my smartphone with the monitoring app running, and a picture of one of the sending units on a tire valve....
.....
The three shaded fields on the display are telling me that the readings shown are NOT in "real time" because I'm currently in the house and the Spyder is outside in the garage, out of range. If they were "real time" readings, the fields would be white. (I'm running the rear at 25 psi, since it is a Yokohama s-Drive car tire.)
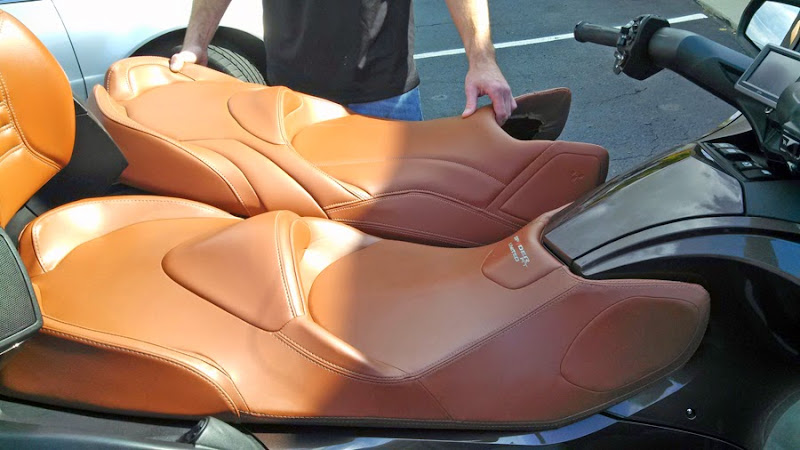
When I bought my 2013 RT, it had the standard seat on it. Because I am 6'3" tall, I knew right away that I wanted the comfort seat that sits you 2" further back for extra leg room. I added it at the time of purchase and included it in the financing.
When the Comfort Seat came in, I took a picture of the stock seat on the Spyder next to the new Comfort Seat which the guy from the dealer is holding. Compared side by side, you can really notice the difference in seat length, as well as the nicer stitching in the Comfort Seat.
Utopia Backrest
I like the BRP comfort seat, since I am tall and it gives me an additional 2" of leg room. But Can Am did not make a backrest for the 2013 edition. Fortunately, Utopia Products, in Wadsworth, Ohio does have a matching backrest for the 2013 comfort seat. They make backrests for the Spyder RT Standard Seat and Comfort Seat for any model year and in all stock colors. (For the Comfort Seat, the mounting bar is a bit shorter to accommodate the shorter distance to the pan. Other than that, the backrests for the two different BRP seats are identical.)
Both the color and the stitching are great matches for the BRP seat!
I absolutely love this backrest. It is large and comfortable. There are four height adjustments and front-to-back adjustment is continuous, just by turning a set screw. You can change that setting while sitting on the seat any time you want. On the Comfort Seat, the Utopia backrest is mounted one inch closer to the driver when measured from the front edge of the raised section of the seat behind the driver's butt. (This is necessary for the bracket to mount up to the proper spot on the seat pan.) This allows more room for the passenger, but with the continues fore/aft adjustment it does not make the driver any less comfortable. (Also, as others have reported, if you need more room when riding double, you can simply remove the backrest at the hinge, if need be.) And of course the backrest is mounted on a hinge and folds completely forward for easy rider/passenger mounting.
The backrest comes with a matching storage pouch that can easily be removed and doubles as a shoulder bag. You can also order a matching wrap to hide the hardware for $19 more. Also, I eventually replaced the OEM gas seat lift with a RhinoPac 4423, at a cost of only $13, plus $5 shipping. This lift is about 1/2" shorter, but it has a 30 lb. lifting force which makes the seat easier to lift, and now the seat stays solidly in place in the raised position despite the additional weight from the Utopia backrest.
I installed this chrome trunk rack made by "Customer World International". Looks really good, I think. At only 9" deep from the top of the seat back to the tip of the defector, it's not too big and overpowering. Yet it's plenty big enough to hold a medium sized storage bag. Also I wanted one that would not hide my Custom Dynamics top brake light from cars behind me when the rack was being used.
This is a bit expensive but very well made. Chrome rack and deflector; bolts on with chrome hex-head bolts, lock nuts, and chrome braces inside the trunk lid (between the two bolts on both sides) for extra strength. They also provide plastic lipped shims for the 4 holes you drill in your trunk lid. It also comes with rubber tape gripping strips on the sides so as to take the stress off the bolts. I added a little 3M automotive molding tape under the top lip for additional support.
Update... A few folks have asked me how to get this trunk rack. I recently looked on the Value Accessories web site and don't see it there anymore. I've looked on Custom World's Web Site, and can't find it there either. However Rivco now makes a similar one. Here it is on the Value Accessories Web Site.
Here's a quick and easy farkle that's extremely useful. Spyder Pockets from TricLed are handy zippered mesh pockets that go into the various storage compartments on the RT. I got them to fit the lids for both saddlebags and the trunk. You can securely store small things in there that you want to easily get to in a hurry. I use them for things like gloves, sun glasses, flashlight, sun shield spray, USB power cord, etc.
I was looking on TricLed for the pockets but could not find them, suggestions?
Great looking Spyder, I want all the mods.
Thanks for the complement.
As for the Spyder Pockets, I've noticed that TricLED no longer has them listed. I spent a little time looking for these on the Net for someone else a while back and couldn't find them. It's a shame because they ARE very useful little items. You may want to give TricLED a call and see if they have any suggestions for locating a source for these.
As for the Spyder Pockets, I've noticed that TricLED no longer has them listed. I spent a little time looking for these on the Net for someone else a while back and couldn't find them. It's a shame because they ARE very useful little items. You may want to give TricLED a call and see if they have any suggestions for locating a source for these.
Just curious where did you route the power cables for the items on your dash? Through the windshield mount area? And if so how hard was it to fish through there?
Just curious where did you route the power cables for the items on your dash? Through the windshield mount area? And if so how hard was it to fish through there?
No, I didn't want to go that route as the wire might get caught in the windshield mechanism. Instead, I removed the left wind deflector and the front panel just forwarded that, and routed the wire behind that panel, and into the electrical service area. From there it was easy to fish the wire down to the battery compartment. There is an in-line fuse inside the battery compartment. That weatherproof outlet , on top of the dash, also serves as the connection point for my battery tender.
in July of 2015 I took a ride up to Netzley's Tire in Accord, NY and Derrick Netzley installed a Yokohama S.drive on the rear. My exact mileage on the OEM Kenda at the time was 7873, and you can see by the picture below that it was ready to be replaced. (It was probably one of the soft-composite ones they were installing back in 2012/2013.)
The size of the Yokohama s.Drive tire is 205/55R15, which is the same diameter and sidewall width, but slightly wider at the bead than the OEM Kenda (255/50R15). Derrick said that it actually fit the Spyder's automotive rim better than the original tire. (Tire size calculators show these two tire sizes to have almost identical demensions.) This Yoko s.Drive tire has a very favorable UTQG rating of 300/AA/A
Here is a picture of my RT on Derrick's tire platform that he built. He takes this to Spyderquest, in Lake George, every year. Netzely Tire is a GREAT place to get a new tire - the service is great and the price is right. With an advance phone call, Derrick will order you in any tire you want to install. Derrick's dad, Ron Netzely, is one of the Spyderquest organizers and a long-term member of the Spyderlover Forum. I would highly recommend Netzely Tire to anyone in the Northeast. Their shop is located in the beautiful Catskill Mountains of NY. I spent 3 days there, just riding around and taking in the sites (and visiting Spyderlover Bob Denman, who also lives in the area).
As I edit this post, there are about 4000 miles on the new Yokohama, but the tread still looks almost brand new. It is not wearing in the middle, like the Kendas do. And it definately holds the road better - especially when the road is wet.
I upgraded my Sena SMH10 headset today to the new 10S that came out a few months ago. I'm glad I did. There are a lot of nice features on it. I thought I'd post a report for those wondering about the 10S. (SMH10 on the left, 10S on the right) .....
The 10S is now the immediate replacement for the SMH10 that was Sena's top headset until the 20S came out early last year. It is very much like the 20S, although a bit smaller. The main differences between the two newer units (10S & 20S) are that the 10S has only 4 group intercom channels instead of 8; and the 10S has about 33% less stated range (1 mile vs. 1.5 miles). And, of course, the 10S is less expensive. There are other minor functional differences, but those are the main ones. Since I won't be using it for group communications, the 10S was the perfect upgrade for me.
What I like about the 10S vs. my original SMH10, is that it is smaller, sleeker, and a bit more streamlined. AND it has the same speakers and sound system as the 20S. I would not say that the sound difference is "night & day" - the SMH10 had decent sound, but the 10S is noticeably better, making the music a bit more clear and crisp. Phone calls are more crisp as well (for both ends of the conversation, according to my wife). It also has a longer battery life, and the sleeker new 20S style jog dial is easier to use.
The 10S has the same "multi-tasking" audio system that the 20S has. That means that I am able to switch seamlessly between two paired music sources - like my iPod played through the SM10 BT dongle, and any music source on my phone, such as Pandora Radio. I no longer have to get off the bike to turn off the dongle in order to listen to music from my phone. I love that feature. Bluetooth technology has been upgraded to v4.1, which means lower power consumption, more sound clarity, and longer range.
I don't usually ride duel, so I cannot comment much about the intercom features. I did use the intercom once with a passenger who had an SMH10 headset. It worked well.
There is also an FM radio built into the 10S that wasn't there in the SMH10. And, all the new "S" series Sena units also feature a mobile phone app (both Android and Apple), which makes it easier to change feature settings, setup phone and radio pre-sets, and keep track of firmware updates. The apps also contain the Quick-start guide and the user manual.
Pairing devices is a bit different from the SMH10. The SMH10 had a pairing mode called "Multipoint Pairing" which allowed me to pair a third device - my Zumo GPS - which gave me the ability to have two different A2DP music devices and still hear GPS directions from the GPS and use my phone (both HFP protocols). "Multipoint Pairing" has been replaced on the "S" series units with "Selective Pairing", which means you can pair a third device (like a GPS) in only HFP audio mode, and still use it with two music inputs. However, because of the new audio "override feature", if I turn BT on for my Zumo, allowing me to hear directions, it "overrides" my ability to make and receive phone calls while the Zumo is connected. (However I can still listen to music from the phone, or the SM10 dongle, since that is a different protocol.) There IS a work-around... I can open an HFP BT link between my phone and the Zumo, which gives me back the phone functions via the GPS. There are more details about how I paired all 4 devices in the attached PDF document. (Sorry to get a bit technical here, but I figured some folks would want to know about this.)
Bottom line: The 10S is sleeker, easier to use, and sounds better than the SMH10, all of which makes me happy that I upgraded. The intercom functions are also better, but I don't use those.
Some additional reference material for those who may be interested...
Sena Press Release describing some of the upgrades of the 10S from the SMH10
A detailed description of how I paired the 10S with my phone, my SM10 BT dongle, and my Zumo GPS in both "Hands Free Phone" (HFP) and Media Protocols (A2DP) is attached to this message in PDF format (updated 5/14/16) for those who may be interested. (Mostly I wrote this for myself. I spent most all day learning how to pair everything together on the 10S, so that it all worked the way I wanted it to. I do NOT want to have to repeat that "learning experience" when I upgrade the firmware in the future. )
Before the heat recall on my 2013 RTL, I had deleted the CAT, wrapped the headers & bypass pipe, and shielded the fuel tank and the hottest panels (including the two under the seat) with heat reflective tape. Doing this rectified the worst of the original heat. So after the recall of last summer, all of my heat problems were history! - EXCEPT for that pesky dragon's mouth down by my right foot - especially when I placed my feet up on the highway pegs.
But no more.... The right foot heat is GONE!! Here's how I finally conquered it (with a bit of help from my dealer):
I had already added the 2014 radiator grill with the lower block-off plate. But while it made the Spyder look nice, it did little to stop any foot heat. The 2013 RT is unique, among 998 RT's, in that it has a radiator fan shroud that is completely enclosed and open only at the "dragon hole" forcing 100% of the radiator heat out those two vents. Therefore simply removing the bottom skid plate and adding block-off plates over the vents doesn't work because the heat would still be blocked from going out the bottom. You can see that fan shroud in the picture below (the holes in it are new)...
So what I did was this.. (The following steps correspond to the attached pictures below in the order which they appear. You can click on each of them to see the larger pictures.
1. I had my dealer remove the back half of the right bottom skid plate - the part that was directly under this fan compartment. This picture is taken from under the bike. (Dealer did it because it is difficult for me to work under the bike.)
2. Then I had them cut eight holes - approx. 2" wide - in the floor of the fan shroud, so the heat could escape through those holes, and then down through the removed portion of the skid plate. This is now how 90% of the radiator heat escapes. There is no access for it to get back into the engine compartment. Other than these eight holes, the shroud is still intact.
3. I then took my 2014 grill and molded a sheet of aluminum to the back grill contour. The aluminum blocking plate was then painted flat black and riveted to the back side of the grill. At the same time, I trimmed a small section off the bottom edge of the bottom block-off plate to allow the remaining 10% of heat to escape below it (which also happens to be slightly below the floorboard). Pictures 3 & 4 below show the front and back of this grill.
4. Picture 5 below shows what the covered grill looks like with it in place, before re-installing the right middle side panel.
The finished result, as viewed from the outside, is shown in the top picture of this post. I now can ride all summer, and even put my feet up on the pegs, without my right foot and ankle burning up.
I did the same thing. Except I used a mud flap cut to size for the grill part and attached it with heavy duty velcro. This way if for some reason the bike gets hot, I can remove the cover easily. No issue with dragon mouth again.
Before the heat recall on my 2013 RTL, I had deleted the CAT, wrapped the headers & bypass pipe, and shielded the fuel tank and the hottest panels (including the two under the seat) with heat reflective tape. Doing this rectified the worst of the original heat. So after the recall of last summer, all of my heat problems were history! - EXCEPT for that pesky dragon's mouth down by my right foot - especially when I placed my feet up on the highway pegs.
But no more.... The right foot heat is GONE!! Here's how I finally conquered it (with a bit of help from my dealer):
I had already added the 2014 radiator grill with the lower block-off plate. But while it made the Spyder look nice, it did little to stop any foot heat. The 2013 RT is unique, among 998 RT's, in that it has a radiator fan shroud that is completely enclosed and open only at the "dragon hole" forcing 100% of the radiator heat out those two vents. Therefore simply removing the bottom skid plate and adding block-off plates over the vents doesn't work because the heat would still be blocked from going out the bottom. You can see that fan shroud in the picture below (the holes in it are new)...
So what I did was this.. (The following steps correspond to the attached pictures below in the order which they appear. You can click on each of them to see the larger pictures.
1. I had my dealer remove the back half of the right bottom skid plate - the part that was directly under this fan compartment. This picture is taken from under the bike. (Dealer did it because it is difficult for me to work under the bike.)
2. Then I had them cut eight holes - approx. 2" wide - in the floor of the fan shroud, so the heat could escape through those holes, and then down through the removed portion of the skid plate. This is now how 90% of the radiator heat escapes. There is no access for it to get back into the engine compartment. Other than these eight holes, the shroud is still intact.
3. I then took my 2014 grill and molded a sheet of aluminum to the back grill contour. The aluminum blocking plate was then painted flat black and riveted to the back side of the grill. At the same time, I trimmed a small section off the bottom edge of the bottom block-off plate to allow the remaining 10% of heat to escape below it (which also happens to be slightly below the floorboard). Pictures 3 & 4 below show the front and back of this grill.
4. Picture 5 below shows what the covered grill looks like with it in place, before re-installing the right middle side panel.
The finished result, as viewed from the outside, is shown in the top picture of this post. I now can ride all summer, and even put my feet up on the pegs, without my right foot and ankle burning up.
I need to get that heat directed someplace else!!
Jim
Ryde, eat, sleep.... repeat
2019 Spyder RT Limited Pearl White/Dark LaMonster drink holder with X-Grip
LaMonster Belt Dampener
Lamonster USB cable with extension
Variously called Stormtrooper, Pearl, and Goober by wife and various (friends?)


.........


 Reply With Quote
 ..........


 ... ...


 Rob. Love the chrome rack on the trunk and wig wag brake lights.


 .....
.....
 )
)


