OverHillAndDale
Member
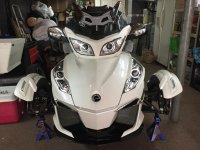
Due to some people mentioning these lights in a thread, I decided I had no choice but to install them.
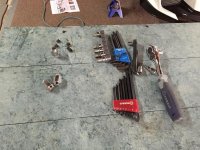
I didn't get it done in the single hour some people stated - it too me that long to get the scissors jack out of my car, get the front end on jackstands, remove the front tires and locate all the tools I needed.


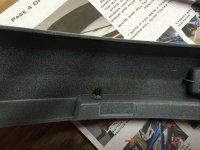
Removing the wiring/lighting channels on top of the fenders would have been easy were it not for a screw with a completely striped out head. I had to drill it out, but I got it an removed the two plastic parts with the lighting, removed the old reflectors and put in TricLine LED reflectors.
 .
.
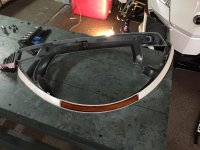
This part was easy, and had I been satisfied at this part putting the bike back together would have been easy (TricLines instructions were very good and didn't miss anything)... but I had purchased the turn signal components, so I had to dig into the mirrors, tap into the turn signal '+' wire, snake it through the to fender. This involved a lot of zip ties and a few words I shouldn't have uttered.
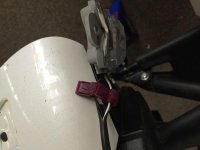
When I tried to put it all back together the left side went smoothly, but with the extra turn signal gizmo and wiring connects I'd had to install, I couldn't properly fit the wires inside the fender channel and make it fit on the fender.


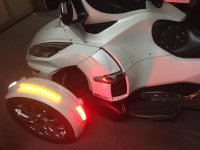
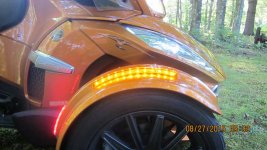
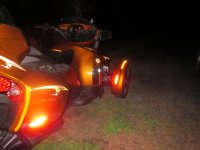
So I had to cut into the wires so I could extend them and put the connectors further away from where the front of the channel veers to the inside of the bike. I eventually got the channel back on the fender with all the extra wires neatly tucked inside. The lights are very bright, they blink Off when the turn signals blink ON. Since visibility is major component of bike safety, I've just increased my odds of avoiding a wreck.
My kit came with LEDs to replace the saddlebag reflectors, but that's for another weekend.
I didn't get it done in the single hour some people stated - it too me that long to get the scissors jack out of my car, get the front end on jackstands, remove the front tires and locate all the tools I needed.
Removing the wiring/lighting channels on top of the fenders would have been easy were it not for a screw with a completely striped out head. I had to drill it out, but I got it an removed the two plastic parts with the lighting, removed the old reflectors and put in TricLine LED reflectors.
This part was easy, and had I been satisfied at this part putting the bike back together would have been easy (TricLines instructions were very good and didn't miss anything)... but I had purchased the turn signal components, so I had to dig into the mirrors, tap into the turn signal '+' wire, snake it through the to fender. This involved a lot of zip ties and a few words I shouldn't have uttered.
When I tried to put it all back together the left side went smoothly, but with the extra turn signal gizmo and wiring connects I'd had to install, I couldn't properly fit the wires inside the fender channel and make it fit on the fender.
So I had to cut into the wires so I could extend them and put the connectors further away from where the front of the channel veers to the inside of the bike. I eventually got the channel back on the fender with all the extra wires neatly tucked inside. The lights are very bright, they blink Off when the turn signals blink ON. Since visibility is major component of bike safety, I've just increased my odds of avoiding a wreck.
My kit came with LEDs to replace the saddlebag reflectors, but that's for another weekend.