Gray Ghost
New member
I have a bit over 28000 on the bike and wanted to do some work under the tupperware, so decided to check the valve clearance while I was in thre.
All were within spec (EX: .0087~.0114", IN: .0043~.0071"). The front left exhaust was a tight .009, the right was a loose .010, the rear left exhaust was .011, the right was a tight .010. While I am not going to change anything now, I will be checking it again to keep an eye on the right front. The front left intake was a tight .005 and the front right was a loose .006, the rear intakes were both .006, the left slightly looser than the other. I will be watching that left front intake as well.
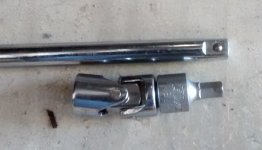
Some of the challenges with an SE5. The rearmost valve cover bolt is a major pain to get to. The engineer who laid out that section without putting a bit of a dimple in the forward edge of the gas tank needs to be sentenced to doing valve checks on these things for the next ten years. I ended up getting a 1/4" drive stubby 5mm socket from Snap-on, that worked with a universal joint and long extension.
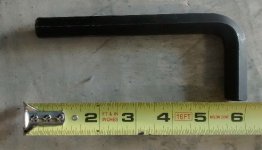
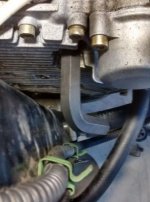
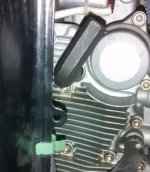
The other challenge was the engine rotation. The drawing in the service manual would lead one to believe that it takes the short leg of a L shape 14mm hex wrench. That was a wrong impression. I first tried to use a stubby 14mm socket bit, no dice. The access hole is just large enough for a 14mm to go through. The side walls of the socket would not pass. So I ordered a L shape wrench and found to my intense joy that the oil tank sits just enough to the rear that it is not a straight shot into the access hole. You have to wiggle the tank out while squeaking the tool into the access hole. And due to the location you only get about 180 degrees of rotation. Pictures of the tools and the wrench in position with the oil tank attached.


All were within spec (EX: .0087~.0114", IN: .0043~.0071"). The front left exhaust was a tight .009, the right was a loose .010, the rear left exhaust was .011, the right was a tight .010. While I am not going to change anything now, I will be checking it again to keep an eye on the right front. The front left intake was a tight .005 and the front right was a loose .006, the rear intakes were both .006, the left slightly looser than the other. I will be watching that left front intake as well.
Some of the challenges with an SE5. The rearmost valve cover bolt is a major pain to get to. The engineer who laid out that section without putting a bit of a dimple in the forward edge of the gas tank needs to be sentenced to doing valve checks on these things for the next ten years. I ended up getting a 1/4" drive stubby 5mm socket from Snap-on, that worked with a universal joint and long extension.
The other challenge was the engine rotation. The drawing in the service manual would lead one to believe that it takes the short leg of a L shape 14mm hex wrench. That was a wrong impression. I first tried to use a stubby 14mm socket bit, no dice. The access hole is just large enough for a 14mm to go through. The side walls of the socket would not pass. So I ordered a L shape wrench and found to my intense joy that the oil tank sits just enough to the rear that it is not a straight shot into the access hole. You have to wiggle the tank out while squeaking the tool into the access hole. And due to the location you only get about 180 degrees of rotation. Pictures of the tools and the wrench in position with the oil tank attached.