Tutorial- Added LED headlight bulbs to a Spyder RS 2008- Some DIY required
I just completed a marathon session today installing LED lights into me 2008 RS. The original bulbs are H7 and thats what I replaced them with. Trouble is the retainers that hld the halogens DO NOT FIT LED's ... This is what needs to be done to make them fit and work..
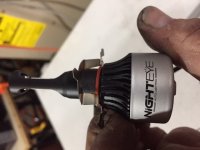
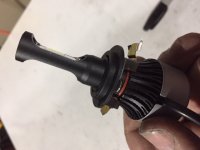
I purchased "NightEye" 6500K LED bulbs from Amazon.ca 3 years warranty and I have had good luck with them in the past
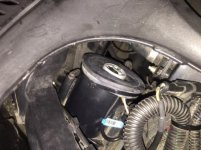
1-Remove cluster and windshield to gain access to the headlights.
2-Remove the headlight housing rubber shield and the bulb come out by rotating counterclockwise. (they are DARN hard to turn.. if really bad- back out the Torx head screws a bit to loosen the rotation (T20) (one each side holding the retainer in)
3-Pry out the clips holding the connector on the bulb, remove and separate the retainer from the bulb
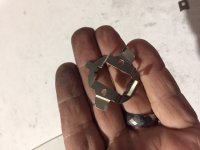
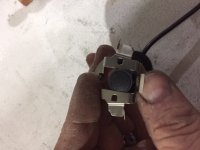
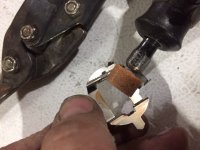
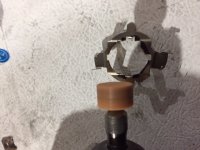
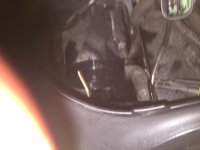
4-Examine whatever bulb you have- Almost all will need the retainer modified- See pictures - the square hole needs to be made round, the retainer clips come off as well as the tiny tabs that will stop the LED bulb sitting flat on the retainer. I used a dremel with a grinding wheel- makes quick work of it. A pair of tin snips can be used to trim and lessen the grinding.
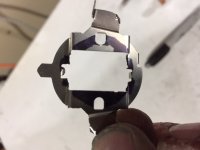
5-Depending on the LED design - trin and grind enough so the reatiner will fit under the H7 flange.
6-Assemble and place back in the housing- Its tight in there and a real pain in the butt to line everything up. I loosened the torx screws to make it easier to rotate the LED- then tightened again afterwards.
7- I elected to have the wires outside the headlight can.. So I cut a hole in the rubber boot and a VENT hole to allow air exchange to help cool the LED's (mine have fans) Placed the rubber boot back on OVER the wires then used tye wraps around the boot to secure (theres a nice groove to retain the tye wraps.
Test and all good!
This method will work however I believe a Mercedes has retainers (search Amazon) that have round hole that may fit without too much rework.. I elected to use the stock ones as thats what I had. Any questions- Please i'm all ears.. A nice project albeit a tad frustrating!
Cheers
Dave
I just completed a marathon session today installing LED lights into me 2008 RS. The original bulbs are H7 and thats what I replaced them with. Trouble is the retainers that hld the halogens DO NOT FIT LED's ... This is what needs to be done to make them fit and work..
I purchased "NightEye" 6500K LED bulbs from Amazon.ca 3 years warranty and I have had good luck with them in the past
1-Remove cluster and windshield to gain access to the headlights.
2-Remove the headlight housing rubber shield and the bulb come out by rotating counterclockwise. (they are DARN hard to turn.. if really bad- back out the Torx head screws a bit to loosen the rotation (T20) (one each side holding the retainer in)
3-Pry out the clips holding the connector on the bulb, remove and separate the retainer from the bulb
4-Examine whatever bulb you have- Almost all will need the retainer modified- See pictures - the square hole needs to be made round, the retainer clips come off as well as the tiny tabs that will stop the LED bulb sitting flat on the retainer. I used a dremel with a grinding wheel- makes quick work of it. A pair of tin snips can be used to trim and lessen the grinding.
5-Depending on the LED design - trin and grind enough so the reatiner will fit under the H7 flange.
6-Assemble and place back in the housing- Its tight in there and a real pain in the butt to line everything up. I loosened the torx screws to make it easier to rotate the LED- then tightened again afterwards.
7- I elected to have the wires outside the headlight can.. So I cut a hole in the rubber boot and a VENT hole to allow air exchange to help cool the LED's (mine have fans) Placed the rubber boot back on OVER the wires then used tye wraps around the boot to secure (theres a nice groove to retain the tye wraps.
Test and all good!
This method will work however I believe a Mercedes has retainers (search Amazon) that have round hole that may fit without too much rework.. I elected to use the stock ones as thats what I had. Any questions- Please i'm all ears.. A nice project albeit a tad frustrating!
Cheers
Dave
Attachments
-
 IMG_7011.JPG80 KB · Views: 87
 -
 IMG_7012.JPG76.6 KB · Views: 73
 -
 IMG_7013.JPG95.2 KB · Views: 69
 -
 IMG_7015.JPG65.8 KB · Views: 70
 -
 IMG_7016.JPG93.6 KB · Views: 68
 -
 IMG_7019.JPG81.4 KB · Views: 75
 -
 IMG_7020.JPG68.9 KB · Views: 70
 -
 IMG_7021.JPG58.6 KB · Views: 73
 -
 IMG_7022.jpg47.2 KB · Views: 70
 -
 IMG_7023.JPG61.6 KB · Views: 61
 hyea:
hyea: