• There were many reasons for the change of the site software, the biggest was security. The age of the old software also meant no server updates for certain programs. There are many benefits to the new software, one of the biggest is the mobile functionality. Ill fix up some stuff in the coming days, we'll also try to get some of the old addons back or the data imported back into the site like the garage. To create a thread or to reply with a post is basically the same as it was in the prior software. The default style of the site is light colored, but i temporarily added a darker colored style, to change you can find a link at the bottom of the site.

Tri-axis handlebar

brerrabbit

New member
I installed a tri-axis handlebar on my 2018 RTL a while back. It is amazing what is did for my aching back. It took a while to install due to same aching back issues but when finished the change was amazing. I bought the kit from a forum member and it was missing a couple parts. One I got from amazon, the other, the rubber boot around base, is still not 'repaired'. I plan on making one out of leather.

My wife & I switched bikes today for a short ride so she could check out the 'Honda grips' I had installed. The grips were too big for her but the handlebar got her attention real quick. She said to get one on hers ASAP.

Anyone have one they want to sell?

=bob=
 
Hey Bob. Those were the only parts missing?

Glad it helped you out.

The foam grips work pretty well too for most of us.

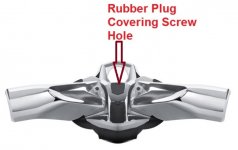
There was one more missing part, something screws into the top front center of the bar. Logo plate or something. Leaves a screw hole that I plugged. Will see when the new on comes in as to what it is supposed to be.
 
There was one more missing part, something screws into the top front center of the bar. Logo plate or something. Leaves a screw hole that I plugged. Will see when the new on comes in as to what it is supposed to be.

Rubber Plug that covers GPS mount screw location.Tri-Axis Plug.jpg
 
How terrible of a task was it to install The Tri-Axis?

It wasn't too bad. Took some time as had to remove a lot of panels, glove box, console unit and I removed the frunk so I could get a good grip on the console unit when I lifted it off. All of this stuff comes off so you can get to 2 screws that hold the switch housing on. As 'finless' would say, pretty fiddly. As things came apart I kept the screws etc. in separate containers and labeled them. I also counted the wire connections on each one and put that on the label as well. The console was the heaviest but not bad. My wife helped line it up when I put it back on. Finless has some good videos on the installation but I found a few things on the '18 RTL not mentioned in his videos. When I do the one for my wife, I'll try to take notes and pictures of some trouble spots.

That said, it took 3.5 days to complete as I could only work short bursts due to back aches and physical therapy hadn't started yet. Most of one day was trying to figure out how to get the fog light panels out of the way. I finally figured out they come off with the frunk. The frunk is held on by only 4 screws as I recall. A 'DUH' moment.

=bob=
 
The frunk is held on with 4 screws on the top and two under. The first time I tried to remove it I was not aware that you need to lift it up to remove it from its hangers.
 
Yeah there is a lot of stuff to remove just to put on the TRI Bars that's for sure. But its not really that bad as long as you take your time.
 
The frunk is held on with 4 screws on the top and two under. The first time I tried to remove it I was not aware that you need to lift it up to remove it from its hangers.

Yeah, I remember now. When I took it off, it had two on the top. Neither hole had threads in it and the screws looked like they had been pounded in, all stripped. When I put it back on, I threaded the holes and put in small bolts. I got it back on and tried to add the two bolts in the center but those holes were not threaded either. I don't know why I didn't try to thread them before I mounted the frunk, but was able to thread them without removing the frunk again by taking out the headlights. Then added those two bolts and all was well.

=bob=
 
How terrible of a task was it to install The Tri-Axis?
Not bad, but make sure to hold onto all the screws and other parts. There is a plate with two screws that holds the ignition switch in place. Drop the plate and you're in for one h*** of a time retrieving it. I now own a Home Depot inspection camera I bought in order to find mine!
 
With all the handlebar installations here, anyone find out a place to download the instruction manual or adjustment guide? :dontknow:
 
Does anyone know definitively if the Tri-Axis bars will fit on an ST?
I've been thinking about adding...
 
Hi...checked the links provided and thanks!!!!! Didn't need the installation part as the dealer did that for me, but the adjustment part looks helpful...if I can figure it out....;)
 
Back
Top