• There were many reasons for the change of the site software, the biggest was security. The age of the old software also meant no server updates for certain programs. There are many benefits to the new software, one of the biggest is the mobile functionality. Ill fix up some stuff in the coming days, we'll also try to get some of the old addons back or the data imported back into the site like the garage. To create a thread or to reply with a post is basically the same as it was in the prior software. The default style of the site is light colored, but i temporarily added a darker colored style, to change you can find a link at the bottom of the site.

Saddle bags, a work in process

oregoncoast

New member
I have wanted some saddle bags for some time, I use my Ryker daily and it would be nice to do a little shopping and have room for rain gear etc. https://www.ebay.com/itm/Leather-Mo...630720?hash=item547163fb80:g:JOoAAOSwKg9dBnxq
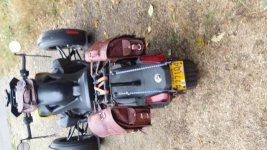
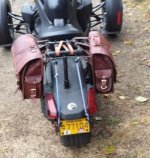
Bought these bags and made a temporary frame from abs pipe. I have tested it with about 12 ilbs on both sides at high speeds and there fine. I still am not sure what to do with the rear bracket, just sitting on a leather stripe to not make up the fender. I made a cable with lock to go through the bags so they don't disappear. When down the road I will either make a stronger frame or look at a max mount. I have just under 10,000 miles on my Ryker and still having a blast riding. Sorry about the pic being sideways, don't know how to change it on this web page.
 

Attachments

  • 20190901_082105.resized.jpg
    20190901_082105.resized.jpg
    49.2 KB · Views: 322
I am looking at doing the same thing. I want a luggage rack to haul stuff that won't fit in the saddlebags, but I also want the saddlebags. But, I want the luggage rack easily removable so that I can slide the passenger seat on if my spouse wishes to ride with me.
 
I'm doing the same thing and will be working on a bent tubing frame for supporting the side bags from swinging in and hitting the rear tire on my Rally.
I have experience bending tubing but I don't have one at home so I am right now looking into getting a 1/2" tubing bender. I will keep you updated on my progress.
 
Nice job! For running around town, rain gear, water bottle. Perfect. I had no idea leather saddlebags were so cheap! Good find!!
 
Love the DIY's

Well done and when the testing is done you will have just what you need. With this leg work done you will help a lot of folks work out the same problem. This is what the site is about...:2thumbs: Thank and let us know how the final set up works out....:bowdown:
 
Here is what I have so far. They are made out of 3/8" dia 316 Stainless tubing and attach between the two 8mm bolts under the seat and the 8mm bolts on my passenger seat backrest. I bent the tubing and then flattened the ends out where the bolts go through to make a wider through hole area. I also added stainless washers behind the tubing because the original bolts were counter bored into the frame.

I am still in the process of finishing them. I'm adding JB weld to permanently attach the washers to the tubing for extra stability and then everything will be painted black.


IMG_20190921_110054 (2).jpg IMG_20190921_110103 (2).jpg IMG_20190921_110115 (2).jpg
 
Here is what I have so far. They are made out of 3/8" dia 316 Stainless tubing and attach between the two 8mm bolts under the seat and the 8mm bolts on my passenger seat backrest. I bent the tubing and then flattened the ends out where the bolts go through to make a wider through hole area. I also added stainless washers behind the tubing because the original bolts were counter bored into the frame.

I am still in the process of finishing them. I'm adding JB weld to permanently attach the washers to the tubing for extra stability and then everything will be painted black.


View attachment 175826 View attachment 175827 View attachment 175825

Nicely done:firstplace:
 
Nice job, there are as many ways as there are ideas. I ended up making my from from 1/2 copper and painted black. I had to keep it lower than the seat so with my back and leg issues I could still get my leg over the seat. It sure is nice to have storage for clothes food or what ever I need at the time.Stainless would be better but where I live on the coast I'm lucky to have hardware stores.
 
Nice job, there are as many ways as there are ideas. I ended up making my from from 1/2 copper and painted black. I had to keep it lower than the seat so with my back and leg issues I could still get my leg over the seat. It sure is nice to have storage for clothes food or what ever I need at the time.Stainless would be better but where I live on the coast I'm lucky to have hardware stores.

Yeah, hardware stores around here don't carry stainless either. I got mine from McMaster Carr and went with the lighter weight .031 thick wall, knowing that tubing is already going to be very rigid so lighter weight walls were fine. Plus my tubing bender was able to handle thin walled stainless.
 
I have built several pieces to bolt on behind the passenger grab handles on the F3-S out of stainless steel. Currently working on saddlebag mounts when I have the time. I used small diameter solid stainless steel round stock. It can be easily heat bent without collapsing and is available on the internet.

https://www.onlinemetals.com/?gclid=EAIaIQobChMIg6j7v_fk5AIVCK_ICh1sQQTvEAAYASAAEgLQJfD_BwE

They sell small amounts by the foot or custom cut, many different metals and sizes. Flat stock, round stock, tubing, sheet, whatever you need. Always got fast service dealing with them.
 
Here is what I have so far. They are made out of 3/8" dia 316 Stainless tubing and attach between the two 8mm bolts under the seat and the 8mm bolts on my passenger seat backrest. I bent the tubing and then flattened the ends out where the bolts go through to make a wider through hole area. I also added stainless washers behind the tubing because the original bolts were counter bored into the frame.

I am still in the process of finishing them. I'm adding JB weld to permanently attach the washers to the tubing for extra stability and then everything will be painted black.


View attachment 175826 View attachment 175827 View attachment 175825

Nice job. Professional looking. How do you get the passenger seat off, or are you planning to leave it on permanently?
 
Nice job. Professional looking. How do you get the passenger seat off, or are you planning to leave it on permanently?

I have no plans on removing the passenger seat. I like the look of the passenger seat and backrest over the rear wheel. If I did want to remove the seat, I would have to remove the 4 bolts holding on the saddlebags supports.
 
i had a little set back on finishing these. I originally mounted them to the frame and had to buy longer 8mm bolts since they would no longer be sitting in counterbores. I decided to get stainless steel...figuring I was being smart since SS handles weathering better.
Bad move...but found out something interesting.
The bad thing was that one of the bolts ended up galling inside the threads on the frame of the Ryker. I managed to get it out after drilling off the head and then working it out slowly but surely using some channel locks.

The good news is that the threads on the frame of the Ryker are stainless so that's a plus in my book.
 
Your not the only one with a issue. My first set of copper I had used both bolt holes on each side, forgetting the seat moves. I cracked a hole in the copper, I replaced it and just used the first hole and also put a wood dowel in the copper where the bolt goes through. So after a couple of weeks it seem ok, but I check the whole rack over before every ride. You will figure it out.
 
i had a little set back on finishing these. I originally mounted them to the frame and had to buy longer 8mm bolts since they would no longer be sitting in counterbores. I decided to get stainless steel...figuring I was being smart since SS handles weathering better.
Bad move...but found out something interesting.
The bad thing was that one of the bolts ended up galling inside the threads on the frame of the Ryker. I managed to get it out after drilling off the head and then working it out slowly but surely using some channel locks.

The good news is that the threads on the frame of the Ryker are stainless so that's a plus in my book.

Stainless steels are prone to galling when similar alloys are used together. You may remember the galling issues when manufacturers of Model 1911s began producing stainless steel frames and slides back in the late 1970's. The answer then (and now) is to use Never Seize (or a similar product) during assembly. This is a copper based grease that will prevent the problem.
 
Thanks to you, I have a set of those bags! Nice, hold what we need, look cool, and thrifty! Thanks for the inspiration! Joe
 
Here is my finished product. I painted the stainless tubing flat black (though it looks more satin to me) and I have Sedici saddlebags that I got at Cycle Gear for $120. I have the saddlebags attached to the tubing with some two sided velcro strapping that I got at the hardware store.

IMG_20190929_132906.jpgIMG_20190929_132927.jpg
 
Back
Top