MDBrion
New member
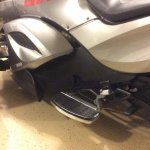
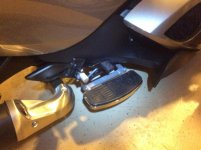
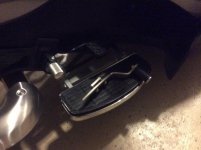
I installed the Rivco CA020-WO Driver Floorboard on my 2011 RSS today. I'm holding off installing the ISCIRIDE.com brake extender until I'm sure I'm pleased with the floorboards since the installation requires a level of modification which can't be undone without replacing the entire OEM brake pedal ($75 and a whole lotta labor). The installation took ~2 hours and required a bit of ingenuity to get the engine mount replacement bolts installed. The Rivco provided hardware left something to be desired. The bolt used for the foot peg mount was stainless steel, the engine mount replacement bolt was anodized and the bracket bolt was a lower grade steel cadmium bolt (guess they have never heard of dissimilar metal corrosion).
Rivco's instructions are totally ridiculous and don't apply to the CA020-WO part. The instructions cover the 2013 variant of floorboards but are suppose to be similar to the 2012 and earlier models, (THEY ARE NOT). The instruction are basically worthless. I called Rivco to see if there were instructions for the CA020-WO specific install and it was an exercise in futility. I most likely could have cut install time by 1/2 hour had the instruction been even remotely
applicable.
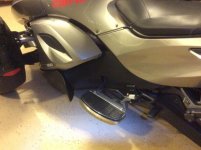
Once the install was complete I was pleased with the change in rider positioning and quality of the basic floorboard and mount bracket. I'm 5'8" and in addition to the floorboard have previously installed a 1.5" riser block on my handlebars. The stubby sport pegs which can be stowed are a nice addition in the event I want to switch riding position back to a more agressive stance. The isolation / dampening mounts on the floorboards are also a nice addition and should cut down on fatigue during longer rides.
Lastly the light silver brackets and chrome floorboard base don't match the gloss black and metallic silver color scheme of the RSS and tend to make the floorboards standout as definitively an aftermarket addition. I'll continue to ride the Spyder and ensure I'm comfortable with the change and after a few weeks or so if I decide to keep the floorboards I'll remove them for the brake pedal modification which entails removing the rubber pad and using a grinder and cutoff wheel to remove the horizontal portion of the pedal and drilling the vertical brake bracket and mounting the extender. After which I will paint the bracket and possibly the chrome base a gun metal gray to match the OEM surrounding parts....

Rivco's instructions are totally ridiculous and don't apply to the CA020-WO part. The instructions cover the 2013 variant of floorboards but are suppose to be similar to the 2012 and earlier models, (THEY ARE NOT). The instruction are basically worthless. I called Rivco to see if there were instructions for the CA020-WO specific install and it was an exercise in futility. I most likely could have cut install time by 1/2 hour had the instruction been even remotely
applicable.
Once the install was complete I was pleased with the change in rider positioning and quality of the basic floorboard and mount bracket. I'm 5'8" and in addition to the floorboard have previously installed a 1.5" riser block on my handlebars. The stubby sport pegs which can be stowed are a nice addition in the event I want to switch riding position back to a more agressive stance. The isolation / dampening mounts on the floorboards are also a nice addition and should cut down on fatigue during longer rides.
Lastly the light silver brackets and chrome floorboard base don't match the gloss black and metallic silver color scheme of the RSS and tend to make the floorboards standout as definitively an aftermarket addition. I'll continue to ride the Spyder and ensure I'm comfortable with the change and after a few weeks or so if I decide to keep the floorboards I'll remove them for the brake pedal modification which entails removing the rubber pad and using a grinder and cutoff wheel to remove the horizontal portion of the pedal and drilling the vertical brake bracket and mounting the extender. After which I will paint the bracket and possibly the chrome base a gun metal gray to match the OEM surrounding parts....