spyderbirds
New member
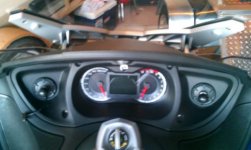
Recently my gas gauge started bouncing and that gave me the incentive to go ahead and pull the gas and temp guages.
They now appear on the main display.
Purchased the Zumo 220 and using the cradle, arm, and wiring supplied with this I was able to connect power where the fuel guage used to connect.
Connected to the 12 volt positive formerly to the light on gauge as well as the ground wire that the gauge used for the Garmin supplied wiring harness.
I prefer not to have cell phone connected to the scala bluetooth headset so the Zumo fit my needs a bit more economically than the 550 or 660 models.
The bluetooth into my helmet was a must as I didnt want to be distracted by trying to view route on GPS while in traffic. Plus the Zumo allows you to preplan your route on the computer and upload it to your unit as a custom route.
I was less than a week out from a 10 day 4000+ mile trip when I began this and didnt get the BRP gauge caps ordered in advance so used a temporary solution for capping off the guage holes and mounting the GPS and the cup holder. I tried several things and finally settled on a sandwich made from a 2.375" diameter "magic slider" furniture mover with a Ball jelly jar lid on each side for added rigidity. I had the slider and one jar lid outside the panel and another jelly jar lid behind the panel for back plate. See below front and back of panel.
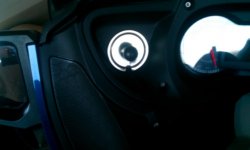
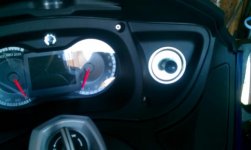
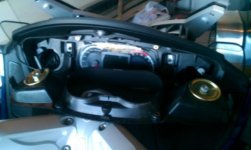
I used the 1" ram ball with 10MM male thread to attach to the make shift hole plug. Also cut a slot for the power cable to route through this plug for the Zumo. This temporary solution was not real pretty and not as rigid as I desired but it did get us through the trip.
The permanent solution is MUCH more rigid and so far have no vibration in GPS on the roughest road I know of close to home. Ordered the BRP part # 705003421 Guage cap for each hole. I had hoped these would snap into the panel secure enough to hold GPS and cup holder securely but this was not the case. They snap in and are only held by three small tabs that catch on back of hole in panel. With the GPS cradle on the ram ball just wiggling the unit side to side made the cap (cradle GPS and all) pop out of panel into your hand.
For the fix i transitioned from the 1" ram ball with 10 MM male thread to another ball with 5/16 female threads for each device. The thread length of the male thread version is very short only around .300" and is pretty much useless for attaching through something. Next i modified the magic sliders i already had on hand for use as a backplate. These sliders are just a semi hard rubber covered on one side with a thin hard plastic shell. I cut three slots to avoid pushing on the three tabs in the BRP cap and used a 1.625 fender washer to bolt this on back side of the panel.
The result is a very rigid unit that now has virtually no vibration of the GPS while on rough roads.
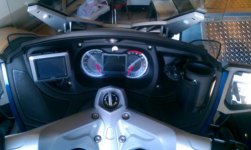
I obtained most of the parts used from GPS city
Zumo 220
Cup holder w ball Ram-B-132BU
2 each 1" Ram balls with .312-24 female threads RAM-B-358U
Arm double ball socket RAM-B-201UA
BRP guage cap #705003421
The magic sliders are available at most hardware stores or Walmart, I found a 4 pack of the 2 3/8" diameter for $7.
Also used 5/16-24 hex bolts and 1 5/8" fender washers.
They now appear on the main display.
Purchased the Zumo 220 and using the cradle, arm, and wiring supplied with this I was able to connect power where the fuel guage used to connect.
Connected to the 12 volt positive formerly to the light on gauge as well as the ground wire that the gauge used for the Garmin supplied wiring harness.
I prefer not to have cell phone connected to the scala bluetooth headset so the Zumo fit my needs a bit more economically than the 550 or 660 models.
The bluetooth into my helmet was a must as I didnt want to be distracted by trying to view route on GPS while in traffic. Plus the Zumo allows you to preplan your route on the computer and upload it to your unit as a custom route.
I was less than a week out from a 10 day 4000+ mile trip when I began this and didnt get the BRP gauge caps ordered in advance so used a temporary solution for capping off the guage holes and mounting the GPS and the cup holder. I tried several things and finally settled on a sandwich made from a 2.375" diameter "magic slider" furniture mover with a Ball jelly jar lid on each side for added rigidity. I had the slider and one jar lid outside the panel and another jelly jar lid behind the panel for back plate. See below front and back of panel.


I used the 1" ram ball with 10MM male thread to attach to the make shift hole plug. Also cut a slot for the power cable to route through this plug for the Zumo. This temporary solution was not real pretty and not as rigid as I desired but it did get us through the trip.
The permanent solution is MUCH more rigid and so far have no vibration in GPS on the roughest road I know of close to home. Ordered the BRP part # 705003421 Guage cap for each hole. I had hoped these would snap into the panel secure enough to hold GPS and cup holder securely but this was not the case. They snap in and are only held by three small tabs that catch on back of hole in panel. With the GPS cradle on the ram ball just wiggling the unit side to side made the cap (cradle GPS and all) pop out of panel into your hand.
For the fix i transitioned from the 1" ram ball with 10 MM male thread to another ball with 5/16 female threads for each device. The thread length of the male thread version is very short only around .300" and is pretty much useless for attaching through something. Next i modified the magic sliders i already had on hand for use as a backplate. These sliders are just a semi hard rubber covered on one side with a thin hard plastic shell. I cut three slots to avoid pushing on the three tabs in the BRP cap and used a 1.625 fender washer to bolt this on back side of the panel.
The result is a very rigid unit that now has virtually no vibration of the GPS while on rough roads.


I obtained most of the parts used from GPS city
Zumo 220
Cup holder w ball Ram-B-132BU
2 each 1" Ram balls with .312-24 female threads RAM-B-358U
Arm double ball socket RAM-B-201UA
BRP guage cap #705003421
The magic sliders are available at most hardware stores or Walmart, I found a 4 pack of the 2 3/8" diameter for $7.
Also used 5/16-24 hex bolts and 1 5/8" fender washers.

