Hokiev
New member
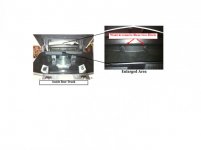
I am trying to install the LED rear trunk light and switch that Lamont demonstrated in a previous thread.
I am having trouble figuring out how to remove the two plastic bolts/rivets that are holding the top plastic cover in place.
There are two philips head screws toward the bottom that I have removed.
It is the two larger plastic rivets at the top with what looks like a flat head plastic screw in the center post.
I have tried turning, prying, twisting, etc. and I am not having any luck getting them out. They do not appear to have the small slot to lift out like the other plastic rivets have on the Spyder.
Prior to ruining them permanently, does anyone know how to properly remove them?
Thanks for your help.
Click image to enlarge.
Attachments
Last edited:

