• There were many reasons for the change of the site software, the biggest was security. The age of the old software also meant no server updates for certain programs. There are many benefits to the new software, one of the biggest is the mobile functionality. Ill fix up some stuff in the coming days, we'll also try to get some of the old addons back or the data imported back into the site like the garage. To create a thread or to reply with a post is basically the same as it was in the prior software. The default style of the site is light colored, but i temporarily added a darker colored style, to change you can find a link at the bottom of the site.

OEM F3 Spyder floorboard dimensions

troop

Well-known member
Hey all,
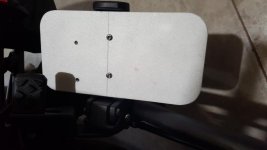
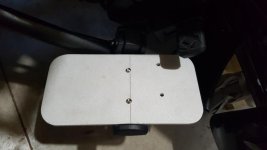
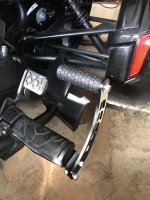
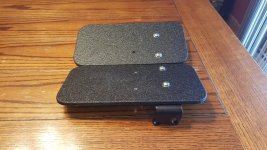
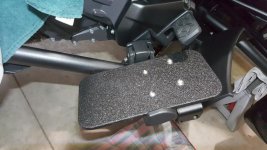
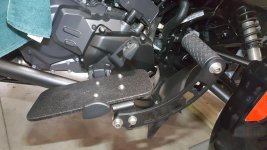
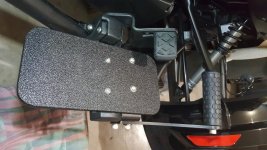
I have a couple questions for those F3 owners with OEM floorboards. My good buddy says he knows a guy who might be able to make me some floorboards. Can you owners tell me the length of the OEM F3 floorboards? Also, are they a bit longer to the front or rear from center ? I popped a peg pad off to know I need them 5.75" wide. I also have my pegs in +5 position, so I'm thinking an overall length of around 10" or 11" would be good. Thanks for any input...
 

Attachments

  • s-l1600 (1).jpg
    s-l1600 (1).jpg
    57.9 KB · Views: 16
The driver OEM floorboards on my 2017 F3L are, as LifeLongRider says, 11.5" in overall length. They are slightly longer from the pin-hole attachment point to the rear than to the front. I made this out to be 5-1/4" from front edge of floorboard to pin, and 6-1/4" from pin to extreme back edge of floorboard. Hope this helps. There are other makes of floorboards with different shapes and dimensions, so I think you could custom make to fit as you wish. The extreme width of my floorboards is 5-1/2" at mid point, with the outer edge being a (nearly) straight line, front to back, and the inside edge tapering from mid-point (pin) to a 4" width at front, and tapering to a a 4-1/2" width at rear. These measurement do not include the bracket which couples the boards to the frame tube; just the foot pad alone (which is rubber-covered, so that the metal plate itself is likely slightly shorter/narrower than the dimensions quoted).
 
This may be obvious - but I tend to be a sucker for the obvious. Keep in mind the pegs mount differently than the boards. So if you have pegs now - the boards made will need to be fashioned in such a way that they mount to the pegs. I hope that makes sense. I bought my F3S used - and someone had made some diamond plate boards that I like well.

IMG_1874.jpg
 
Yup .. Their is a company that makes replacement boards for the F3(S). I have my board dimensions mocked up. I have my pegs in the +5 spot and everything will clear. They're going to be 11" L and 5-5/8" W to accommodate Line-X coating. The center mounting point will be at 6" from peg center, allowing a bit more room to the rear. With the pads off, the pegs have a slight curvature to them, so I'll shim the mounting bolts with either aluminum spacers or SS washers, as the gap will be very thin. I'm going to install some Spyder accessory brand highway pegs to the front to allow some extra foot movement. The highway pegs will clear the rear of the front fenders by a couple of inches, so no worries there. A local metal worker is only charging me, approx, $60 to do the boards. They will be made out of 6061 1/4" thick aluminum. I will give him my mock dimensions and foot pads for proper hole placement, along with my highway peg mounts for proper placement. He'll half circle the corners and countersink all mounting holes and sand blast for Line-X coating. The local Line-X guy is going to charge me, approx, $25 to spray the boards. Being in WI, I'll likely start the process later next week. They'll be a fill in job, so may not be ready for a few weeks. Nice thing, I'll be able to alternate between boards and pegs with two bolts (screws) from each side. Yee hawww :)

** Anyone find it weird how Can-Am cheaps out on the rubber pad mounts with two small allen SS sheet metal screws !!
 
Getting there. Boards are cut, fitted, drilled, and now off the Line-X sprayer. The extra forward, drilled holes are for some highway pegs I bought used from a forum member. They bolt right on and fit/look great.
 

Attachments

  • 20200126_164052_001 (1).jpg
    20200126_164052_001 (1).jpg
    30.6 KB · Views: 29
  • 20200126_164103.jpg
    20200126_164103.jpg
    25.9 KB · Views: 25
  • 800_a9f11fb099e0e470060f8976d866762237246821.jpg
    800_a9f11fb099e0e470060f8976d866762237246821.jpg
    45.5 KB · Views: 29
I get it, not for everyone. Neat thing is that I'll have to feet options as simple as removing/installing (2) nuts/bolts per side. I'll post follow up pix once I get the boards back from the Line-X sprayer..
 
Getting there. Boards are cut, fitted, drilled, and now off the Line-X sprayer. The extra forward, drilled holes are for some highway pegs I bought used from a forum member. They bolt right on and fit/look great.

Very similar to what the Previous Owner of my F3S made. Mine aren't as long as yours though. I was thinking of buying those same highway pegs and mounted them the normal way (as intended). I'm wondering if they will be far enough forward of my boards to do me any good - so I"m very interested in seeing how those work mounted in your secondary holes. I worry about how they will hold up. How thick is your "board"?
 
Very similar to what the Previous Owner of my F3S made. Mine aren't as long as yours though. I was thinking of buying those same highway pegs and mounted them the normal way (as intended). I'm wondering if they will be far enough forward of my boards to do me any good - so I"m very interested in seeing how those work mounted in your secondary holes. I worry about how they will hold up. How thick is your "board"?

They are .25" inch thick T6061 aluminum. Very stout. They are for the rider, not passenger boards. The highway peg mount(s) are basically butted up against the forward side of the rider peg, so this would be at the most rigid part of the plate. Plus, they will be Line-X'd, so that material will also add to the rigidity of the plate. I have no worries of the plate flexing, as the forward pegs will most often just be a toe/upper foot rest with my heels on the boards. I still have no doubt that they'd support the weight of my leg. I won't be using the boards as a stepping platform to get on/off the machine. I'm 6' 2.5" tall with a 36" inseam. I can throw my legs over the Spyder seat quite easily :) .
 
Mine are a pretty thin diamond plate and have bent a little - though not to any concerning level. Also, Previous Owner painted them instead of coating them. At some point I may pull them off and coat them. That's why I think I'll probably mount the highway pegs as designed.

IMG_1980.jpgIMG_1981.jpgIMG_1982.jpg
 
Do those not take away ground clearance? Do you use them to get on and off? Are they able to support the weight of a man standing on them? How do those mount? Very curious. Thanks.

they held me up when i weighed in at 269 lbs, YES, i can stand on them... NO, i do not use them to mount my F3, i use the rear OEM pegs, no ground clearance issues in the 5 yrs i've had these... they are attached with 2 bolts, and no drilling and no alterations of the chassic...
 
Pretty much done. They fit perfectly and feel great ! The only thing I might do before the riding season is countersink the bolt holes for flat head bolts. As they are now, with my boots/shoes on, the bolt heads are not an issue at all. They can be swapped out for the peg cushions as easy as removing the bolts and switch around. I also put thick rubber washers between the boards/peg mounts as a vibration damper. The boards are in the +4 position now, but everything was fitted in the +5 position as I have linkage rods to swap around. The highway pegs are awesome :) All in, I have:
1.) T6061 boards: $60
2.) Line-X coating: $50
3.) SS nuts/bolts/rubber washers: $7
4.) Used highway pegs: $120
 

Attachments

  • 20200201_083348.jpg
    20200201_083348.jpg
    97.2 KB · Views: 18
  • 20200201_084455.jpg
    20200201_084455.jpg
    69.9 KB · Views: 18
  • 20200201_105424.jpg
    20200201_105424.jpg
    58.4 KB · Views: 19
  • 20200201_105715.jpg
    20200201_105715.jpg
    56.2 KB · Views: 18
  • 20200201_105722.jpg
    20200201_105722.jpg
    70.8 KB · Views: 16
Back
Top