Williebbaker
New member
After I had been taking my mirrors on and off several times over the years for various MODS on my 2010 RT.

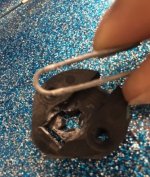
My clips broke here on the retainer portion of the top Clip. See the piece from the broken clip?
One day as I was passing by my RT, I bumped into my mirror and the darn thing nearly fell off. I was furious at first, but then I remembered reading about using magnets to hold the mirrors on (magic mirrors). I thought I might give it a try. So here is what I came up with;
The parts I used were:
6 each -Magnets from “eBay” - Round Countersunk Ring Magnets 25 x 10mm Hole 6mm Rare Earth Neodymium
6 each Steel Washers
12 each Countersunk wood screws
1 ¼ inch long metric screws
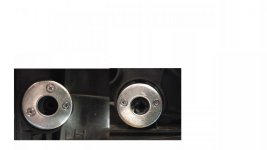
First of all instead of the washers being cut down to fit inside the clip socket, I made it so the washers would fit over the clip while it is still in the socket while using the same screw holes but longer screws. You will have to remove the clip so you can pick up the holes. See pictures below.


Once the holes are picked up they should be counter sunk (the screws must not protrude above the surface of the washer).
Now proceed to do the rest of the washers. Here’s how mine looked when I finished.

Now let’s prepare the clips, first I had to modify the good top clip to match the broken one.

To be continued on my next post. See you next time")


My clips broke here on the retainer portion of the top Clip. See the piece from the broken clip?
One day as I was passing by my RT, I bumped into my mirror and the darn thing nearly fell off. I was furious at first, but then I remembered reading about using magnets to hold the mirrors on (magic mirrors). I thought I might give it a try. So here is what I came up with;
The parts I used were:
6 each -Magnets from “eBay” - Round Countersunk Ring Magnets 25 x 10mm Hole 6mm Rare Earth Neodymium
6 each Steel Washers
12 each Countersunk wood screws
1 ¼ inch long metric screws
First of all instead of the washers being cut down to fit inside the clip socket, I made it so the washers would fit over the clip while it is still in the socket while using the same screw holes but longer screws. You will have to remove the clip so you can pick up the holes. See pictures below.
Once the holes are picked up they should be counter sunk (the screws must not protrude above the surface of the washer).
Now proceed to do the rest of the washers. Here’s how mine looked when I finished.
Now let’s prepare the clips, first I had to modify the good top clip to match the broken one.
To be continued on my next post. See you next time