h0gr1der
New member
For those that do this chore yourself, please feel free to chime in. I must say, until I read the Can Am Spyder Service Manual I had been doing it wrong for many years.
Look at YouTube, and almost every video on hub wheel bearings has a guy whipping the bearings in with a driver or socket and extension. Same here, that’s the way it was done. Never thought much about it. Until now. Wonder why these bearings fail so often? Let’s look at something in the Service Manual. By the way, the 2018 RT/RTL service manual shows a 2 piece rear wheel in the “Drive System” section. Very confusing to us first timers! The 2019 manual corrects that to the single piece hub.
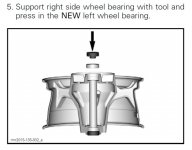
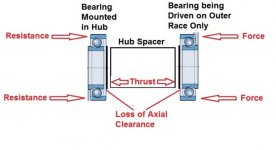
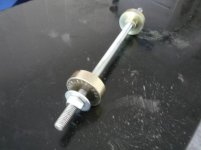
So for you guys like me that do this occasionally, and tend to forget it until next time, the procedure goes something like this (abbreviated for brevity). Remove bearings with a blind bearing puller. Install the right side (disc brake) wheel bearing first (to the bottom of the bore) using an appropriate driver or press. Note, since there is no opposing bearing or spacer, a big socket will work on this side. Flip the wheel and install an appropriate support. Understand that is says the driver and support must remain in contact with both inner and outer races at all times (a little more on this later). Drive or press the left (drive hub) bearing using the correct tool. Now this is where I missed it for all those years. If you don’t support the inner and outer races WITH PRECISION, as soon as the drive pulley side inner race hits the hub spacer, all your axial clearance vanishes (see last picture). The radial clearance for these bearings is 5-20 microns (this relates closely to axial clearance), or .000196” to .000787”. Very small tolerances. Smash it all out and there is no room for grease to circulate well. The drive pulley side bearing has a shoulder, but it may or may not make it all the way down due to the hub spacer. This bearing stops in the bearing bore at whatever depth the hub spacer dictates. By supporting all bearing races at both sides, the inner races don’t have a chance to force outward, and the balls don’t get crunched against the races.
So, excerpts from the manual. Let’s cuss and discuss!
The Tool

The Warning

The Procedure

The Reason

Look at YouTube, and almost every video on hub wheel bearings has a guy whipping the bearings in with a driver or socket and extension. Same here, that’s the way it was done. Never thought much about it. Until now. Wonder why these bearings fail so often? Let’s look at something in the Service Manual. By the way, the 2018 RT/RTL service manual shows a 2 piece rear wheel in the “Drive System” section. Very confusing to us first timers! The 2019 manual corrects that to the single piece hub.
So for you guys like me that do this occasionally, and tend to forget it until next time, the procedure goes something like this (abbreviated for brevity). Remove bearings with a blind bearing puller. Install the right side (disc brake) wheel bearing first (to the bottom of the bore) using an appropriate driver or press. Note, since there is no opposing bearing or spacer, a big socket will work on this side. Flip the wheel and install an appropriate support. Understand that is says the driver and support must remain in contact with both inner and outer races at all times (a little more on this later). Drive or press the left (drive hub) bearing using the correct tool. Now this is where I missed it for all those years. If you don’t support the inner and outer races WITH PRECISION, as soon as the drive pulley side inner race hits the hub spacer, all your axial clearance vanishes (see last picture). The radial clearance for these bearings is 5-20 microns (this relates closely to axial clearance), or .000196” to .000787”. Very small tolerances. Smash it all out and there is no room for grease to circulate well. The drive pulley side bearing has a shoulder, but it may or may not make it all the way down due to the hub spacer. This bearing stops in the bearing bore at whatever depth the hub spacer dictates. By supporting all bearing races at both sides, the inner races don’t have a chance to force outward, and the balls don’t get crunched against the races.
So, excerpts from the manual. Let’s cuss and discuss!
The Tool

The Warning

The Procedure

The Reason


