• There were many reasons for the change of the site software, the biggest was security. The age of the old software also meant no server updates for certain programs. There are many benefits to the new software, one of the biggest is the mobile functionality. Ill fix up some stuff in the coming days, we'll also try to get some of the old addons back or the data imported back into the site like the garage. To create a thread or to reply with a post is basically the same as it was in the prior software. The default style of the site is light colored, but i temporarily added a darker colored style, to change you can find a link at the bottom of the site.

Installation of Doc's Air Ryde Rock Armour - Part 1

IdahoMtnSpyder

Active member
I decided a few months ago that since I would changing my rear tire, and like to occasionally drive on gravel, that Doc's Air Ryde Rock Armour would be a good farkle to install. After I read all his instructions I said, "Oh crap!" The install is not a one hour simple process, mostly because you have to take the muffler and catalytic converter off to gain access to the air bag. And my dealer did not have the exhaust gasket and muffler clamp in stock. After stalling for a week I decided to see if in fact I could do the install without removing the muffler and converter. Since I had the rear tire off I had a lot of access to the shock and air bag area.

Well, I did it! :yes:

First, you do need to follow Doc's instructions regarding removing tupperware I raised the bike on some planks and my ATV jack. Here's a pic. That afforded me a fair amount of working space.
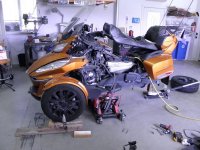
Rock guard 0.jpg

I took the valve out of the air bag Schrader valve so that it would easier to move air in and out of the air bag. When you get to Doc's instructions for removing the muffler and catalytic converter, you just skip over them. Next few steps are to remove the the lower shock absorber bolt and the bolt holding the air bag. I put the axle into the swing arm so I could jack it up and down as needed, both to the get the shock bolt out and to give space above the converter to remove the air bag bolt. I cut a V notch in the end of a 8" long 4 x 4 to fit between the jack and the axle.
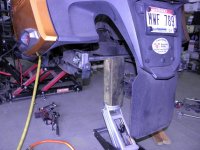
Rock guard 5.jpg

Here's a pic of the air bag as seen from the left side.
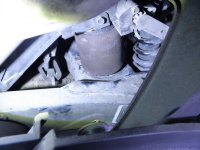
Rock guard 1.jpg

Here's the tire inflator setup I used to move air in and out of the bag.
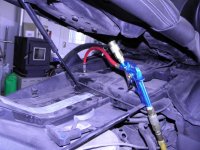
Rock guard 2.jpg

Here you see the underside of the swing arm where the air bag bolt goes through. By jacking up the swing arm as far as possible it's quite easy to remove the bolt. Doc's replacement bolt is longer but it fits in the space very nicely.
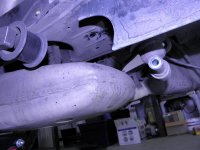
Rock guard 4.jpg

Continued in next post.
 
Last edited:
Installation of Doc's Air Ryde Rock Armour - Part 2

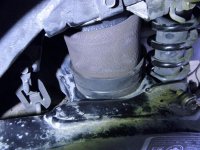
Next step is to loosen the air bag from the swing arm and clean the area of all debris. Then you can squeeze, push, pull, lift, and whatever to manipulate the rock guard into place. The air bag is quite flexible. While I was doing this I added and removed air from the bag to get it to settle down into the guard. I does require some manipulation to get it in, but it's not a real big challenge. I moved the swing arm up and down and added and removed air from the bag to get room to manipulate the bag bolt into place. That operation requires patience as you have to line up the bolt into the upper hole in the swing arm, through the hole in the guard, and get it started into the air bag. Pay attention to Doc's admonition about tightening the bolt into the air bag.

Rock guard 6.jpg

Here's a pic from the right side. Not easy to see because of all the wires and such.

Rock guard 3.jpg

Here's a pic of the completed job.

Rock guard 7.jpg

If you have been considering installing the Rock Armour, and have a rear tire changeout coming before long, I suggest you do them at the same time. Thank God, I cannot speak from first hand experience, but when I looked at what was involved in taking the muffler and converter off and getting them back on I concluded that it would be, as our Aussie friends would say, "A Royal pain in the arse!"
 
Way easier on a '13 when you drop the swing arm enough.:shocked: No tupperware removal, no cat removal. Start with height sensor, final muffler, (left the cat on), jack to remove shock bolt, jack to let swing arm swing down far enough to stretch airbag out far enough (I didn't do this the first time I tried). Release air bag pressure, take out airbag bolt, slip ARRA on, get that (*&^$#%&^) bolt started, lower enough to finish installing air bag bolt, then shock bolt, then muffler, then height sensor.
 
Way easier on a '13 when you drop the swing arm enough.:shocked: No tupperware removal, no cat removal.
I should have mentioned mine is a 2014 RTS w/ the 1330. I see on the parts diagram that the cat is smaller and doesn't extend back under the swing arm nearly as much with the 998 engine. That would make it a lot easier!
 
Thanks Idaho for the MechLog and Pictures

I have Docs Rock Armour ready to put on also when I change out my rear tire on the 15 RTsometime this summer. Its always a confidence boost to see another successful job done and after several rear tire changes, it should be easy enough when the time comes. Did you use any special sealant or back-ups when reassembling the air bag - do you need to disconnect the air supply? Looks like you"re ready to ROCK & ROLL this summer!!:yes:
 
I never was able to get the swing arm low enough with the converter on with the 1330. I have sneaked it in with the cat delete pipe or the 998 converter. Glad you were able to find a shortcut. Hardest part for me was starting the bottom bolt to the AB. Getting the correct angle has taken me as long as 5 minutes up to 30 minutes.
We are going on 4 years with our pinhole airbag and the aftermarket compressor. Still going strong!
Did you take the valve out of the Schrader valve? Doing that made it fairly easy to lift the bottom of the air bag high enough to squeeze the guard under it. Then inflating and deflating several times forced the bag to fit down into the guard.

Getting the bolt in place is tricky. Here again, having the valve out made it easy to move the air bag and guard around to line up the holes. I couldn't get them to line up with even a little bit of pressure in the bag. After I took the inflater off the Schrader valve I was able to move the guard around.
 
I have Docs Rock Armour ready to put on also when I change out my rear tire on the 15 RTsometime this summer. Its always a confidence boost to see another successful job done and after several rear tire changes, it should be easy enough when the time comes. Did you use any special sealant or back-ups when reassembling the air bag - do you need to disconnect the air supply? Looks like you"re ready to ROCK & ROLL this summer!!:yes:
You don't disassemble the bag at all, just loosen the bottom end from the swing arm. No need to disconnect the air supply. Just take the valve out of the Schrader valve under the seat. That's what you use to manually put air into the air shock.
 
You don't disassemble the bag at all, just loosen the bottom end from the swing arm. No need to disconnect the air supply. Just take the valve out of the Schrader valve under the seat. That's what you use to manually put air into the air shock.

To be honest I may not have pulled the schrader. You may have totally revamped the way to do this. And saved alot of work. Will try it next time. In fact, I believe I will add your alternative method in the instructions if you don't mind.
 
To be honest I may not have pulled the schrader. You may have totally revamped the way to do this. And saved alot of work. Will try it next time. In fact, I believe I will add your alternative method in the instructions if you don't mind.
Feel free to use my method and to edit it as you may see appropriate. I take it as a compliment. If you have problems copying photos from the thread let me know which ones you want and I'll send them to you.
 
Back
Top