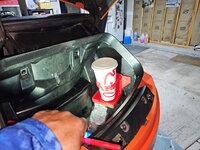
Whenever I grab fast food on my Spyder, I'm usually left trying to figure out how to get the drinks home without spilling them everywhere.
I usually try to barricade them in the trunk somehow using whatever things happen to be in there. Often, the pressure pops the lid off and the drink spills a bit, but even worse, things may shift and dump the entire contents into the trunk. I've felt for a long time that there should be a foldable cup holder in the trunk that takes up very little room, but can be unfolded when needed.
My recent experiment in designing a cup holder for my passenger led me to wonder if I couldn't design my own.
As with most 3d designs, I started by searching Thingaverse, Printables, and Makerworld to see if such a thing already existed. It didn't exist as I needed it, but there was an awesome foldable cup holder already available. So all I needed to do was modify that to fit my needs. Here's roughly the steps I used to do it.
I used the mirror function in tinkercad to make a bracket for the other side of the trunk and it fit just as well; I just had to print a new top and bottom for it.
Unfortunately, the license for the foldable cup holder forbids remixes. I can modify the design for my own use, but I cannot distribute the modification, so don't ask me to sneak you a copy and certainly don't ask me to print you one.
If you want something like this but don't want the hassle of what I did, the original design had 4 mounting holes in the back plate. You could just drill/tap 4 holes in your trunk and mount it directly. Just go to any 3d design website and search for "foldable cup holder" and you're bound to find it.
Walmart and other stores sell cup holders kind of like this, but I found them too small and flimsy. This one is much sturdier, especially after upscaling it.
 -
- 
I usually try to barricade them in the trunk somehow using whatever things happen to be in there. Often, the pressure pops the lid off and the drink spills a bit, but even worse, things may shift and dump the entire contents into the trunk. I've felt for a long time that there should be a foldable cup holder in the trunk that takes up very little room, but can be unfolded when needed.
My recent experiment in designing a cup holder for my passenger led me to wonder if I couldn't design my own.
As with most 3d designs, I started by searching Thingaverse, Printables, and Makerworld to see if such a thing already existed. It didn't exist as I needed it, but there was an awesome foldable cup holder already available. So all I needed to do was modify that to fit my needs. Here's roughly the steps I used to do it.
- I printed the cup holder and found it was too small to use for large fast food cups. So I scaled it up 10% and printed another and that fit just a little tight, but would expand enough to hold the cup very well.
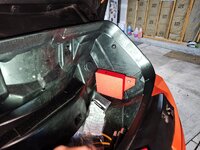
- I used CAD (cardboard aided design) to make a template of the flat area on the side of the trunk. I'd hold it loosely against the side wall and draw an approximate line on the cardboard. Then using a knife, cut away that section of the cardboard, until eventually I had a fairly nice template of the flat area.
- I taped the cardboard into the trunk along the top, then carefully pressed the cardboard against the bolt heads to make an impression of the bolts.
- Using my scaled up cup holder, I experimented with positioning the holder so that folding it down didn't hit things and so that the cup was well positioned. I also used a small level to make sure the cup holder was near level, and marked it's position on the template.
- I put my template in my printer/scanner and scanned a black and white photo of the template.
- Using inkscape (free), I imported the image and traced out the 2d shape and the holes of my template, then saved the svg file.
- Using tinkercad (free web app), I imported the svg file and the stl file for the cup holder back plate.
- I positioned the backplate roughly where I'd marked on the template and merged them as 1 piece:
- There was a lot of tweaking and fiddling here to get just what I wanted; and
- I printed a lot of 0.4 mm thick templates to test fit the bracket, until I was happy with it and the position of the cup holder.
I used the mirror function in tinkercad to make a bracket for the other side of the trunk and it fit just as well; I just had to print a new top and bottom for it.
Unfortunately, the license for the foldable cup holder forbids remixes. I can modify the design for my own use, but I cannot distribute the modification, so don't ask me to sneak you a copy and certainly don't ask me to print you one.
If you want something like this but don't want the hassle of what I did, the original design had 4 mounting holes in the back plate. You could just drill/tap 4 holes in your trunk and mount it directly. Just go to any 3d design website and search for "foldable cup holder" and you're bound to find it.
Walmart and other stores sell cup holders kind of like this, but I found them too small and flimsy. This one is much sturdier, especially after upscaling it.
 -
- 

