• There were many reasons for the change of the site software, the biggest was security. The age of the old software also meant no server updates for certain programs. There are many benefits to the new software, one of the biggest is the mobile functionality. Ill fix up some stuff in the coming days, we'll also try to get some of the old addons back or the data imported back into the site like the garage. To create a thread or to reply with a post is basically the same as it was in the prior software. The default style of the site is light colored, but i temporarily added a darker colored style, to change you can find a link at the bottom of the site.

How To Properly and Stylishly Mount Mutazu Bags To An F3S - with pics

Trevor G

New member
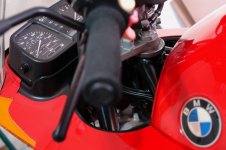
How To Properly and Stylishly Mount Mutazu Bags To An F3 or F3S - with pics

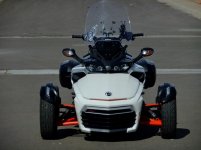
Mutazu bags, at $299 shipped, represent the best value for money by far.

In addition to being stylish, they are quite large, and well built. We also (well, Patti my wife) found some very affordable inner liners that are a close fit and will do the job for us.

Their downfall has been their universal mounts - the frames supplied which the bags attach to are very robust and well thought out. The hanging brackets supplied to mount the frames to the bike are strong and pre-bent for an "average" installation, but to do the job properly takes time and thought. Well, it took me 2 1/2 weeks of mornings to nut it out and put it together, and so I share my work with you now. I reckon it would take 5 to 6 hours of not rushing to finish mounting them from scratch, not including electrical wiring.

It also takes a few additional parts, like spacers, T nuts and bolts (about $35 worth), in addition to the pretty good set that comes with the kit, plus an angle grinder with cut-off and finishing disks, a 10-12" adjustable wrench and a can of satin black touch up paint.

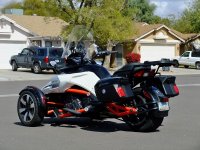
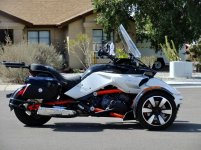
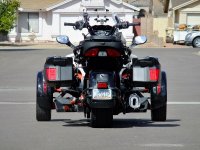
To me, mounting bags up high and angling them to match the grab handles is just not on. These are set straight, in line with the frame, not the grab handles, and are angled down ever so slightly. You probably could adjust the angle up or down by about a 1/2", measured at the rear of the bag.

In addition, the bags need additional support to stop them from sagging inwards at the bottom under load, just like any other saddlebags. That is where most of the time and thought went. Some people mount them without that, and it looks wacky and is unsafe.
 

Attachments

  • DSCF2248.jpg
    DSCF2248.jpg
    89 KB · Views: 478
  • DSCF2250.jpg
    DSCF2250.jpg
    75 KB · Views: 403
  • DSCF2252.jpg
    DSCF2252.jpg
    96.9 KB · Views: 534
  • DSCF2254.jpg
    DSCF2254.jpg
    72.6 KB · Views: 586
  • DSCF2257.jpg
    DSCF2257.jpg
    48.5 KB · Views: 408
Last edited:
Looks great. How about a picture, or two of the mounts without the bags. Even better if you have step by step instructions of how you did this!
 
Looks good with them lower than where most mount them (including me).
Have been putting off lowering mine, but now I will after seeing yours.
I ran a cross piece between the bags at the rear to eliminate sideways movement of the bags. I also did not like the idea of them flopping side to side. Mine are level like yours because they do look odd at the steep angle many have done.
The actual bags mounts look almost identical to the system Givi uses for some bags (I've had three different sets of that type) and make for easy removal for cleaning..
My bike with bags on is one of the pics in the Ebay listing for the Matazu bags. Sent them a pic after install and they decided to use it. If it helps someone decide to buy them, I'm all for it.

So how about pics without the bags so we can see how you handled the brackets?
And tell us what the angle grinder and cutoff and discs were used for.
 
THOSE BAGS

Thanks for sharing ... I also have a set to be mounted on an RSS ..... I have already painted the side covers ( the ones that un-screw from the inside so it's very easy to paint ) .... I painted mine " Cognac " with no clear top coat, I wanted them to match the Flat RSS orange .....it does very nicely ............... another member here " Warlock " discovered the plastic brackets that hold the bags onto the frame aren't very sturdy and He fixed them ( PM Him I can't remember exactly how He did His ) .... because of His Experience I plan to weld a nut to the Bracket that attaches the bags to the Mutaza Frame ..... then I will put a bolt through from inside the bags and screw it into the welded nut .... the only it can possibly come off accidently is the entire attachment Bracket will have to come loose ....... Mike :thumbup:
 
Bracket Mods

Can you explain what you did to the stock mounting brackets to lower the bags. I just bought a pair and have them mounted much higher.

Thanks, Chris:doorag:
 
Can you explain what you did to the stock mounting brackets to lower the bags. I just bought a pair and have them mounted much higher.

Thanks, Chris:doorag:
good question, I asked the same a couple posts earlier.
He's been on the forum but apparently hasn't been back to this thread.
His mounting looks good-hope he gives us more info.
 
sent the OP a private message asking him to please give us the details
can't wait to take mine off and remount them
 
Sorry, I had a BMW happen to me two weeks ago

DSC01673.jpg

I'll get the closeup pics and details onto my Facebook page shortly.

I have been looking for something to let me keep up with my wife, Patti, on her F3S. I had been sitting on the back behind her, which is a lot of fun. I get so many thumbs up for doing that, especially from female drivers around town.

On the day we drove to Prescott to look at the BM, which is a 1988 K75S with less than 6,000 miles, one car pulled up beside us at 75 mph on the I17 just to give us the thumbs, and another did the same at 50mph in Prescott Valley.

Mrs G will readily push any Spyder to 80-90 mph, and my hotted-up 750 Moto Guzzi was just a bit vibey at that speed. Now I easily leave her, in comfort.
 

Attachments

  • DSC01670a.jpg
    DSC01670a.jpg
    45.7 KB · Views: 63
Last edited:
thanks for not forgetting us, Trevor
could you post pics here for those of us who don't do Facebook?

The K75 is a sweet bike-almost got one a few yews ago and now every time I see one I wish I had.
 
sure hope to see pics of the mounting
took my bags off and lowered them on Sun.-looks much better
The bags in their new position have more side to side movement at the bottom than I like.
Looking for ideas on how to stiffen them up.
Maybe connecting them to each other at the bottom as is common on other (mostly adv bikes), or fabricating a mount to the bike itself (maybe to the passenger footpeg)?
So, let's hear some ideas
 
Last edited:
gave it a shot

lowered my bags because they look so good on the OP's Spyder.
Decided to add additional bracing as I mentioned before.
A member here, als, gave me some good advice so I gave it a shot.
Here are pics. The front brace goes to the outermost bolt under the seat. The rear brace goes to the one I already installed connecting the bags together at the rear.
The whole thing is pretty solid. Paint used on the additional braces was Rustoleum Bedliner. Have used it many times, very hard finish with texture.
thumbnail_0315181706b.jpgthumbnail_0315181709.jpgthumbnail_0315181711.jpgthumbnail_0315181708.jpg
 
Pictures

Thanks Much for the photos.

lowered my bags because they look so good on the OP's Spyder.
Decided to add additional bracing as I mentioned before.
A member here, als, gave me some good advice so I gave it a shot.
Here are pics. The front brace goes to the outermost bolt under the seat. The rear brace goes to the one I already installed connecting the bags together at the rear.
The whole thing is pretty solid. Paint used on the additional braces was Rustoleum Bedliner. Have used it many times, very hard finish with texture.
View attachment 158761View attachment 158762View attachment 158763View attachment 158764
 
My Mounting Mods

I wanted to modify the standard Mutazu mount but I didn't want to lower the bags as much as Trevor did. I used the forward most mounting hole on the bracket, then I used one of the brackets that came with my Matazu bags to lower the rear a bit.

I also modified the bracing bar. I ended up buying a metal bar at the local Home Depot to use as the bracing bar. I mounted one of the elbows to the bracket, (had to drill a hole for the height I wanted), then added the bracing bar which is positiong about 1/4" under the taillight. The bracing bar also required drilling to match the mounting holes on the elbow and a bit of black paint.

Bracket I used to lower the back.
0324181532.jpg

I mounted lowering bracket at an angle to the rear of the bracket.


0325181338.jpg

The brace mounted to the two elbows which are mounted to the two brackets.


0325181635.jpg

Bags mounted

0325181642d.jpg0325181642a.jpg

:doorag::yes::yes::yes::yes:
 
Here Is An Overview Of The Mounting Syustem

DSCF2258.jpgDSC01660A.jpgDSCF2242_1.jpg

My aim was to use the brackets supplied. I don't have a vise, but I do have a drill and an angle grinder, so everything had to be achieved with just those tools.

The bags are braced at the rear. Because the frame mounting system supplied is so strong there is no chance of the brackets twisting or bending unless, maybe, you sat on one of the bags!

The bag frame is stabilised at the front, to stop it bending inwards under the weight of the bags, by using a third hanger. The top of this sits directly under the grab rail boss - as the bags try to bend inwards the top of this hanger contacts the boss and prevents further movement.

This additional hanger also allows the bags to be mounted at the correct height, so that they don't come too close to any fixtures such as the front hanger/grab rail mounting bolt.


DSCF2264.jpg

The full instructions are being placed on my Facebook page first. I'll add here as required.

https://www.facebook.com/trevor.graetz.9/posts/809804402538083
 

Attachments

  • DSCF2259_1.jpg
    DSCF2259_1.jpg
    90.7 KB · Views: 60
Last edited:
List Of Additional Parts Required

When ordering Mutazu bags for your Spyder make sure you get the Can Am Spyder version from Ebay. This will ensure that you get side opening bags (top opening will not clear the grab rails) and the brackets supplied exactly fit the mounting points.

You will also need to buy some additional components, which are available in the US from Ace Hardware stores.

4 x 8mm (or 5/16") mudguard washers

4 x Steel bushes 5/16" ID, 3/8" Long, 5/8" OD

2 x Steel bushes 5/16" ID, 3/4" Long, 5/8" OD

2 x Button head 8mmx50mm bolts

2 x 8mm T nuts

If you have no other accessories fitted to the grab rails then you will use the 4 x 40mm long 8mm round head bolts which are supplied in the mounting kit, to mount the hangers off the grab rails. In that case you will then need:

4 x 8mmx30mm round head bolts.

I had originally thought to use heat shrink tubing on the hangers to cover the many bolt holes, but that has certain issues. Instead, we found 5/16 nylon caps at Ace which fill the holes nicely.

You will need the following tools:

Big hammer (just joking)

Electric drill with 8mm or 5/16" bit.

Small bit to drill pilot holes

Angle grinder with cutoff and finishing discs, or hacksaw (very slow)

Hand file (optional if you are really good with the angle grinder).

1 aerosol can of satin black paint - Ace's paint is great.


Last edited:
@Trevor g
nice job
I like the extra brace mounted to the bike and the addition of the extra bolt through the rear mounting bracket. Much cleaner than my connecting the two bags-may have to revisit my install.
I can see it would be sturdy.
 
The First Step

The first step is cosmetic.

Remove the screws from the grab rails, one side at a time, and pull the grab rail off its mounting.


Inside the mounting on the grab rail is a black mudguard washer - that is, a washer with a much larger outside diameter than normal.

Replace this black washer with a silver one you bought from Ace (or wherever). Note that all of these types of washers (not engineering washers) are stamped out of flat sheet or bar, so that one side is rounded off on the edges and the other side is straight-edged flat.

DSCF2234.jpgDSCF2235.jpg

Install the new washer so that the flat edge is against the mounting stub on the frame and the rounded edge is against the inside of the grab rail.

The black washers will be used on the outside of the rail when mounting the hangers for the bags.

Here is an example of the rounded-off edge of a normal size (not mudguard size) washer, which is normally used on the top or outside of the item you are mounting it on, so that this rounded off edge is visible.

There is an important exception to this rule - when using this type of washer on plastic or a similar, soft surface, the rounded-off edge always goes against the plastic. The sharp edge will actually cut through the plastic - this is important for a later step in the installation.
 
Installing The Hangers

There are six hangers, about 8" long, with an offset bend on one end, and six holes drilled in the long, straight section. These form the basis of the brackets; three are used on each side.

Before you mount the front one you need to cut off the bottom

section, about 3/16" below the bottom hole. This is to allow a mounting bolt to fit just below the end of this hanger. You will understand later, if not now.

De-burr, but there is no need to round off the corners.

Note the orientation of the two hanger brackets - this is the key to the parallel installation of the bags.

DSCF2208.jpg

The front hanger is mounted so that the 6 holes section is inwards of the top mount.

The rear hanger is mounted so that the 6 holes section is outwards of the top mount.

We have an MBL rack mounted which somewhat obscures the placement of the fixing hardware. I'll show that in another image, but the sequence is:


1) silver washer under grab rail

2) grab rail

3) grab rail spacer

4) black washer removed from inside grab rail

5) hanger

6) washer and 40mm round head bolt from fitting kit

Don't leave off the washer between the hanger and the grab rail spacer. This spacer has a raised edge which the hanger does not fully cover, which means that it would have a lot of flex outwards and produce an unstable mounting.

MOST IMPORTANT: If you have a nice, shiny Akrapovic or similar get a bath towel and fold it over several times and place it on top of the muffler BEFORE you start work. This will prevent damage from the many times you drop something on it.
 
Last edited:
Back
Top