kevorama
MOgang Member & Pyro-Man
Hey gang, I'm at it again. The weather is crap in the Midwest right now. This will be a step-at-a-time, type install. I will add to the original 1st post, and bump it with the msg 'pics have been added to original post'.
What I'll be doing in this series is to show you how to basically install the items listed below and how I wired them to the power grid (TricLED's FZ-1 FuzeBlock), Reggy's 4 zone remote and in the case of the tunnel lights, an LED rocker switch located in the left speaker grill.
Here are a few pics of what to expect if you are going to do the following:
Bump Skid wht LED leading edge strip (Connected to 4 zone remote)
Day Time running LED wht (connected to turn signals)
Tunnel Lights (Red) w/directions on how to connect to a rocker switch by the dash
Vader Eyes (Connected to 4 zone remote)
Vader Fogs (Connected to 4 zone remote)
HALO under lighting (RGB w/ remote)
Project Nite (Red) (Connected to 4 zone remote)
Custom rear turn signals with directional yellow LED's on sides of trunk lid
Amber to red 622 trailer side strips
2 FZ-1 Fuzeblocks
Smart Battery Isolator
... and whatever else I missed ")
I already have the Fender strips and tips, 3rd and 4th brake light and Vader Wings installed.
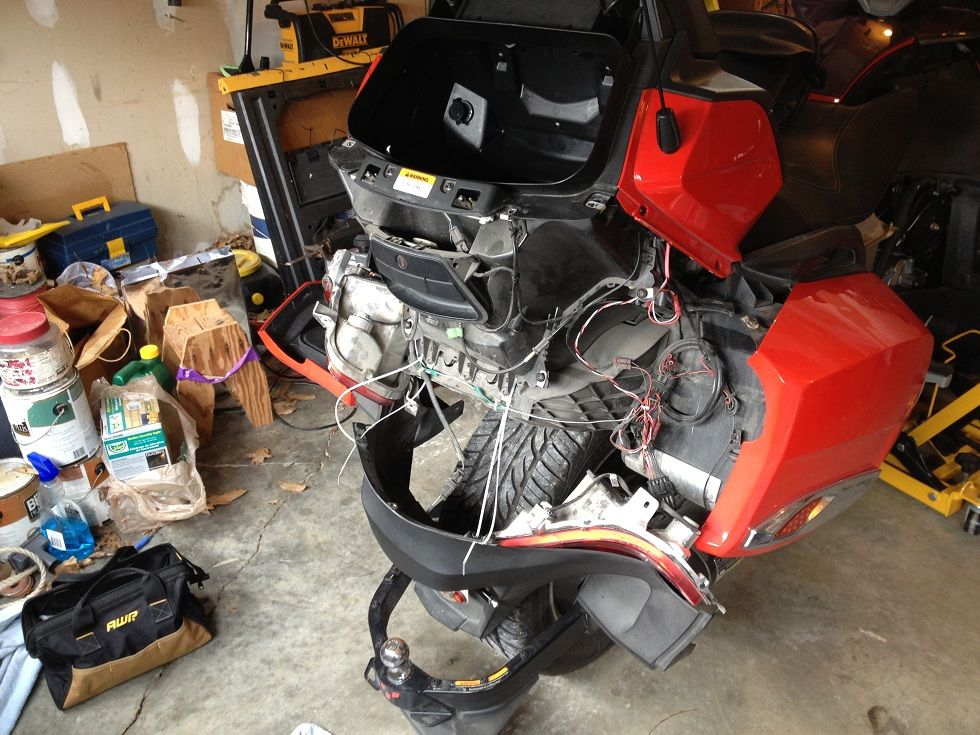
For starters, you'll have to break a few eggs to make an omelet. In these next three photos, I have the bike stripped of most of the tupperware. You will have to do this in order to install the items listed above.
In this photo, the front has been pretty much stripped and the bike is ready to be prepped for the eyes, fogs and tunnel lights.

The sides are open in order to run more armored conduit from front to rear and visa-verse.

The rear panels and lights have been removed in prep for the new rear LED turn signals, Battery Isolator and the FZ-1 FuzeBlock.
A short video of the project to come:
Since my last post, I added the red tunnel lights (rocker switch install later), Daytime running lights, Vader Fogs, Vader Eyes, Reggy's custom made rear turn signals that flank the trunk lid (yes, Reggy not Reggie) and conduit for the FZ-1 Fuze Block (yet to be installed), battery isolator and battery.
This is a short video on location and basic install of the 4 Zone Remote, The Halo Receiver and connection to the fuse block.
Tunnel Lights and rocker switch. I'll do a pictorial on this install, now that I know it is correctly wired to my satisfaction. I test everything before placing the switches and wiring in their permanent homes.
I still have some work to do before SpyderFest, but I figured I'd shoot this before we get another foot of snow. Usually, I have the bike on a battery tender at all times in cold weather. Didn't do that the last few days, as you see in this video. There are some still shots that I still have to add on parts of the install, but in the meantime, here's the mostly finished product.
What I'll be doing in this series is to show you how to basically install the items listed below and how I wired them to the power grid (TricLED's FZ-1 FuzeBlock), Reggy's 4 zone remote and in the case of the tunnel lights, an LED rocker switch located in the left speaker grill.
Here are a few pics of what to expect if you are going to do the following:
Bump Skid wht LED leading edge strip (Connected to 4 zone remote)
Day Time running LED wht (connected to turn signals)
Tunnel Lights (Red) w/directions on how to connect to a rocker switch by the dash
Vader Eyes (Connected to 4 zone remote)
Vader Fogs (Connected to 4 zone remote)
HALO under lighting (RGB w/ remote)
Project Nite (Red) (Connected to 4 zone remote)
Custom rear turn signals with directional yellow LED's on sides of trunk lid
Amber to red 622 trailer side strips
2 FZ-1 Fuzeblocks
Smart Battery Isolator
... and whatever else I missed ")
I already have the Fender strips and tips, 3rd and 4th brake light and Vader Wings installed.
For starters, you'll have to break a few eggs to make an omelet. In these next three photos, I have the bike stripped of most of the tupperware. You will have to do this in order to install the items listed above.
In this photo, the front has been pretty much stripped and the bike is ready to be prepped for the eyes, fogs and tunnel lights.
The sides are open in order to run more armored conduit from front to rear and visa-verse.
The rear panels and lights have been removed in prep for the new rear LED turn signals, Battery Isolator and the FZ-1 FuzeBlock.
A short video of the project to come:
Since my last post, I added the red tunnel lights (rocker switch install later), Daytime running lights, Vader Fogs, Vader Eyes, Reggy's custom made rear turn signals that flank the trunk lid (yes, Reggy not Reggie) and conduit for the FZ-1 Fuze Block (yet to be installed), battery isolator and battery.
This is a short video on location and basic install of the 4 Zone Remote, The Halo Receiver and connection to the fuse block.
Tunnel Lights and rocker switch. I'll do a pictorial on this install, now that I know it is correctly wired to my satisfaction. I test everything before placing the switches and wiring in their permanent homes.
I still have some work to do before SpyderFest, but I figured I'd shoot this before we get another foot of snow. Usually, I have the bike on a battery tender at all times in cold weather. Didn't do that the last few days, as you see in this video. There are some still shots that I still have to add on parts of the install, but in the meantime, here's the mostly finished product.
Last edited:
 ray:
ray: