• There were many reasons for the change of the site software, the biggest was security. The age of the old software also meant no server updates for certain programs. There are many benefits to the new software, one of the biggest is the mobile functionality. Ill fix up some stuff in the coming days, we'll also try to get some of the old addons back or the data imported back into the site like the garage. To create a thread or to reply with a post is basically the same as it was in the prior software. The default style of the site is light colored, but i temporarily added a darker colored style, to change you can find a link at the bottom of the site.

How to add Bluetooth to installed Entertainment Harness

Doc - Riverside

New member
Another SL Member asked me if I could figure out how to install the Bluetooth Dongle on his RT when he came to the Secret Lab in early April for a visit to work on his RT. He has the CB and XM radio installed and the Bluetooth Instruction state that the CB Radio can't be installed or removed. He said he never uses the CB so come up with a way to do it. Looking at the Wire diagram for the RT connector RD0_2 is the connector that the CB and XM radio use to connect the radio. I called him back and told him that it would cost $14.00 for parts to make the required cable( 5 contacts, 7 blanking plugs, USB power cable and 3.5mm audio cable ). The 12 wires for the CB were totally removed from RD0_2 and the Bluetooth cable installed.

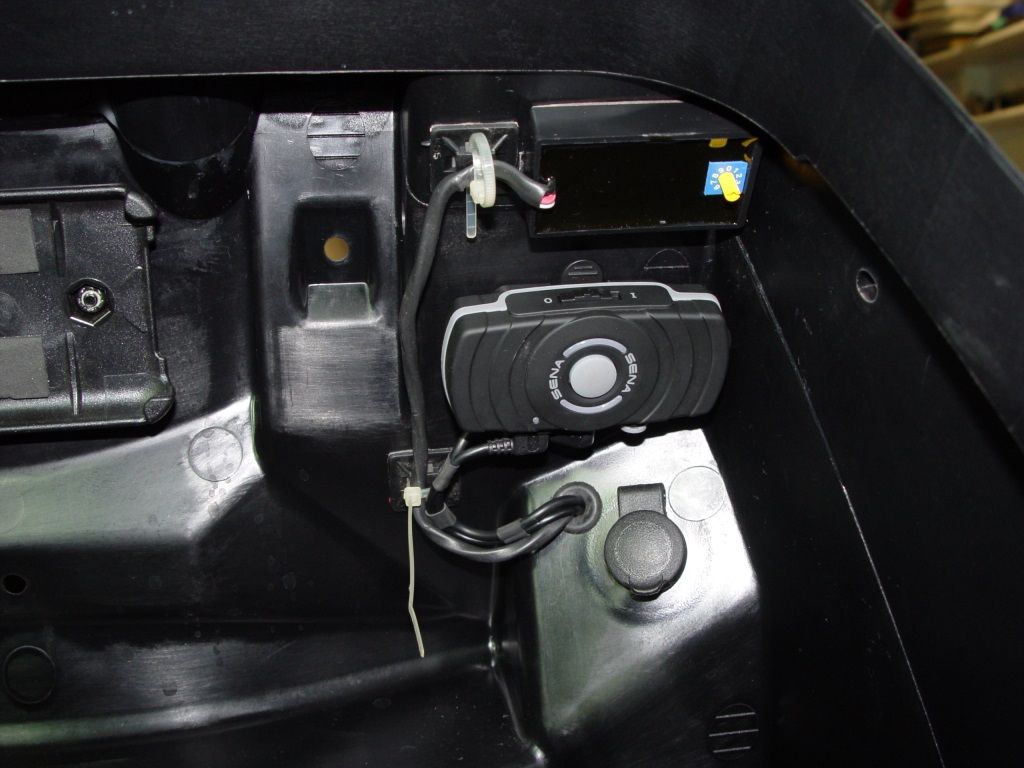
Trunk install is accomplished by drilling a 3/8 inch hole as shown and installing a 1/4 inch ID grommet. The contacts on the dongle cable will easily pass thru the grommet and RTV is used to return the trunk to a sealed condition. The RTV is on the backside of the grommet.


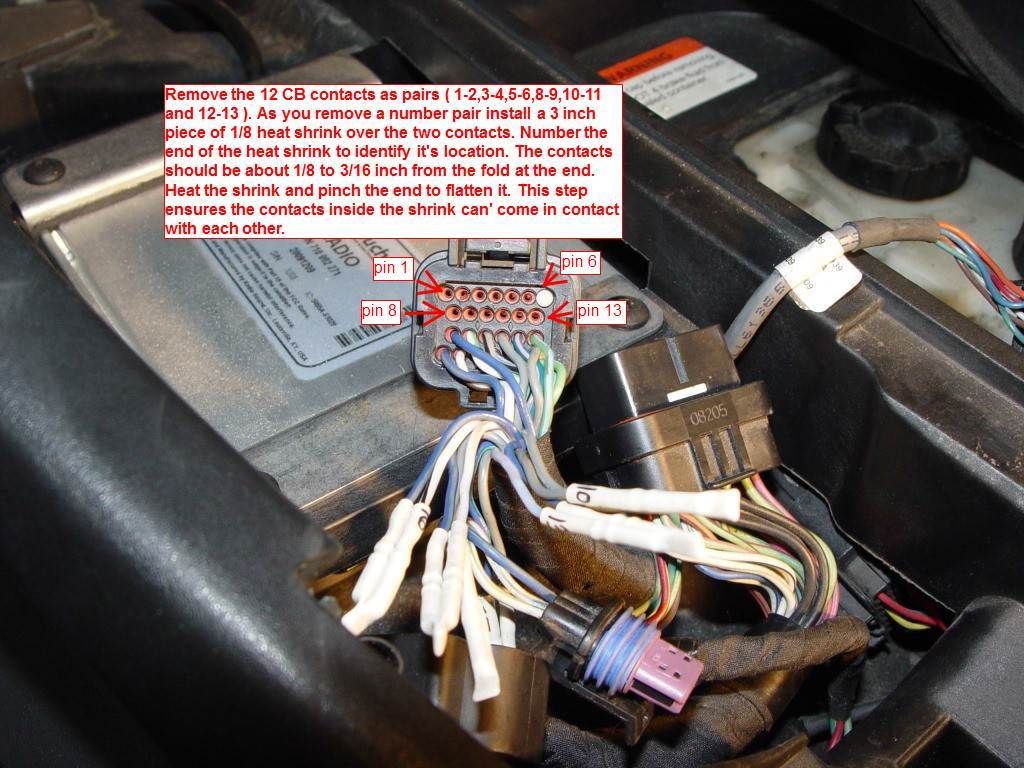
To remove the contacts you have to release the contacts


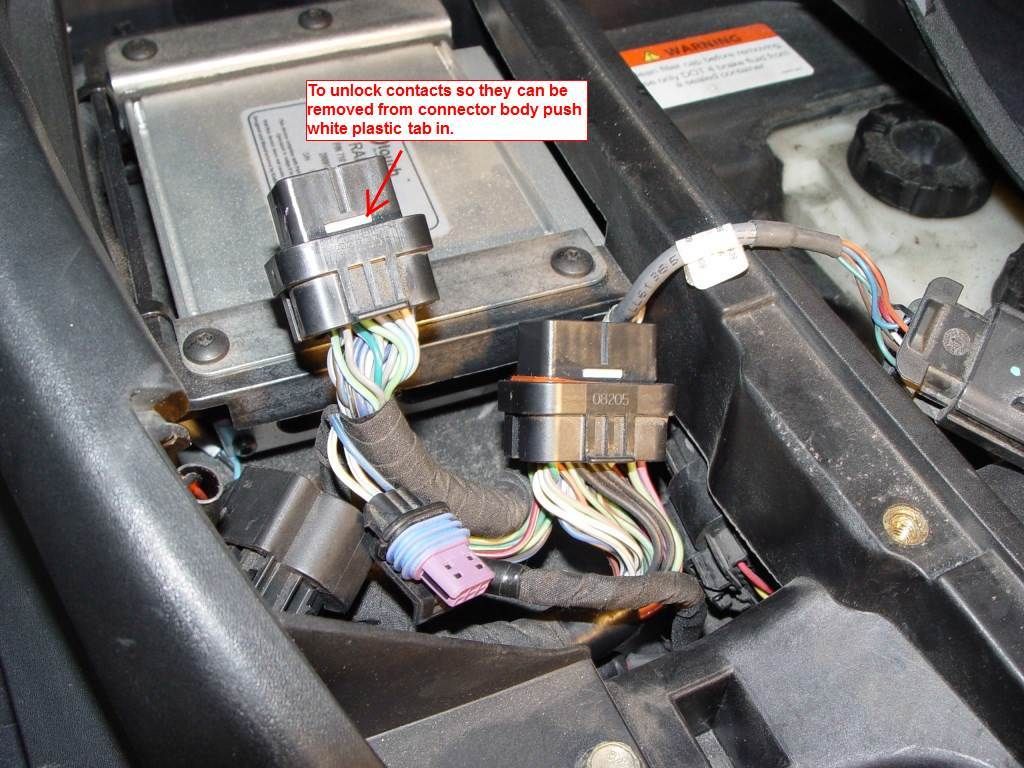
Remove the 12 Wires associated with the CB


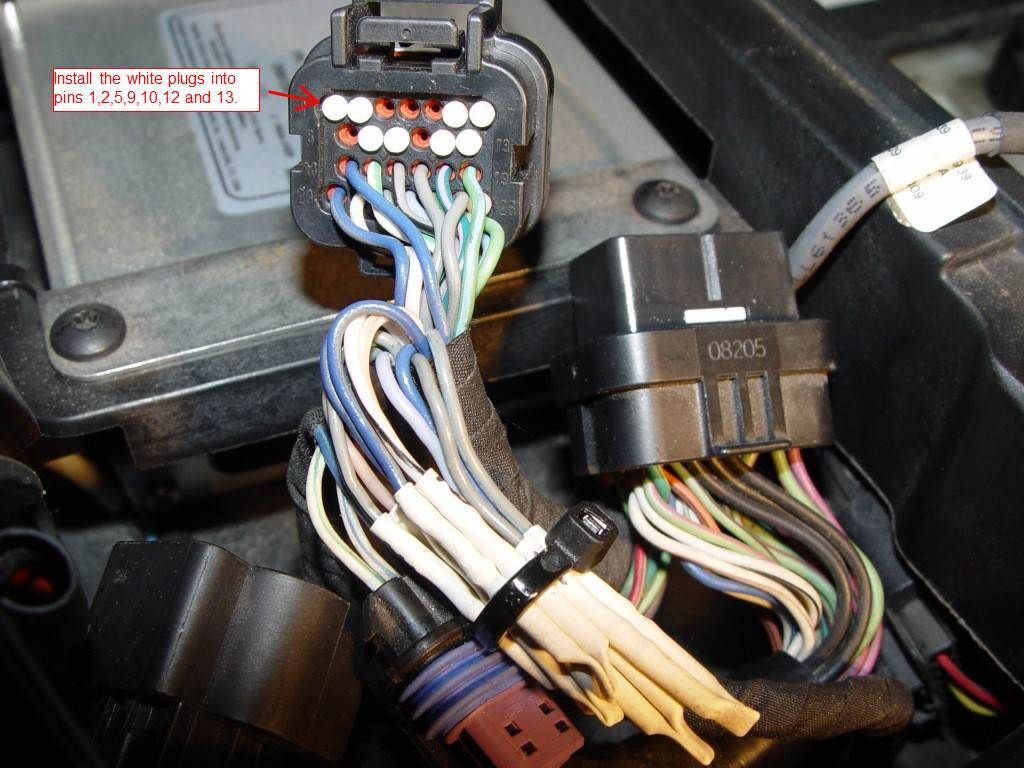
Unused pins have plugs installed to weatherproof the connector


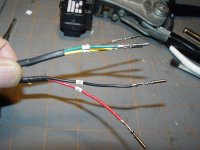
New cable with contacts crimped onto 20 awg wire.


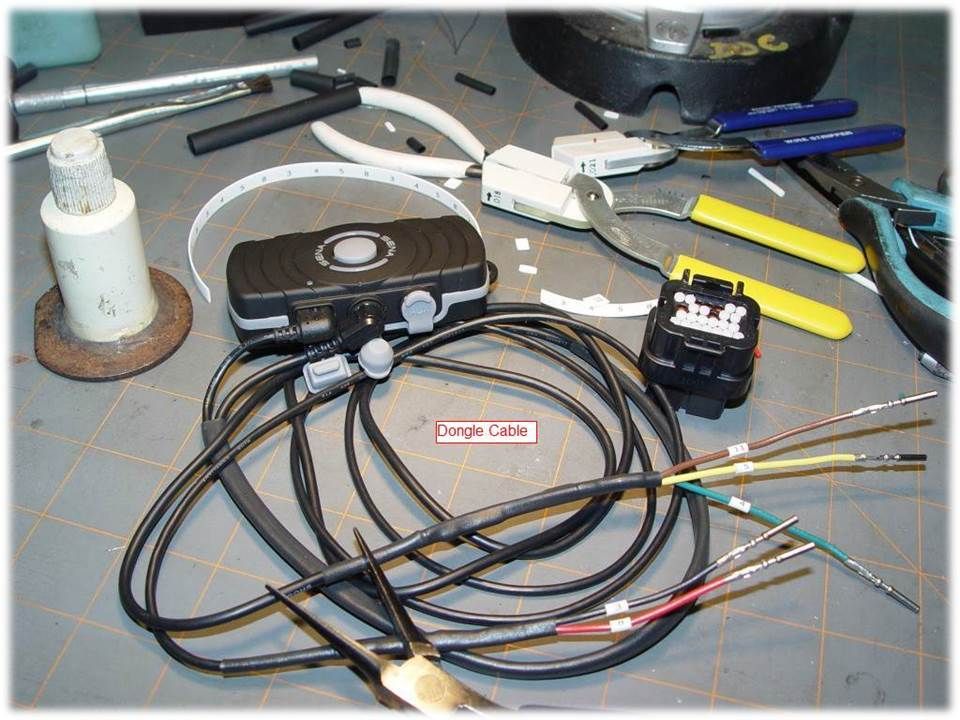
Contacts inserted into connector. 20 AWG insulation diameter ensures that there is a 100% weatherproof seal when the contact is seated inside the connector


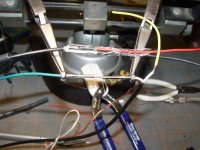
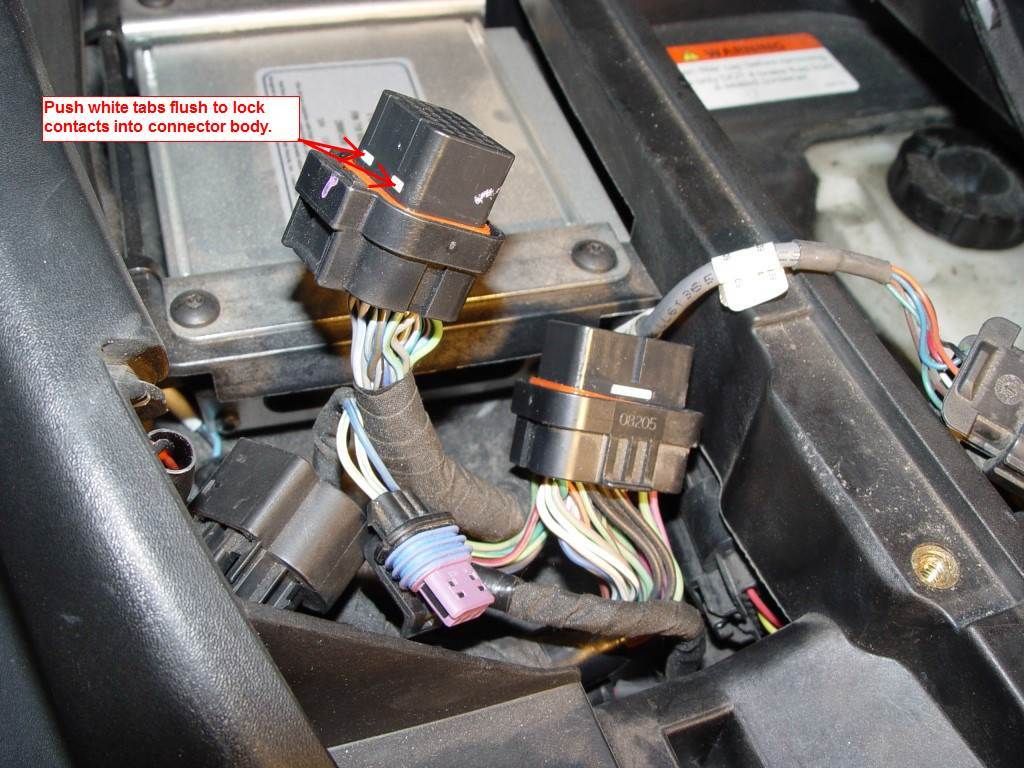
Locking the contacts


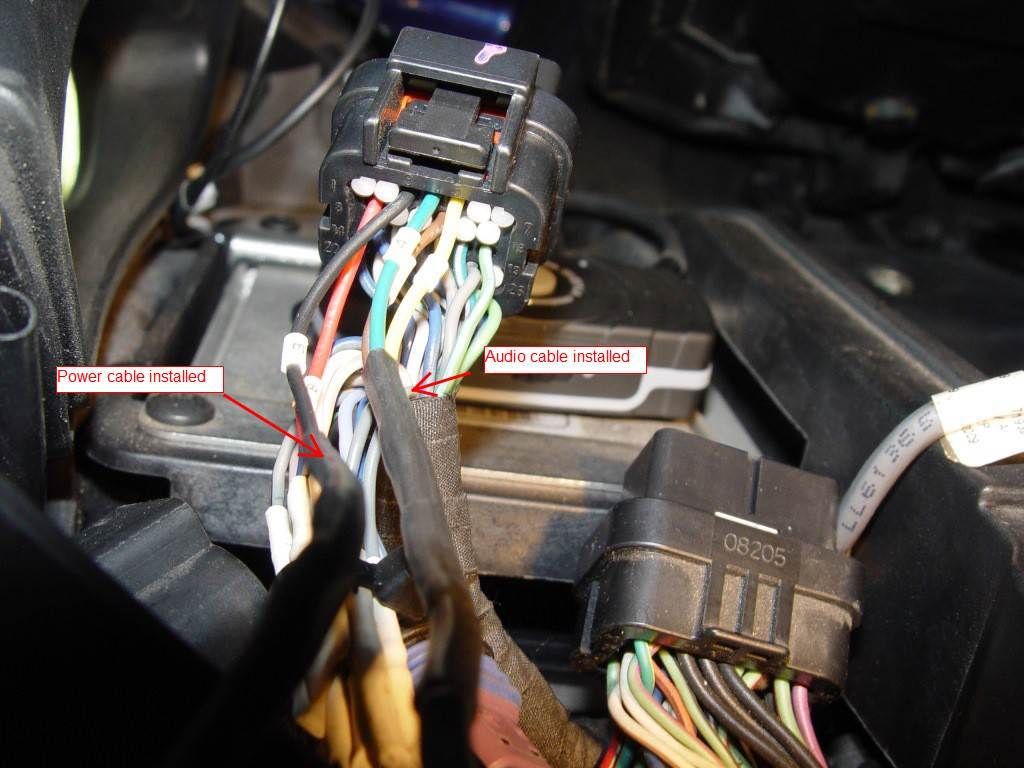
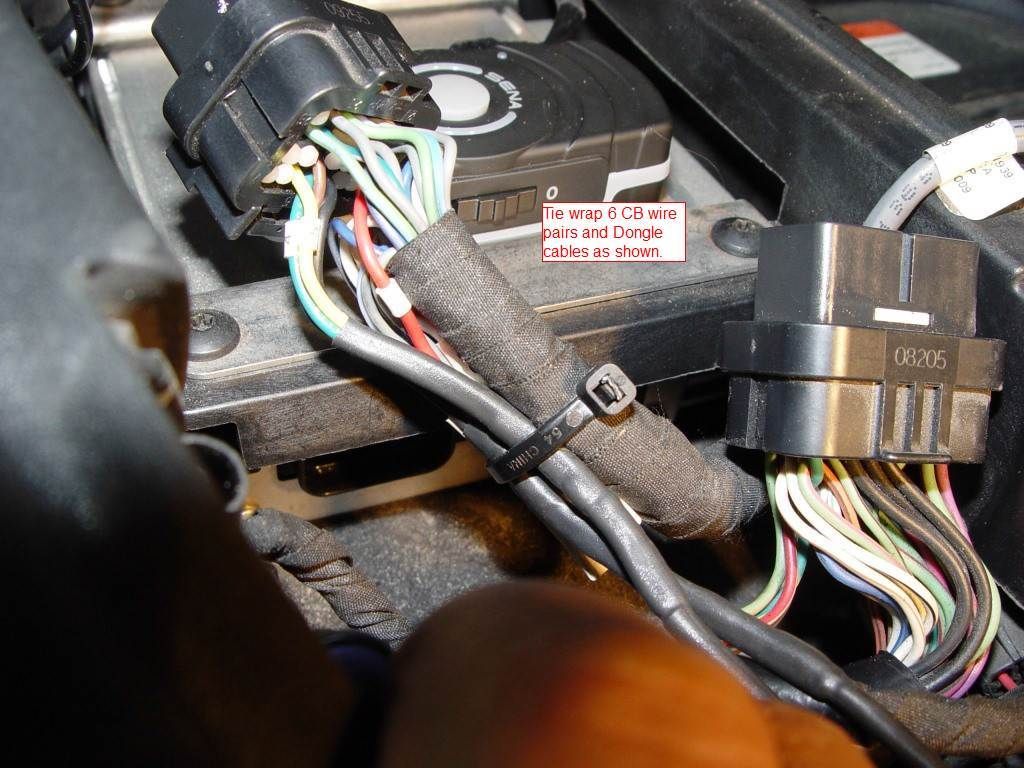
Tie wraping the 6 CB contact pairs and dongle cable so RD0_2 can be reinstalled into the radio


Now reconnect the two connector to the Radio. RD0_2 first and then RD0_1.


This Mod will totally disable the hardwired BRP headsets but will give you the XM Radio as well as all other radio functions via Bluetooth.


This is the same cable I used to install the dongle on my 2014 RT but I had to 16 more sealing plugs ($1.60) and A OEM Connector ($6.00)
 
Actually Doc, because he had the ENT harness, you could have just unplugged the CB and made a plug that goes right into the ENT harness CB plug. This would have been much easier than modding the RDO-2 connector :)

See my post here, I show what pins on the top CB connector you would plug into. I also know the part number for the plug and pins to make the cable for the ENT harness.

http://www.spyderlovers.com/forums/...ur-own-Dongle!&p=802094&viewfull=1#post802094

Bob
 
Well Bob

I read thru your 6 page post that you directed me to and watched the install video for the cable you are now selling. From the video it appears that you are somehow attaching the USB and audio wires to the contacts. I would guess a drop of solder. You also cautioned in your video that the customer must be careful when removing the connector from the radio if they have to because it is possible to break the wire/wires.

I have 45 years experience assembling all kinds of connectors (21 years as an Electronics Technician in the Navy and 24 years working for Lockheed Martin). To do any of this work I had to be trained and certified in soldering , connector termination (crimp contacts and solder) and fiber optics. I also became an Instructor for soldering ,crimping and fiber optic termination. The certification were both Mil Standard and ISO.

That being said when I did the research on the RD0-2 connector so I could put the Dongle in the rear. I could have just taken the cable I had that puts the dongle in the front trunk and reworked it but I wanted it as a reference for making the short version of the cable for the rear trunk. The spec for the contact (pn 3-1447221-4) calls out 20 awg wire with a max diameter of .06 inches. There is a reason that 20 awg wire is used. It is the vehicle by which the contact is inserted or removed from the connector body. I also went looking for a source for a right angle USB and audio cable. With cables in hand I found that the USB cable was 28 awg wire and the audio was 26 awg wire for the right and left channel and the shield was 18 awg when you did the calculations for figuring out unknown wire gauge. Clearly you should not terminate the USB or audio cable to the contact as the wire does no have the necessary rigidity to insert it into the contact body. To overcome this problem one must solder 20 awg pigtails onto the small gauge wire then crimp the contacts onto the end of the 20awg wire. The attached pictures show the process for adding the pigtails and the final product.

As you can see the final product can be used for two purposes. Adding the Dongle to a radio with no connector in RD0-2 location or adding it to the RD0-2 connector of the entertainment harness. The RD0-2 connector is the simplest connector to work on for the simple reason that it has a slide lock built into the connector body for locking the contacts in place. All one does is push in on the large white plastic tab and pull the wires out. To insert the contacts one just pushes the contact into the connector body, there is no paying attention to the contact orientation like on the Delphi or the other AMP connectors found on the Spyder.


I will make this cable up for any member that wants it for cost of connector, contacts, sealing plugs and the two right angle cable for cost and postage. You have to do is buy your own Sena Dongle

The cable for those that have the entertainment harness costs me in parts $14.00 and I'll provide the 1/4" grommet for going thru the trunk wall. CB function is removed from entertainment harness at RD0-2

The cable for the stock radio costs me $21.40 in parts and I'll provide the 1/4" grommet for going thru the trunk wall.


The grommet only requires a 3/8" drilled hole and when the grommet is inserted into the wall you can pass the two cables thru the hole and with some RTV on the backside of the grommet return the trunk to a weather proof condition.
 

Attachments

  • entertainment bluetooth 003.jpg
    entertainment bluetooth 003.jpg
    59.9 KB · Views: 62
  • entertainment bluetooth 006.jpg
    entertainment bluetooth 006.jpg
    59.7 KB · Views: 60
  • entertainment bluetooth 013.jpg
    entertainment bluetooth 013.jpg
    47.7 KB · Views: 56
  • entertainment bluetooth 014.jpg
    entertainment bluetooth 014.jpg
    63.1 KB · Views: 68
Last edited:
Understood. But the CB connector is also an easy plug to work with. The pins slide in and lock. To remove them there is a little hole under each pin on the connector you slide a paper clip in and it releases them. But no need for a user to do that.

Before Motorcycle Dave started selling the cable, I made about 50 cables for free for people. Only had one return out of those and it was my fault in construction. Never had anyone rip the wires out. They way I did it was I would add a 18 gauge stub wire to the crimp area with the thin USB wires. I would crimp all that and then solder it. Also for the free cables I made I would put a tie wrap right at the end of the cable. Then I would use silicon sealant and close off the entire rear of the connector encasing the tie wrap. This gave a bit of a strain relief and then I did not need 21 white pin plugs. The sealant made it all waterproof.

Also, if you notice the top of the RD0-2 connector there is a tab with 2 holes. I put a tie wrap loop on that which gives a handle to unplug the connector instead of pulling on the wires. But with that said... How often is someone going to unplug the thing? Most probably never. But your way is a stronger way should someone pull on the wires. For me doing that was just too much soldering, heat shrink, etc to make it for free for people.


I can tell you that while you and I are fully capable of pulling pins out and sticking new ones in, trust many people will be timid about doing that. Heck some don't even want to remove the panel above the radio by themselves! Then you have to have them heat shrink off the ENT harness pins they pulled out so they don't short on something. Just my experience in what people are willing to do vs getting something that is as simple as possible.

Anyway making a plug and done cable for those with ENT harness and XM, will get you happier customers. No pin pulling just plug it in.
It's 5 pins, 1 plug (which is cheaper than the radio plug), and 7 rubber blank hole plugs. Also unlike RD0-2 pins which minimum order is 100 (unless you found a source that sells them singles), you can get the pins for the CB connector as singles. In that post I think I gave all the part numbers?

Bob
 
Bob

I think you missed the point I was trying to make. If you make the Dongle cable as I have shown with the contacts crimped onto the 20awg wire you now have a cable that the customer can install into the RD0-2 connector body very easily. So now we have a cable that will work for the ones that have the stock radio (no connector installed in RD0-2 jack) and you supply them with the cable and the connector to install. the second option is for those that have the entertainment harness with XM radio and either don't use the CB or the CB is not install but want Bluetooth. You then supply them with the same cable and 7 sealing plugs. They depin the 12 CB wires (pins 1-6 and 7-13) install the 5 dongle cable pins and 7 seals. Bottom line is you have a single cable that will work for both configurations. The dongle is receiving the power and audio directly from the radio thus eliminating The CB connector you tap into. Doing it this way you cut costs. You also only need one set of instruction which would cover the pin installation for RD0-2. You also reduce the size of the hole required in the trunk wall because you are passing only the contacts thru the hole not the USB and audio connector.
 
I got the point trust me. Just saying again some people are not going to be comfortable pulling wires etc. Just my experience.

FYI, if someone wants a cable that just plugs in and you have the ENT harness (XM is OK just no CB), contact me I will do them for free as well. So you have 2 options :)

Bob
 
I will stick with my offer like you once did and offer member a second source for the Dongle cable they they can install. All they have to do is PM me on there needs. Anyone can work this connector as I have supplied it to several members already with the connector not attached until the cable is routed to the radio.
 
Back
Top