• There were many reasons for the change of the site software, the biggest was security. The age of the old software also meant no server updates for certain programs. There are many benefits to the new software, one of the biggest is the mobile functionality. Ill fix up some stuff in the coming days, we'll also try to get some of the old addons back or the data imported back into the site like the garage. To create a thread or to reply with a post is basically the same as it was in the prior software. The default style of the site is light colored, but i temporarily added a darker colored style, to change you can find a link at the bottom of the site.

Has anyone found & installed Brighter rear-facing lights on their F3L?

GRHorst

Member
I was looking for a video or instructions on connecting additional lights on the rear of my F3L. But since I didn't find any, I'll ask here ...

I see Lamonster has something called the "Tail Brighter LED for the F3-LTD, 2020+ RT Top Case". There it states that "Super easy install as all the wiring is done as the tail brake light. You pull two pins and plug and play."

Has anyone installed this or a similar tail/brake light? Where does it connect? Simple as the claim? Are there other lights I could consider?

Thanks,
GR
 
Last edited by a moderator:
I've just ordered the Tail Brighter Kit from Lamonster. It connects by removing two push pins at the top case latch and pulling the plate there. That gives access to the top case tail light wiring. I believe that Lamont includes Lever Locks with the kit; they make the wiring connections pretty simple - lift levers, insert wires, lock levers down. If no one speaks up, give me a couple of weeks to get the kit in and installed and I'll give you the lowdown.
 
I installed those on my 2022 F3L SS. It is that easy! Hardest part was making everything fit in there without being in way of latch and putting it back together. I did opt for a slightly different application however. Wanting as much light as possible nearer the line of sight of cagers behind me, I chose to mount what is the lower strips shown in Lamonster's pictures to the top line of colored part of top case, basically in line with the factory top brake/tail light on top case.
 
Last edited:
I installed those on my 2022 F3L SS. It is that easy! Hardest part was making everything fit in there without being in way of latch and putting it back together. I did opt for a slightly different application however. Wanting as much light as possible nearer the line of sight of cagers behind me, I chose to mount what is the lower strips shown in Lamonster's pictures to the top line of colored part of top case, basically in line with the factory top brake/tail light on top case.

Just looked at my top case, I think that's a darn good idea. Got a photo? I'd appreciate seeing how/where you routed the electrical for the upper strips.
 
Installed on our 2020 RT. Easy install. And like what was mentioned by the Rev, getting it all back in was a trip. LOL Makes a big difference back there. Also installed the running lights down the back of the top case. It really stands out! :thumbup: Tom :spyder:
 
I will try to take a couple pics this evening. The upper strip electrical went right into factory light just like the other strips.
 
i installed the Red NANO Saddlebag Marker Lights with Full Illumination, Can Am Spyder F3T/LTD (pair), & Sequential Fender LED's (Amber/Red) w/ Safety Reflectors, fits can am spyder F3 19+RT 20+.

I got the above from Value Accessories, they are a vendor on this site.

Deanna
 
GR, here's a quick rundown of Lamonster's Tail Brightener Kit installed in my 2017 F3T with factory top box.

What's in the package:

LM Tail Brightener Kit Included Parts resized.jpg

The instructions:

LM Tail Brightener Kit Instructions resized.jpg

The tail light you'll be removing, looking down from the top with the top box lid open:

Top Box Tail-Brake Light Before Removal resized.jpg

Retention pins removed and light flipped over to expose plug:

Top Box Tail-Brake light pins removed resized.jpg

Now, here's where I ran into issues. The included brake light flasher module would not work on my F3T. I ordered the top box after purchasing the Spyder, maybe the wiring is different. However, the end result is that the flasher harness would not work in my installation. Given the inexpensive price of the kit, I went ahead and installed it without the flasher module harness. YMMV.

I cut and stripped the top box tail, brake and ground wires, reconnecting them with the Leverlocks included in the Lamonster kit. After positioning, preparing and installing the two upper LED strips, I stripped back about 2" of the outer jacket of the LEDs wiring and stripped about 1/4" from the individual wires' insulation. The wires were then twisted together by color and inserted in the Leverlocks. Note that the wiring colors do not correspond as the instructions say they should. Since each of the two rows of LEDs are of equal brightness, it doesn't matter which way they go in this installation. The excess wiring and Leverlocks fit easily into the space under the tail/brake light. Reinstalled the top box light, ensuring that the tabs on the bottom of the light housing engage the top box, insert and press the locking pins into place and it's done!

Wiring connections no flash module resized.jpg

The same procedure would be used to connect the lower LEDs - I chose to only install two for the moment. You will note in the instructions that the wiring on one lower LED strip needs to be reversed "to maintain symmetry". That way, if you have the lower strips mounted vertically as the instructions call for, you won't have the left side of both strips as the tail and both right sides as the brake.

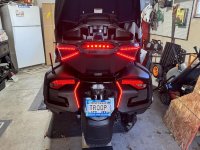
As I said, I've only mounted the upper pair of strips for the moment. Here's what they look like in tail light mode; they're quite a bit brighter than the factory tail lights. In addition, as Revjames notes the LEDs are closer to drivers' line of sight. I also like that they extend around the sides of the top box as the F3T/L is seriously deficient in side lighting IMO.

Top Box LEDs in tail light mode resized.jpg
 
Last edited:
And finally... if you buy the Lamonster Tail Brightener and the flasher module doesn't work, that can be fixed. I noted that the outgoing negative (black wire) from the flasher module had been cut flush with the grommet. Pulling up the wiring diagram on the 'Net, every diagram and video indicated that this lead was required. I have no idea why that was done - somebody perhaps didn't get that whole "electrical circuit" thing? :p I could have gotten another from Amazon https://www.amazon.com/Podoy-GS-100...7bd-4d16-bd0f-982d2146c7a3&pd_rd_i=B01F4OKWSG for about $7, but chose to try repairing the one I had just for fun. I popped open the flasher case, extracted the stub of cut off wire and soldered a longer lead to it. Running the new negative wire out through the grommet was a bit of a chore but doable, after which I simply snapped the case shut. The flasher module's circuit board is potted... sort of... but it should keep moisture from damaging the board. For what it is, I was actually surprised to see that it was potted; that's a plus and good choice of parts by Lamont. Sorry, didn't take a photo of the inside of the flasher module.

I pulled the top box light and determined which wire provided the brake light with 12v. Rather than make a huge rat's nest of wiring, I opted to cut the leads and solder in the incoming positive and negative leads to the flasher. The outgoing leads remained unsoldered as they would be connected via Leverlock. Now it was a simple matter to secure the Leverlocks to the bottom of the top box light opening with Scotch mounting tape and route the power and LED leads. I also opted to extend the leads from the tail-light plug to make it easier to install and remove if needed. The flasher module I had to leave loose as there was no good mounting location available (there would probably have been if I hadn't secured the Leverlocks to the bottom of the opening). When installed, the tail-light holds the module in place well enough. Now the top box brake light and the added LED strips flash as intended.

Not a terribly difficult job, but not exactly plug-and-play either, I'm sorry to say. I still think the kit is good, especially for the sale price. Here's what the final setup looks like:

Wiring connections with flash module resized.jpg
 
Last edited by a moderator:
I'm finally getting back to this ... thanks for all the input!!

I have an independent 3rd party LED strip. It has the two brightness leads and ground. So not needing more than one wire for each, I don't think I will use leverlocks. They have some advantages. But I'll use either the old style crimp things or just get out my solder iron grumpyoldretiredcop did.

IMHO if you've tested the system and it works - SOLDER it and seal with heat shrink ..... good luck Bro .... Mike :thumbup:
 
IMHO if you've tested the system and it works - SOLDER it and seal with heat shrink ..... good luck Bro .... Mike :thumbup:

"SOLDER it and seal with heat shrink" - sounds like good advise. I always keep a supply of heat-shrink tubing of various sizes and use it often. However, I didn't cut the wires in this case. I just trimmed the shield and soldered on the three new wires w/o actually cutting the existing wire. Maybe I should have cut the wires just to be able to get some heat shrink on. But oh-well. Solder and electrical tape is working decently. This was a simple, basic, and cheap (e.g. $5) addition of a running light and brake light. More lights in back always seems like a good idea.

Brake-Run-Light_addition-circled.jpg
 
Last edited by a moderator:
Sounds dumb but when we have to rebuild our combat fighting robots for battle bots on the fly between bouts, we solder and coat with hot glue then tape and simply rub hot glue melted with tip over the tape. Almost Same as heatshrink
 
"SOLDER it and seal with heat shrink" - sounds like good advise. I always keep a supply of heat-shrink tubing of various sizes and use it often. However, I didn't cut the wires in this case. I just trimmed the shield and soldered on the three new wires w/o actually cutting the existing wire. Maybe I should have cut the wires just to be able to get some heat shrink on. But oh-well. Solder and electrical tape is working decently. This was a simple, basic, and cheap (e.g. $5) addition of a running light and brake light. More lights in back always seems like a good idea.

View attachment 204460

If I can't use "heat shrink" .... I will use elec. tape ..... I have found that it will un-ravel if it gets wet or hot .... what I do is fold the tape over the splice and put both Sticky sides together.... it is a *itch to remove, but it lasts much longer .... good luck ... Mike :thumbup:
 
Last edited by a moderator:
Sounds dumb but when we have to rebuild our combat fighting robots for battle bots on the fly between bouts, we solder and coat with hot glue then tape and simply rub hot glue melted with tip over the tape. Almost Same as heatshrink

I didn't think of the hot glue trick. Apparently the glue is non-conductive and a good insulator.
My problem with hot glue is that it ALWAYS finds it way onto one of my fingers regardless of how careful I think I'm being ... :yikes:
 
Just placed my order for the Tail Brighter lights. I like the fact that it is totally contained in the top case, as I do remove my top case and install the color top plate on occasion.
 
I just got my Tail Brighter lights installed this week. I wanted more brake lights up higher, so I did like Revjames did and put them on just below ridgeline on top case, and then I mounted the second row right below it. I think that makes them show up even better by having a larger and more concentrated area of running lights/brake lights. I'm very happy with the way it looks. I was worried that the LED strip wouldn't lay flat on the curve, but Revjames said it did, and he was right. That adhesive must be pretty strong. I did get in a hurry to put them on after cleaning the area with alcohol, and I forgot to use the primer. I wonder how much that will affect the long-term durability.

IMG_0902.jpg

IMG_0903.jpg

IMG_0906.jpg

Screenshot 2023-12-29 at 9.50.41 AM.jpg
 
Last edited by a moderator:
George said I’ll see your LED placement and raise you double or nothing, then called. :roflblack: :roflblack:
George my friend you are a winner and I love your LED installation! That looks great and I believe you are correct more concentrated light is better, especially in daylight I’d imagine.
 
Just got mine installed this morning. I separated them along the lines of my top case. I think they’re a nice contrast to my TRICled vertical run/turn/brake lights. I also have the TRICled flash module on the lower lights. Truly were a straight forward, plug/play install.
 

Attachments

  • IMG_0776.jpg
    IMG_0776.jpg
    88.2 KB · Views: 15
Last edited:
Back
Top