cruisinTX
Member
Greetings from the Far Side all. Sharing this in the event some others may need it.
A few weeks ago, my wife was preparing to spend a few days helping one of her daughters do some work in a small shop she owns in a town a good ways off so she packed some clothes for a couple of days. As has become her normal routine, she used the Spyder's frunk case. She has been using it a lot the past few years as it is a very handy size for short stays and seems to be pretty sturdy in respect to the wheels and extending pull handle. Unfortunately, the strap right on top isn't as durable. I went to pick it up that particular morning and it broke very near the middle of that top strap. I told her to just use it that way until she got home and I would try to fix it on her return.
I am pretty much a hopeless DIY kind of guy, so I schemed a little and decided using some industrial sized heat-shrink I had left over from some other projects might be sufficient to execute this repair with minimal effort. I cut a piece to a length that would allow me to slip it over each side of the break by tilting them upward then bending the tubing in the center. I then applied heat with a heat gun and shrunk the tubing down sufficiently--or so I thought. A couple of more uses and the tubing slipped away exposing the broken handle again. dangitall!
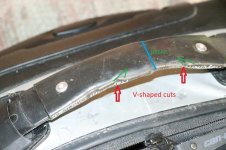
Sunday, I made another attempt first by cutting some V-shaped notches in four spots on the edge of the handle about half-way between the break and the ends. I made sure the edge of the cuts closest to the break were at an angle to help keep the tubing from backing out as easily once the tubing was heated and shrunk some more. I then mixed up an ample amount of a plastics epoxy I had purchased for yet still a different project and applied it to the handle on the surface of the break, in the raised lettering on the handle and in those cuts I made.
The next step went a lot easier than I expected as I slipped the tubing back in place trying not to squish the epoxy out of the cuts. Lastly on this part, I carefully re-heated the tubing over the raised lettering and the V-shaped cuts & left it to cure overnight. I put the final touch of setting a pop-rivet about 3/4" from the ends of the tubing for an added touch of security.
Main take away is, be very :yikes: careful about saying things like, "no surprise it broke seeing as how you have put more miles on the suitcase than you have on the Spyder," when first seeing it broken. Some people just have no sense of humor.
A few weeks ago, my wife was preparing to spend a few days helping one of her daughters do some work in a small shop she owns in a town a good ways off so she packed some clothes for a couple of days. As has become her normal routine, she used the Spyder's frunk case. She has been using it a lot the past few years as it is a very handy size for short stays and seems to be pretty sturdy in respect to the wheels and extending pull handle. Unfortunately, the strap right on top isn't as durable. I went to pick it up that particular morning and it broke very near the middle of that top strap. I told her to just use it that way until she got home and I would try to fix it on her return.
I am pretty much a hopeless DIY kind of guy, so I schemed a little and decided using some industrial sized heat-shrink I had left over from some other projects might be sufficient to execute this repair with minimal effort. I cut a piece to a length that would allow me to slip it over each side of the break by tilting them upward then bending the tubing in the center. I then applied heat with a heat gun and shrunk the tubing down sufficiently--or so I thought. A couple of more uses and the tubing slipped away exposing the broken handle again. dangitall!
Sunday, I made another attempt first by cutting some V-shaped notches in four spots on the edge of the handle about half-way between the break and the ends. I made sure the edge of the cuts closest to the break were at an angle to help keep the tubing from backing out as easily once the tubing was heated and shrunk some more. I then mixed up an ample amount of a plastics epoxy I had purchased for yet still a different project and applied it to the handle on the surface of the break, in the raised lettering on the handle and in those cuts I made.
The next step went a lot easier than I expected as I slipped the tubing back in place trying not to squish the epoxy out of the cuts. Lastly on this part, I carefully re-heated the tubing over the raised lettering and the V-shaped cuts & left it to cure overnight. I put the final touch of setting a pop-rivet about 3/4" from the ends of the tubing for an added touch of security.
Main take away is, be very :yikes: careful about saying things like, "no surprise it broke seeing as how you have put more miles on the suitcase than you have on the Spyder," when first seeing it broken. Some people just have no sense of humor.
Attachments
Last edited: