• There were many reasons for the change of the site software, the biggest was security. The age of the old software also meant no server updates for certain programs. There are many benefits to the new software, one of the biggest is the mobile functionality. Ill fix up some stuff in the coming days, we'll also try to get some of the old addons back or the data imported back into the site like the garage. To create a thread or to reply with a post is basically the same as it was in the prior software. The default style of the site is light colored, but i temporarily added a darker colored style, to change you can find a link at the bottom of the site.

Easy Trunk Light for RT (maybe others)

wd5gnr

New member
Not exactly rocket science.

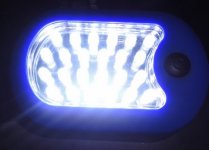
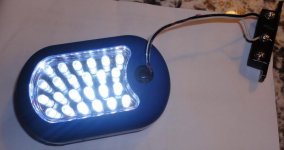
I started with this: http://www.harborfreight.com/27-led-portable-worklight-flashlight-67227.html
You can't beat these for the $3 they are usually on sale for. Bright! The only downside is they have 2 positions, but at least it turns off after each one. So the button goes: Full light on, off, flashlight on, off. So sometimes you have to hit the button 3 times to get the big lighting.

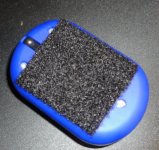
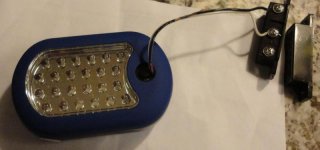
I got out the trusty industrial strength Velcro. I was careful to cut it so I could still get to the screws needed to change the battery (see pictures).

I am guessing you can figure out the rest. Velcro to Velcro and you are done.
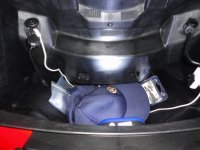

DSC03537.JPG
Lit up trunk


DSC03538.JPG
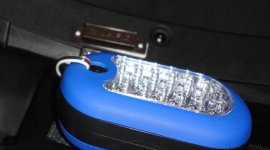
Bad shot of lamp working in place


DSC03539.JPG

Detail of Velcro work
 
light

i had the led trunk light installed on my bike and what you did does a better job than the one the dealer installed
 
I have the factory one too and even when it is on I can't see a
anything by it. Very weak. This looks much better.
 
Another advantage is you can remove it and use it as a trouble light or flash light if you need it. The only downside is you can't get to the hook for hanging the light under the Velcro without peeling it off.
 
Those lights are great for all sorts of things, and the batteries last quite a while too. I think they run on three AAA's, I have only changed a set out once though.
 
Son of trunk light.

I grew tired of having to click the light switch twice every time and running the risk of leaving it on. So....

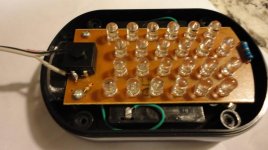
I took a different light apart (surprisingly, the backs were not interchangeable, so I wound up just using the new light).

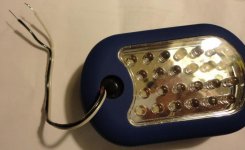
Under the decorative switch cover is a mechanical switch that has two positions. There are three terminals, two together and one alone. If you short the one that is alone with the one closest to the edge of the device, you get the full LED on. I left the switch cover off and routed a pair of wires out to these two terminals. Then a simple magnetic reed switch (commonly used for home alarm systems) will do the trick. Just make sure the switch is on when there is NO magnet (the one I used had both contacts, but some only have a normally open (NO) or normally closed (NC). The trick is, do you consider in the magnetic field normal or not? That's why I just got one with both contacts.

The real trick was lining up the magnet. Like a refrigerator, you can't tell when the light goes off! So I put a digital camera on 10 second self timer, dropped it inside and closed the lid until I got it right.

Pictures follow.

DSC04903.jpg
Wires soldered


DSC04904.jpg
Routed through switch hole

DSC04905.jpg
The right contacts will light the light with no magnet....

DSC04906.jpg

.... and turn it off when the magnet is present.


DSC04911.jpg
Self timer photo with trunk lid closed.

Note the switch is stuck to the inside part of what I think of as the weather stripping guard. The magnet is stuck the lid right inside the soft weather stripping (but not on it).

You can get these much smaller and use little tiny magnets. I was afraid the little glass encapsulated reeds might not take shock and vibe on the road and loading/unloading the trunk well.


Let me know if you do either of these.
 
Son of trunk light.

I grew tired of having to click the light switch twice every time and running the risk of leaving it on. So....

I took a different light apart (surprisingly, the backs were not interchangeable, so I wound up just using the new light).

Under the decorative switch cover is a mechanical switch that has two positions. There are three terminals, two together and one alone. If you short the one that is alone with the one closest to the edge of the device, you get the full LED on. I left the switch cover off and routed a pair of wires out to these two terminals. Then a simple magnetic reed switch (commonly used for home alarm systems) will do the trick. Just make sure the switch is on when there is NO magnet (the one I used had both contacts, but some only have a normally open (NO) or normally closed (NC). The trick is, do you consider in the magnetic field normal or not? That's why I just got one with both contacts.

The real trick was lining up the magnet. Like a refrigerator, you can't tell when the light goes off! So I put a digital camera on 10 second self timer, dropped it inside and closed the lid until I got it right.

Pictures follow.

View attachment 79163
Wires soldered


View attachment 79164
Routed through switch hole

View attachment 79165
The right contacts will light the light with no magnet....

View attachment 79166

.... and turn it off when the magnet is present.


View attachment 79167
Self timer photo with trunk lid closed.

Note the switch is stuck to the inside part of what I think of as the weather stripping guard. The magnet is stuck the lid right inside the soft weather stripping (but not on it).

You can get these much smaller and use little tiny magnets. I was afraid the little glass encapsulated reeds might not take shock and vibe on the road and loading/unloading the trunk well.


Let me know if you do either of these.
even better use a mercury switch I found some on amazon for $2.50 with double face foam tape on them 1/2 in square position sensitive easy to mount no contacts to wear out works great
 
even better use a mercury switch I found some on amazon for $2.50 with double face foam tape on them 1/2 in square position sensitive easy to mount no contacts to wear out works great

I'm trying to visualize that. You'd have to put the switch on the lid and thus the light too, right? I wanted the light down in the trunk, although I suppose if you could get the light pointed right it is bright enough.
 
This is what I did several years back:

attachment.php


Some good things about this method is that the light hinges down to shine into the trunk and I can also remove it and use it as is intended as a 'headlight'. Very versatile.

There is a strip of Velcro 'hooks' glued to the trunk lid. Then I took Velcro straps that have the 'hooks' on one side and 'loops' on the other & wrapped them around the elastic strap of the headlight. Those straps then are attached to the Velcro strip on the trunk lid to hold it in place.
 
Last edited:
Back
Top