Yeochief
New member
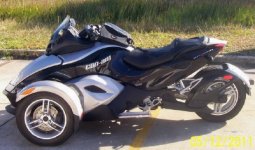
I have been feasting after floorboards for my :ani29: practically from the day I got it, but money is always a problem when you are retired. I've seen some floorboards that others did themselves and they inspired me to get to it. This past Sunday, I took :f_spider: to a shop I rent for storage and some woodworking. Moved things around and got the :f_spider: inside. I borrowed a lift from a neighboring shop and determined the balance point so I can lift my machine when I get my own lift. Harbor Freight has their 1500 lb ATV lift on a coupon deal for $59.99 and I expect I'll pick one up next week.
I then stripped most of the tupperware off so I could remove the splash pans, I know Lamont has had his off forever, and if he's good with that, who am I to disagree. I pulled both pans left and right.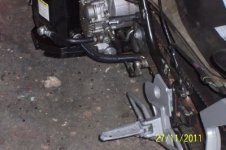
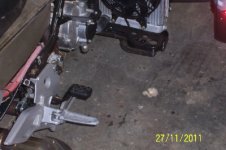
When I had the pans off, I began to see how I could mount floorboards without making major mods to :spyder2:. I knew I wanted to use the drivers pegs to support the tail of the floorboards and the back edge of the cross frame member to support the front. With all the tupperware out of the way, I got some cardboard and determined the approximate size of the boards I want. Then I cut a couple of 1/4" plywood mockups and tried them for fit.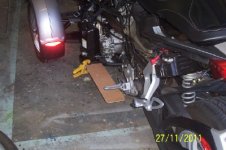
When I knew the size I wanted, I had to locate a supplier. Fortunately, there is still one business in my town that stocks and fabricates custom metal products. I discussed my plans and determined certain limitations about working with aluminum diamond plate. My initial idea was to bend the rear of the floorboard and attach it to the foot pegs with bolts through holes I would need to drill in the foot pegs. The fabricator had indicated that there were issues with getting those bends. Back at the shop, I was looking at the foot pegs, and realized there were two holes in the pegs already. By using those holes, I simplified the boards to a 21" by 5" rectangle with a turned up lip on the long edges. This morning, I had them made out of 1/8" diamond plate, cost $52 + change had them in about 30 minutes.
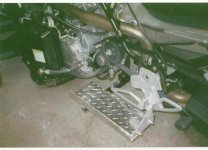
The right side doesn't require any cutting, just three holes drilled to accept the mounting bolts. View attachment 37530
The left side needed to have a corner removed to sit the way I wanted it to. I used my mockup to mark the diamond plate and sawed away. After removing some additional, I am happy with the fit.
There is a bunch of finishing to do before the boards get final mount.
Wednesday 30 Nov 2011: Went to Ace Hardware for stainless steel machine screws to use when mounting the new boards. Those babies are pricey :yikes: $10.53 for the pieces I needed fit in one of those little paper bags Ace uses for screws and such lots of room. Back at the shop I located and drilled the required holes in the boards and used a 1/4 " drill to drill the rubber peg pads where the screws go. Also cut four pieces of 1/2 " PVC to use as spacer. Am still looking for suitable metal to use. I decided to use two 1/4 20 screws for each post with a connecter in the middle flat head on top and pan head on bottom. I think it makes a cleaner job. Put a 5/16 pan head screw through the frame hole to hold the front of the board. It took some futzing, but I got all four posts connected.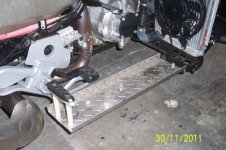
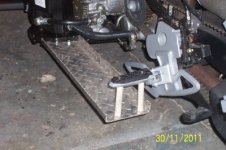 now I can locate and cut notches in the lower body panels.
Then it all comes apart for finish and polish and final assembly. Since I live in Florida, every day in the shop is a day not riding, but this has been satisfying so far.
I then stripped most of the tupperware off so I could remove the splash pans, I know Lamont has had his off forever, and if he's good with that, who am I to disagree. I pulled both pans left and right.


When I had the pans off, I began to see how I could mount floorboards without making major mods to :spyder2:. I knew I wanted to use the drivers pegs to support the tail of the floorboards and the back edge of the cross frame member to support the front. With all the tupperware out of the way, I got some cardboard and determined the approximate size of the boards I want. Then I cut a couple of 1/4" plywood mockups and tried them for fit.

When I knew the size I wanted, I had to locate a supplier. Fortunately, there is still one business in my town that stocks and fabricates custom metal products. I discussed my plans and determined certain limitations about working with aluminum diamond plate. My initial idea was to bend the rear of the floorboard and attach it to the foot pegs with bolts through holes I would need to drill in the foot pegs. The fabricator had indicated that there were issues with getting those bends. Back at the shop, I was looking at the foot pegs, and realized there were two holes in the pegs already. By using those holes, I simplified the boards to a 21" by 5" rectangle with a turned up lip on the long edges. This morning, I had them made out of 1/8" diamond plate, cost $52 + change had them in about 30 minutes.
The right side doesn't require any cutting, just three holes drilled to accept the mounting bolts. View attachment 37530
The left side needed to have a corner removed to sit the way I wanted it to. I used my mockup to mark the diamond plate and sawed away. After removing some additional, I am happy with the fit.
There is a bunch of finishing to do before the boards get final mount.
Wednesday 30 Nov 2011: Went to Ace Hardware for stainless steel machine screws to use when mounting the new boards. Those babies are pricey :yikes: $10.53 for the pieces I needed fit in one of those little paper bags Ace uses for screws and such lots of room. Back at the shop I located and drilled the required holes in the boards and used a 1/4 " drill to drill the rubber peg pads where the screws go. Also cut four pieces of 1/2 " PVC to use as spacer. Am still looking for suitable metal to use. I decided to use two 1/4 20 screws for each post with a connecter in the middle flat head on top and pan head on bottom. I think it makes a cleaner job. Put a 5/16 pan head screw through the frame hole to hold the front of the board. It took some futzing, but I got all four posts connected.

 now I can locate and cut notches in the lower body panels.
 Then it all comes apart for finish and polish and final assembly. Since I live in Florida, every day in the shop is a day not riding, but this has been satisfying so far.
Last edited:

