Several folks have asked for more info on how I built our Ryker shifter - so here’s some photos of the major components and instructions to help you fabricate a similar mod.
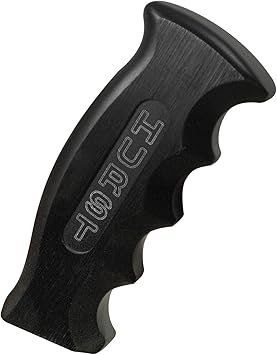
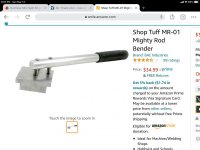
First, the items ordered from Amazon: bender, light bar clamp, air cylinder rod clevis, heim style joints, and shifter knob. I purchased a 3’ stick of 3/8 round bar stock and misc. nuts & bolts at my local hardware. You will also need a means to cut the steel, a welder (mig preferred) and an angle grinder.
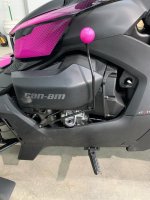
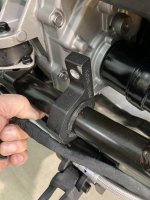
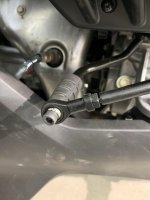
I started by drilling a larger hole (25/64) in the light bar clamp. Cut the zip ties that secure the brake line and wiring to the frame. Mount the clamp to the frame as shown in picture - being sure NOT to pinch the brake line or wires. Thread a 10mm bolt into the clevis. Loosely bolt the clevis to the clamp using a 10mm bolt, 2 nylon washers, and a locking nut.
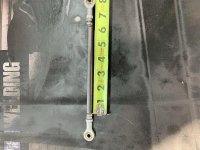
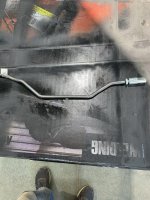
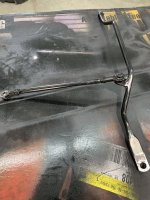
Now use the bender to get creative and form the shifter rod to your liking. You can keep it simple or try to follow the contour of the Ryker. The goal is to be able to weld the the rod to the end of the 10mm bolt. Once you have the rod bent and cut to the correct height, weld the shift rod to the 10mm bolt and check the figment. If good, solidly weld the bolt to the clevis and grind to a nice, round, tapered finish. Weld a bolt to the top of the rod that will thread into the knob/handle of your choice. Again, grind to a nice finish around the top bolt.
Next you need to cut a 6” piece of bar and weld a 6mm bolt to each end to attach the heim joints. Thread the heim joints onto the bolts welded on the ends of the connecting rod.
You will also need to weld an attachment point to the shifter rod for the heim joint to bolt on to. I used a piece of 1/4 steel with a 6mm hole drilled in it - but you could also use a properly-sized heavy washer welded to the shifter rod. The placement and angle are a little tricky because of the angle involved and the limited movement of the heim joints.
Remove the bolt from the end of the factory shifter. I needed to cut the rubber off flush on the end of the shifter in order for the heim joint to bolt securely. You will also need a longer bolt when connecting the heim joint to the shifter.
Paint as desired and attach the shifter to the frame clamp. Bolt the connecting rod to the shifter rod and the factory shifter using appropriate 6mm bolts and locknuts. Thread your knob or handle on the top. Check for proper operation. Some adjustment can be made by moving the frame clamp forward or backward on the frame. Re-secure the wires and brake line using zip ties. ENJOY! PM me if you have additional questions.
Sorry some of the photos are out of order. See the first post in my earlier thread for more finished photos. https://www.spyderlovers.com/forums...y-own-Ryker-Shifter-Mod&p=1566075#post1566075
First, the items ordered from Amazon: bender, light bar clamp, air cylinder rod clevis, heim style joints, and shifter knob. I purchased a 3’ stick of 3/8 round bar stock and misc. nuts & bolts at my local hardware. You will also need a means to cut the steel, a welder (mig preferred) and an angle grinder.
I started by drilling a larger hole (25/64) in the light bar clamp. Cut the zip ties that secure the brake line and wiring to the frame. Mount the clamp to the frame as shown in picture - being sure NOT to pinch the brake line or wires. Thread a 10mm bolt into the clevis. Loosely bolt the clevis to the clamp using a 10mm bolt, 2 nylon washers, and a locking nut.
Now use the bender to get creative and form the shifter rod to your liking. You can keep it simple or try to follow the contour of the Ryker. The goal is to be able to weld the the rod to the end of the 10mm bolt. Once you have the rod bent and cut to the correct height, weld the shift rod to the 10mm bolt and check the figment. If good, solidly weld the bolt to the clevis and grind to a nice, round, tapered finish. Weld a bolt to the top of the rod that will thread into the knob/handle of your choice. Again, grind to a nice finish around the top bolt.
Next you need to cut a 6” piece of bar and weld a 6mm bolt to each end to attach the heim joints. Thread the heim joints onto the bolts welded on the ends of the connecting rod.
You will also need to weld an attachment point to the shifter rod for the heim joint to bolt on to. I used a piece of 1/4 steel with a 6mm hole drilled in it - but you could also use a properly-sized heavy washer welded to the shifter rod. The placement and angle are a little tricky because of the angle involved and the limited movement of the heim joints.
Remove the bolt from the end of the factory shifter. I needed to cut the rubber off flush on the end of the shifter in order for the heim joint to bolt securely. You will also need a longer bolt when connecting the heim joint to the shifter.
Paint as desired and attach the shifter to the frame clamp. Bolt the connecting rod to the shifter rod and the factory shifter using appropriate 6mm bolts and locknuts. Thread your knob or handle on the top. Check for proper operation. Some adjustment can be made by moving the frame clamp forward or backward on the frame. Re-secure the wires and brake line using zip ties. ENJOY! PM me if you have additional questions.
Sorry some of the photos are out of order. See the first post in my earlier thread for more finished photos. https://www.spyderlovers.com/forums...y-own-Ryker-Shifter-Mod&p=1566075#post1566075
Attachments
-
 0ADE13CA-C2DE-4444-A5B8-6F045E4FA4B6.jpg50.7 KB · Views: 170
 -
 651C3FA4-5A81-4A7D-8EAF-0981CECE4A59.jpg39.3 KB · Views: 188
 -
 16CCA95C-4638-403E-BF2B-D834B53D8E66.jpg81.4 KB · Views: 163
 -
 676C9CF4-FBB1-478C-98E1-04C57243531E.jpg40.2 KB · Views: 166
 -
 45619A0D-D2FC-4A9D-A3F1-C8AF4E10543E.jpg46.8 KB · Views: 219
 -
 CC868E73-4F08-40A6-9132-C236B7970C6C.jpg59.6 KB · Views: 184
 -
 92DEB97B-4375-428E-99E2-D7CC6D854F64.jpg56 KB · Views: 173
 -
 E1EFC556-11B2-4534-80A8-0BB131A02CB9.jpg71.3 KB · Views: 179
 -
 CE839846-BB4D-437C-9CA9-9269C6186F40.jpg48.9 KB · Views: 156
 -
 500A5B7A-11E2-497F-B3EB-EFAD34C50E04.jpg27.2 KB · Views: 158
 -
 F4507A29-F90A-43D0-AA8A-F97F4049DA40.jpg37.2 KB · Views: 156
 -
 7819FC07-06A7-491D-937F-C82A3128F6C1.jpg49.4 KB · Views: 175
Last edited by a moderator: