Hello, I have watched a couple videos showing how to remove the small panel with auto clips and the two painted panels! My question is about the big black inner panel on left side of the 2020/2021 RTL’s! Has anyone made or seen a video showing what needs to be done to remove this inner panel? I have read a post describing the procedure, but a video would work best for me! Thanks
-
There were many reasons for the change of the site software, the biggest was security. The age of the old software also meant no server updates for certain programs. There are many benefits to the new software, one of the biggest is the mobile functionality. Ill fix up some stuff in the coming days, we'll also try to get some of the old addons back or the data imported back into the site like the garage. To create a thread or to reply with a post is basically the same as it was in the prior software. The default style of the site is light colored, but i temporarily added a darker colored style, to change you can find a link at the bottom of the site.
You are using an out of date browser. It may not display this or other websites correctly.
You should upgrade or use an alternative browser.
You should upgrade or use an alternative browser.
Any videos showing the Black inner panel removal? 20/21 RTL's
- Thread starter Don60
- Start date
Peteoz
Well-known member
Hello, I have watched a couple videos showing how to remove the small panel with auto clips and the two painted panels! My question is about the big black inner panel on left side of the 2020/2021 RTL’s! Has anyone made or seen a video showing what needs to be done to remove this inner panel? I have read a post describing the procedure, but a video would work best for me! Thanks
Unless someone has created one in the last month, there isn’t a video, Don. The written instructions do detail it pretty well, and it isn’t that hard. The left panel is easier than the right, as you have to manoeuvre around the brake pedal on the right side. I’ll see if I can find my post on it from when I replaced my rear shock, in case you haven’t seen it.
Pete
Last edited by a moderator:
Peteoz
Well-known member
This is from K80Shooter, Don. I’m not sure if this is the one you have seen, but it was all I needed. Just take a few photos as you are doing it, as it does help with “reassembly memory” :2thumbs:
I just took mine off again this morning to have access to the seat strut. There's really nothing to it. Remove the painted panels, remove the passenger and driver's floorboard/footrest, remove the Rotax panel at the floorboard (there is one of those tiny plastic screw thingy's up front, make sure to take it out). Remove the clips and attaching screws from the panel along with the bottom front saddle bag clip/bolt. There is one hidden clip that you just pull on the panel to get loose and be careful down at the floorboard area as there is one piece that snaps around the tubing. Then just slide it out.
Takes maybe 20 minutes after you have the painted panels removed.
Pete
Last edited by a moderator:
Peteoz
Well-known member
Pete,
Thank you for you reply and advice. I want to inspect my front pulley and might install a belt tensioner to help with belt vibration issues! Dealer wants 1 1/2 hours of labor for this job!
Don, what year RT do you have? The ‘20/‘21 RTs from late ‘20 on, started to be shipped with tensioners installed. My ‘20/‘21 BRP workshop manual includes the tensioner in their diagrams.
Pete
Peteoz
Well-known member
Don…….p.s. there IS one tricky bit that the thread I have copied below discusses….. sorry, I forgot about it.
Right at the front bottom of the black panel is a push pin (with screw). They are buggers to get out as a Phillips head #2 can strip them (plastic screw). Have a read of the thread below before removing it…. I used a #1 .
https://www.spyderlovers.com/forums...readed-Push-Pins-in-Side-Storage-compartments
Pete
Jetfixer
Well-known member
You also have a bolt running vertically at the bottom forward edge of the side compartment. You do not need to remove the drivers footrest for the left side. There's the screw rivet mentioned above, 2 lower pushpins, the 3 screws in front of the foot rest (even with the back of the fender), 3 more pushpins along the top edge, and one torx screw in the middle.
RayBJ
Well-known member
Good info regarding REMOVING the black panel. As for RE-INSTALLING, it can be a lot more frustrating. Aligning and snapping the panel back into the adjoining upper plastics requires lots of manipulation and a tender touch. Also, I found the most difficult removal part was lifting the panel off the frame tube at the bottom and snapping it back on during re-assembly.
Pete, my RTL is a 21, but build date of May 2020, so no updated “white pulley” or a belt tensioner! Dealer is sending them, so will use your step by step information on screws and fasteners to remove that panel once all parts arrive.
Jetfixer, thanks for your information also, nice to know I do not have to remove drivers floorboard!
Jetfixer, thanks for your information also, nice to know I do not have to remove drivers floorboard!
Peteoz
Well-known member
Don, by the way, if you just want to check your front sprocket, you can do that by only removing the lower Rotax panel above the floorboard…… 6 Torx top and bottom, 3 Torx at front, and that nasty little screw pin right at the front bottom. (You may not have to remove the screw pin though, as taking the rest of the Torx out should let you pull the panel out far enough to give you a good view of the front sprocket.
ALSO….. I have read a couple of reports on here, that the new, white, front sprockets are also failing. I think I have seen 3 instances now. It might be worth considering keeping your new sprocket aside, and just doing regular checks of your current sprocket. You might not experience the red dust, but if you do, you have the solution to hand.
Pete
Pete, thanks so much on the quick way to check front sprocket! So much easier, and I have read the same about white “fix”! I’m thinking I will be checking the sprocket and not replace unless needed! Enjoy your warmer weather and riding, weather turning cold here, so my riding tapering off!
Escorial
Member
What were the removal instructions?
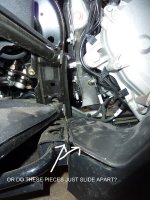
Mine I seem to have loose except for the front lower and the tip of the rear panel is a little bit behind the hardbag. I suspect that once the front is loose I can slip the panel forward a bit to clear the bag
Thanks
Mine I seem to have loose except for the front lower and the tip of the rear panel is a little bit behind the hardbag. I suspect that once the front is loose I can slip the panel forward a bit to clear the bag
Thanks
Attachments
Peteoz
Well-known member
What were the removal instructions?
Mine I seem to have loose except for the front lower and the tip of the rear panel is a little bit behind the hardbag. I suspect that once the front is loose I can slip the panel forward a bit to clear the bag
Thanks
Escorial, it is hard to tell just where you are with that photo. If you read the 10 posts prior to yours on this thread, they cover all the aspects of removing the black panels :thumbup:
Pete
Escorial
Member
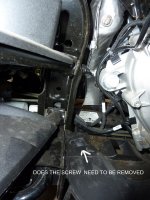
Prob was the rivet with the Phillips head. As the other post mention there are a bugger and easy to strip.
I called the dealer to see if he stocked one but not stock and week or so to get it. If he had one, I would have just cut the stripped one out.
With the upcoming holiday I decided to put it all back together. I will order a rivet after the holiday.
I called the dealer to see if he stocked one but not stock and week or so to get it. If he had one, I would have just cut the stripped one out.
With the upcoming holiday I decided to put it all back together. I will order a rivet after the holiday.
Last edited by a moderator:
Prob was the rivet with the Phillips head. As the other post mention there are a bugger and easy to strip.
I called the dealer to see if he stocked one but not stock and week or so to get it. If he had one, I would have just cut the stripped one out.
With the upcoming holiday I decided to put it all back together. I will order a rivet after the holiday.
Did you see the latter part of my post #10 in the other thread where you've been asking this question??
https://www.spyderlovers.com/forums...ide-inner-panel-removal&p=1677089#post1677089
There's no real need to NOT go ahead and get this done now since those plastic rivets with plastic Phillips head 'screw in' pins WILL work very well as simple Push-pins if the head or the screw is stripped; so if you're only doing using it like a push-pin as a short-term fix to get the job done now rather than waiting for who knows how long just to get a new version of something that will work perfectly adequately as it is, simply cos it's really not all that stressed or significant in the overall scheme of 'holding things together', you should have no issues IF you want to get it done!!
 hyea:
hyea: Just Sayin' :cheers:
Last edited:
Prob was the rivet with the Phillips head. As the other post mention there are a bugger and easy to strip.
I called the dealer to see if he stocked one but not stock and week or so to get it. If he had one, I would have just cut the stripped one out.
With the upcoming holiday I decided to put it all back together. I will order a rivet after the holiday.
There is real easy trick to getting those phillips head plastic rivets out (at least for the 2 in question in this post): Use an appropriate sized phillips head stubby screwdriver obviously. But before trying to unscrew it reach around from the bottom with your other hand and squeeze the wings of the rivet the screw is spreading apart to add more resistance to the threads. The problem is not enough tension from the wings causing the screw to just spin. After adding some pressure on them from the back side with your fingers the screw will unscrew enough to easily pop/pry out. Easy peasy, no replacements needed.
Similar threads
- Replies
- 12
- Views
- 364
- Replies
- 7
- Views
- 2K
- Replies
- 7
- Views
- 2K