Page 2 of 2 FirstFirst 12
Results 26 to 41 of 41
  1. #26
    Registered Users
    Join Date
    Oct 2010
    Location
    Winlock, WA
    Posts
    742
    Spyder Garage
    0

    Default

    also, unless you plan on having them painted, check out http://wrapmyspyder.com/vinyl-category/f3-wheel-kits/ for an interesting wat to black out the rims.

  2. #27
    Very Active Member CanAmChris's Avatar
    Join Date
    Feb 2011
    Location
    Near Philly, PA - USA
    Posts
    604
    Spyder Garage
    0

    Default

    llyrad, how hard was it to do the Plasti-Dip? Did you remove panels or just tape them off?

  3. #28
    Active Member
    Join Date
    Jul 2012
    Location
    Edmonton, Alberta Canada
    Posts
    190
    Spyder Garage
    0

    Default Remove Panels

    Quote Originally Posted by CanAmChris View Post
    llyrad, how hard was it to do the Plasti-Dip? Did you remove panels or just tape them off?
    For the side panel portion (covering where the accessory headlights) I removed the full side panels and than you remove 2 screws and the grey pieces slide out. 4-5 coats of plasti dip- 30min drying time per layer. Let dry for a day (just to be sure and to let it cure) and put back together. Taking the side panels apart and using Plasti-dip are incredibly easy (and I am not that 'mechanically inclined).

    As for the front grill "S" accent. Remove the 4 black screws from the front grill(outside accessible), to remove the whole grill, then there are 10 screws to remove from the removed grill and you have your accent piece, very very easy to do.

    A couple little tips with Plasti-dip, you don't want to touch the pieces at all once you start spraying so I recommend using a stand like the one I made and make sure when you have 360' access to it (I had the stand on a table sitting in middle of garage), so you move around the object rather than moving the object itself. Doing it this way requires no taping at all. Just have the parts resting on the wood and your good to go.

    If you need any more specifics shoot me a PM and I will help you out.
    Attached Images Attached Images

  4. #29
    Registered Users
    Join Date
    Jun 2011
    Location
    Warrenton, Virginia
    Posts
    65
    Spyder Garage
    0

    Default 12 V USB Question

    Quote Originally Posted by llyrad View Post
    Almost forgot added the BRP 12v USB kit. I assumed this kit would have all the wiring required to make it plug and play which is why I paid the crazy amount they asked for it, but there is no wiring at all and still had to make a trip to Home Depot for the connectors. My advice to all those that are going to do this project, save the money and buy the plug adaptors from ebay or amazon for less than 10 bucks. The toughest part is finding the cable under the left service panel, it is covered in black tape and zip tied to a larger black cable.

    OK....I just bought a USB Plug and fuse wire from Amazon as I need to connect my GPS. This seems like the perfect spot to install it. I did see the wire inside and now have a silly question. What did you use to make the hole in the cover? I don't want to damage it using the wrong tool/drill bit. Crazy, I know....BTW, the ryde looks awesome!

    Thanks!

  5. #30
    Active Member
    Join Date
    Jul 2012
    Location
    Edmonton, Alberta Canada
    Posts
    190
    Spyder Garage
    0

    Default No trick to this one.

    Nothing fancy for this install (12v plug). Just grabbed a wood bit for the drill that was about the same size as the plug and spun out a hole for it. Although I did have to slowly enlarge it so plug would fit in nice and tight, as there is a rubber washer on it that allows it to be waterproof.

  6. #31
    Registered Users
    Join Date
    Jun 2011
    Location
    Warrenton, Virginia
    Posts
    65
    Spyder Garage
    0

    Default Thanks!

    Thanks. I figured out I'd start with a standard bit then use a round file to get to the right fit. Thanks again!


    Quote Originally Posted by llyrad View Post
    Nothing fancy for this install (12v plug). Just grabbed a wood bit for the drill that was about the same size as the plug and spun out a hole for it. Although I did have to slowly enlarge it so plug would fit in nice and tight, as there is a rubber washer on it that allows it to be waterproof.

  7. #32
    Active Member
    Join Date
    Jul 2012
    Location
    Edmonton, Alberta Canada
    Posts
    190
    Spyder Garage
    0

    Default Minor Additions

    Instead of using the Brp foglights I just went led lighting at the A frames.


    Still haven't gotten around to upgrading the spring to the one BAM used as I am not sure what exactly needs to be done to it (not mechanically handy) but will ask those questions on my trip to Spyderfest 16!

    Even with all the lighting I still hit a Coyote at highway speeds this fall in the evening at Highway speeds. Surprisingly little damage to the F3 other than body panels and the front rads considering that Coyote exploded (have pics but very graphic).

    The 2015 Trip from Edmonton to New Orleans went very well (over 11000km) other than the extreme heat and the 2 chunks of gravel that put wholes in my drive belt.

    When the weather warms I'll be plasti-dipping the wheels black as I will need to save some money for all my purchases at Spyderfest (first timer, and so far the only Canadian going)
    Attached Images Attached Images

  8. #33
    Very Active Member Ron2andia's Avatar
    Join Date
    Jun 2012
    Location
    Phila
    Posts
    1,429
    Spyder Garage
    0

    Default

    Loving this! Very very nice!
    Live, Love, and Ride! God Bless!

  9. #34
    Active Member
    Join Date
    Jul 2012
    Location
    Edmonton, Alberta Canada
    Posts
    190
    Spyder Garage
    0

    Default Minor Upgrade

    Still snow on the ground here in Northern Alberta, but we had a couple of nice days so I took the F3 into get the recall done for the shock support plate. And I figured while I'm here I upgraded the rear shock to the one designed for 2 up ($210 bucks = to about $170 of your US bucks ) much thicker spring and more coils, noticed a huge difference right away, it sits about the same height but is stiffer on the bumps and keeps it from bottoming out, and got the belt replaced. Now to find the time between snowfalls to get a 1000km on the bike (so it can be adjusted) before I leave for Spyderfest!

  10. #35
    Active Member
    Join Date
    Jul 2012
    Location
    Edmonton, Alberta Canada
    Posts
    190
    Spyder Garage
    0

    Default Blacked out Wheels

    I had a little time this weekend due to new snowfall, so I Plasti-Dip(ped) the wheels.

    Attached Images Attached Images

  11. #36
    Active Member
    Join Date
    Jul 2015
    Location
    Edmonton AB Canada
    Posts
    217
    Spyder Garage
    0

    Default Spyderfeast

    Enjoy the the trip wished I could join you but haven't got my rss out of storage yet

    Quote Originally Posted by llyrad View Post
    Still snow on the ground here in Northern Alberta, but we had a couple of nice days so I took the F3 into get the recall done for the shock support plate. And I figured while I'm here I upgraded the rear shock to the one designed for 2 up ($210 bucks = to about $170 of your US bucks ) much thicker spring and more coils, noticed a huge difference right away, it sits about the same height but is stiffer on the bumps and keeps it from bottoming out, and got the belt replaced. Now to find the time between snowfalls to get a 1000km on the bike (so it can be adjusted) before I leave for Spyderfest!

  12. #37
    Active Member
    Join Date
    Jul 2012
    Location
    Edmonton, Alberta Canada
    Posts
    190
    Spyder Garage
    0

    Default Happy

    Now that the rims are cured, I think they turned out great. Just a few more 'grey' items to get blacked out and then see what comes up at Spyderfest

    Attached Images Attached Images

  13. #38
    Member
    Join Date
    Mar 2016
    Location
    Conley, ga
    Posts
    24
    Spyder Garage
    0

    Thumbs up Recommended Brand of Plasti Dip?

    Quote Originally Posted by llyrad View Post
    For the side panel portion (covering where the accessory headlights) I removed the full side panels and than you remove 2 screws and the grey pieces slide out. 4-5 coats of plasti dip- 30min drying time per layer. Let dry for a day (just to be sure and to let it cure) and put back together. Taking the side panels apart and using Plasti-dip are incredibly easy (and I am not that 'mechanically inclined).

    As for the front grill "S" accent. Remove the 4 black screws from the front grill(outside accessible), to remove the whole grill, then there are 10 screws to remove from the removed grill and you have your accent piece, very very easy to do.

    A couple little tips with Plasti-dip, you don't want to touch the pieces at all once you start spraying so I recommend using a stand like the one I made and make sure when you have 360' access to it (I had the stand on a table sitting in middle of garage), so you move around the object rather than moving the object itself. Doing it this way requires no taping at all. Just have the parts resting on the wood and your good to go.

    If you need any more specifics shoot me a PM and I will help you out.
    Your plasti-dip work looks awesome!! I have the exact same colored F3, and hope to do the same black outs you did on the wheels, can am panels and front fender that is grey also. What brand of Plasti- dip did you use, and where did you get it from? I am looking forward to giving that project a try

  14. #39
    Member
    Join Date
    Mar 2016
    Location
    Conley, ga
    Posts
    24
    Spyder Garage
    0

    Default Any Gloss with your plasti dip work

    Sir, did you use any gloss with your plasti-dip work?

  15. #40
    Active Member
    Join Date
    Jul 2012
    Location
    Edmonton, Alberta Canada
    Posts
    190
    Spyder Garage
    0

    Default

    Quote Originally Posted by jstarmark View Post
    Sir, did you use any gloss with your plasti-dip work?
    No gloss used, just the flat black.

  16. #41
    Active Member
    Join Date
    Jul 2012
    Location
    Edmonton, Alberta Canada
    Posts
    190
    Spyder Garage
    0

    Default

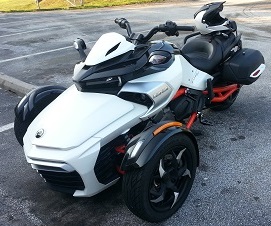
    Been awhile since I posted, but a few things have been changed. Did not like the mesh material saddlebags as I do a lot of touring and them not being waterproof was an issue, plus taking them off took too long so I switched over to the SHAD saddlebags which are amazing (pricey) but being a hard case and fast disconnect (that can be locked) was too good to pass up. A lot more LED lighting has been added and I will be completely removing the Licence plate arm and putting a relocation bracket in under the tail lights. Ordered a Cat delete and hope to have that in a week or 2. Will post pictures of that install shortly.

    66134563_10157558319488420_2442036160176848896_o.jpg

Posting Permissions

  • You may not post new threads
  • You may not post replies
  • You may not post attachments
  • You may not edit your posts
  •