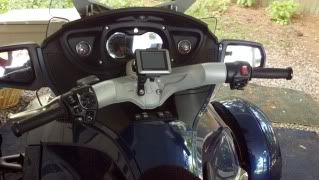
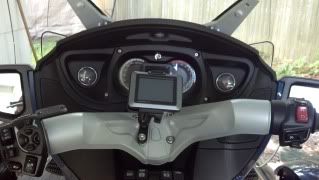
Wanting to use my existing GPS on my RTS, I added the simple RAM mount shown here.
I had a TomTom Rider 2 that I used with my 1994 Honda Goldwing. Some really great ideas in this Forum on how to mount a non-OEM GPS. I would have died to get the Zumo, but couldn't justify the expense. The TomTom was not that cheap originally and buying a second GPS was not feasible after the expense of buying my new Spyder.
I just got my 2012 Spyder RT-S SM5 so really not that many miles. I have read and re-read the different posts on how to get power to my GPS. Can someone look at the pictures and tell me what they would do? I have a 2-wire power line (with inline fuse) that was wired directly to the battery on my Goldwing. How would you wire this up? I am reasonably capable and have the service manual.
What is the best advice for hooking the power up? I can run the GPS off the built-in battery for the short trips I have been making. I like just driving around the rolling hills of southern Ohio, but I don't want to get lost.
Best advice please? Or link to a post that has the best suggestion?
If all you want to run for additional electric is the GPS, go to the battery just like on your Wing. If you want to add other items, and auxiliary fuse block is my suggestion. I do not recommend adding more than one extra connection to a battery.
If all you want to run for additional electric is the GPS, go to the battery just like on your Wing. If you want to add other items, and auxiliary fuse block is my suggestion. I do not recommend adding more than one extra connection to a battery.
That was what I was going to do, but then I saw all these messages explaining how the NEG side of the battery is a bear to re-tighten after loosening. Unless the design for the 2012 is different?
That was what I was going to do, but then I saw all these messages explaining how the NEG side of the battery is a bear to re-tighten after loosening. Unless the design for the 2012 is different?
It is not the negative side of the battery that is a problem, it is the negative jump start terminal under the seat. That should not be loosened! Remove the body panels and go straight to the battery. JMHO
It is not the negative side of the battery that is a problem, it is the negative jump start terminal under the seat. That should not be loosened! Remove the body panels and go straight to the battery. JMHO
Sorry. Poor verbage on my part. I was talking about the jump start terminal and not the actual battery. Your advice is to tie-in directly to the battery.
I also got this advice (did not include ENTIRE response which I received in a private message).
Originally Posted by NorthStar
I installed an aftermarket switched power fuse block to handle the extra items that I have installed on my RT. (GPS, LED lights, Alarm, Heated Clothing wires, Dash Mount 2 volt plug, etc.) If you are only looking to connect your GPS to a switched power source you just need to tap into a switched power source on the Spyder and make sure you have a fuse between your switched power source and your GPS power cable.
It appears that you will be mounting your unit to the bolts on your handlebars. The easiest way to tap into a switched power source is to use the positive (Orange) and negative (Black) wires located at the rear of your fuel or temperature gauges in your dash. Once you remove the 4 torx screws on your bezel it will slide out and you can unplug the gauge to access the wires on the harness to power your GPS. I suggest, for ease of connection, using posi taps to tap into these wires. Make sure you also add an in line fuse (5 amps is what I used) on the positive wire of the power cable running to your GPS.
In the middle of your handle bars you will notice a plastic pop out that can be removed to allow you to run your power cable from your GPS under the handlebar covers to the cavity beneath your speaker cover. Fish the power wires through the center of your handlebars, through to the cavity beneath your speaker cover and up through the hole where the gauge connectors meet with the gauge. I find running the wires from the handlebar pop out hole through to the speaker cavity and up to the gauge hole is the easier direction to travel. Attach your in line fuse after you have done this and before you tap into your switched power wires.
Using these directions only requires your to remove your gauge pod (4 screws), the speaker cover (pryed off with a flat head screwdriver) and the pop out insert in your handle bar (pry off with a small flat head screwdriver). I notched my handlebar insert with an knife to accommodate the GPS wire and simply replaced it in the handlebar for the best effect.
I asked a follow-up question of NorthStar and guess I will decide my approach after hearing back from him.
This may be a stupid question, but what do I buy to attach to the 1" ball? I am buying a Nuvi 550. I have all of the pictured parts for the Spyder, what do I need for the gps to attach to the ball?
"THE DOG SLED"
2011 Spyder Can Am RTS SM5 (Orbital Blue)
Nuvi 550 GPS With Ram Mount
Drink 2 Go Cup Holder
KewlMetal RT Run-Turn-Brake LED
GloRyder Wolf Paw (in blue)
DMWMS Decal
IPS w/
Alaska Leather Sheepskin Butt Pad
TricLed - Brake Pedal
Thanks Scotty (and everyone), I just ordered up everything from GPScity and the stainless bolt and spacer from my local hardware store. Getting ready for a road trip in July, can't wait. Thanks again for the clear details.
"THE DOG SLED"
2011 Spyder Can Am RTS SM5 (Orbital Blue)
Nuvi 550 GPS With Ram Mount
Drink 2 Go Cup Holder
KewlMetal RT Run-Turn-Brake LED
GloRyder Wolf Paw (in blue)
DMWMS Decal
IPS w/
Alaska Leather Sheepskin Butt Pad
TricLed - Brake Pedal
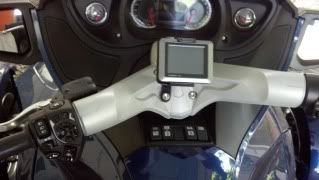
Completed the Install of My TomTom GPS on my Spyder RTS SM5
I previously posted info about my install of my TomTom Rider 2 GPS on my Spyder RT-S SM5.
I completed the install by finishing the electrical connection. Basically, I connected my GPS power cord to the connectors of my analog FUEL gauge.
I routed the power cord through the handlebar tab; pass the left speaker; and up behind the analog FUEL gauge where I linked to the existing power source for the FUEL gauge.
Stole all of my ideas from others (so thank you very much !!) but I thought I would consolidate this information into one posting. If you click on the thumbnail images, I added annotations to better explain how I proceeded.
Wanting to use my existing GPS on my RTS, I added the simple RAM mount shown here. First, remove one existing thin-head M10 x 40 mm handlebar screw. Retain the washer. You will need the following materials:
Retained M10 washer - stainless M10 ID x 19 mm L (3/8" x 3/4") chrome spacer - modified RAM-B-253U mount M10 x 1.50 x 60 mm socket head screw Blue threadlocker (Loctite)
I could not readily find a stainless steel spacer, so I used chromed steel. To fit it in the bottom of the tapered handlebar recess, I put a bolt through it, tightened it with a nut, chucked it in a drill, then ground it down to a slightly smaller diameter for the last 1/8" or so. I coated the ground part with acrylic spray to inhibit rust. A machine shop could probably turn you a spacer of the correct diameter and length out of stainless or high tensile strength aluminum. Standard spacers are English units, even when advertised as metric. A 5/8" spacer would be long enough, but my supplier only had 1/2" and 3/4". A half inch spacer is too short to avoid interference between the mount and the handlebar assembly.
Reinstall the existing stainless washer, then the spacer, and the mount. Use the new, longer screw to secure everything. The original screws have ScotchGrip threadlocker. Enough epoxy remains in the hole to probably secure the new screw, but I used some Loctite to be certain. Torque the screw to 28 lbf-ft (38 N-M). The mount will probably turn when you tighten, so you will have to experiment with the starting position to get it where you want it in the end.
I wear a full face modular helmet and didn't want to look so far down to see my GPS / Phone, so I added a ball to the dash. A short arm and an X-Grip and I was all set. Total time to install was about 15 minutes and parts cost was $41 from Amazon. The stainless steel nuts/bolts to mount it came from the local hardware store and were less than $1. An added benefit to this set up is that I have another bike that also has a ball, so I can quickly and easily move the arm and grip from bike to bike.
"THE DOG SLED"
2011 Spyder Can Am RTS SM5 (Orbital Blue)
Nuvi 550 GPS With Ram Mount
Drink 2 Go Cup Holder
KewlMetal RT Run-Turn-Brake LED
GloRyder Wolf Paw (in blue)
DMWMS Decal
IPS w/
Alaska Leather Sheepskin Butt Pad
TricLed - Brake Pedal
Does anyone know if this setup will work with 2014 RS-S?
(specifically, are the handlebar screws the same size for RS vs RT, 2014 vs 2010?)
ty
Originally Posted by NancysToy
Wanting to use my existing GPS on my RTS, I added the simple RAM mount shown here. First, remove one existing thin-head M10 x 40 mm handlebar screw. Retain the washer. You will need the following materials:
Retained M10 washer - stainless M10 ID x 19 mm L (3/8" x 3/4") chrome spacer - modified RAM-B-253U mount M10 x 1.50 x 60 mm socket head screw Blue threadlocker (Loctite)
I could not readily find a stainless steel spacer, so I used chromed steel. To fit it in the bottom of the tapered handlebar recess, I put a bolt through it, tightened it with a nut, chucked it in a drill, then ground it down to a slightly smaller diameter for the last 1/8" or so. I coated the ground part with acrylic spray to inhibit rust. A machine shop could probably turn you a spacer of the correct diameter and length out of stainless or high tensile strength aluminum. Standard spacers are English units, even when advertised as metric. A 5/8" spacer would be long enough, but my supplier only had 1/2" and 3/4". A half inch spacer is too short to avoid interference between the mount and the handlebar assembly.
Reinstall the existing stainless washer, then the spacer, and the mount. Use the new, longer screw to secure everything. The original screws have ScotchGrip threadlocker. Enough epoxy remains in the hole to probably secure the new screw, but I used some Loctite to be certain. Torque the screw to 28 lbf-ft (38 N-M). The mount will probably turn when you tighten, so you will have to experiment with the starting position to get it where you want it in the end.
Did you have a hard time loosening the handlebar allen bolt ? I am putting a ton of force on it and does not seem to budge. The only thing it may be is that the weather here is 5 degrees. I am a little early waiting for spring. Thanks
Did you have a hard time loosening the handlebar allen bolt ? I am putting a ton of force on it and does not seem to budge. The only thing it may be is that the weather here is 5 degrees. I am a little early waiting for spring. Thanks
the handlebar bolts are very hard to loosen, be careful not to strip it or shear the head off.
Cruzr Joe
2018 F3 Limited, BRP Driver Backrest, Spyderpops Lighted Bump Skid, Dual Spyclops Light, Mirror Turn Signals, Laser Alignment, Engine LEDs, Fog Lights With Halo's, Cushion Handgrips, BRT LEDs, and Under Lighting, Lamonster IPS, (with Clock), F4 25" Vented Windshield with Wings, Airhawk "R" Cushions. Position 4 Brake setting, Short reach Handlebars, Dash Mounted Voltmeter and 12 Volt Plug. Set of 3rd pegs. Extended Passenger Seat. Exterior BRP Connect setup, Ultimate Trailer
[QUOTE=sonicsix;620130]I wear a full face modular helmet and didn't want to look so far down to see my GPS / Phone, so I added a ball to the dash. A short arm and an X-Grip and I was all set. Total time to install was about 15 minutes and parts cost was $41 from Amazon. The stainless steel nuts/bolts to mount it came from the local hardware store and were less than $1. An added benefit to this set up is that I have another bike that also has a ball, so I can quickly and easily move the arm and grip from bike to bike.
Hey...I wanted to send a PM because I am not sure you would get this since the post is so old...
However, I like your dash ram mount. I am picking up my Garmin tomorrow, and like you I do not want to look down at it.
Did you take out the dash? And, did you use bolts and nuts or self tapping screws?
Hi ,
You might want to consider the dash rack from JT ( dealer here ) and there are others. It can hold a few ram mounts and is almost at EYE LEVEL ---- not down at the bars forcing you to take your eyes off the road. If you're handy they are not hard to make.
@Lew L
I really appreciate you hollering at me. That is such a cool add-on...however, I have a ST SE5 and the dash does not have the inserts nor the room. I guess I could mount it on the lip/edge, but I'm afraid the weight would pull down after a while...plus it'd be hard to get bolts on the inside of the lip. I really do like that..and, I'm not that handy.


Originally Posted by NancysToy


 Reply With Quote