|
-
Active Member

-
Very Active Member


I have read it here many times that you are not suppose to jack up or support the RT by the rear shock bracket/mount.
Bob
2011 RT-S SM5 - Black
Bought June 2013 with 450 miles. 27K on 8-1-2017.
Farkles - DIY Trunk Break Light, HMT Break Light, DIY Mirror Turn Signal Lights, DIY Bluetooth Dongle, DIY iPod Setup, DIY Alarm System Install, Show Chrome front fender / rear saddle bag lights, 4th break light around the trunk, Vented Windshield, Baja Ron Sway Bar, DIY GPS setup, Smooth Spyder, BRP Chrome Mirrors, Adjustable deflectors, Triaxis handlebars, NVB Pegs, Bad Boy Airhorn... More to come 
-
Very Active Member


ditto on the shock mount!!
2015 an Am Spyder RT Limited
2013 Yamaha WR250R - Sold
2011 Can Am Spyder RT-S SE5 Limited - Sold
2011 Aspen Sentry Trailer
2003 BMW K1200LT - Sold
2007 Unigo Trailer - Sold
2001 BMW K1200LT - Sold
2001 Honda 750 NightHawk - sold

2015 RT Ltd , Canamspyderaccessories Brake pedal ext. Red
-
Active Member


Thank you to everyone who replied. I didn't see any damage to the support after I lowered it. I did inspect it closely. However, I did notice what looks like two rubber bands crossed over that support. Part of each rubber band is jammed in between the support and bracket, and crosses over to the other side. They are both badly weathered (as a rubber band wasn't made for that environment), and I'm sure will fall apart any day. Does anyone know why there would be a couple of rubber bands here?
Also, the question to me remains; How/where do you jack up the rear and rest it on a stand?
-
Very Active Member

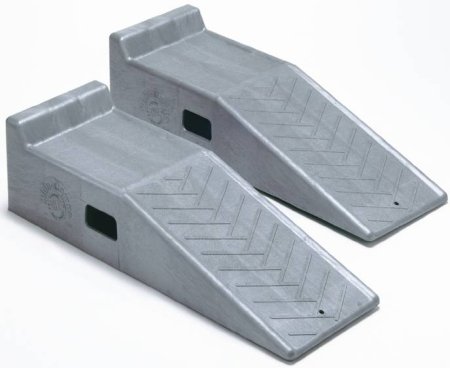
I did the same thing except I backed the  front wheels onto the ramps front wheels onto the ramps
This gave more room to crawl under for an oil change
Don
Now 2014 RT Limited Cognac
Was 2008 GS SM5
Don Garbarino
Cup Holder
GPS locking holder
Mud flap
Modified KNOTT grill
Phone holder and charger
Trailer hitch
Dual air horn
Auxiliary fuse box with relays
Heated clothing controller
volt/oil pressure gauge
Sequential signals in mirror
Tri Axis Handle bars
Baja Ron anti sway bar/heim links
shorty antenna
And many more
-
Active Member


 Originally Posted by garb55

I did the same thing except I backed the  front wheels onto the ramps
This gave more room to crawl under for an oil change
Don
...and that was my other thought; to purchase another set of ramps to have that third ramp to set the RT back wheel on. Thanks Don.
-

Is there any place along the right hand side of the swingarm, where you can see a lifting point? 
-
Very Active Member


 Originally Posted by Texas

...and that was my other thought; to purchase another set of ramps to have that third ramp to set the RT back wheel on. Thanks Don.
This is in fact what I do. Drive it up on ramps on the front, jack up the back and slide another ramp under the tire.
Only time I have it on the jack (ahrbor frieght ATV lift) is when adjusting the belt tension/tracking which I have done once.
Bob
2011 RT-S SM5 - Black
Bought June 2013 with 450 miles. 27K on 8-1-2017.
Farkles - DIY Trunk Break Light, HMT Break Light, DIY Mirror Turn Signal Lights, DIY Bluetooth Dongle, DIY iPod Setup, DIY Alarm System Install, Show Chrome front fender / rear saddle bag lights, 4th break light around the trunk, Vented Windshield, Baja Ron Sway Bar, DIY GPS setup, Smooth Spyder, BRP Chrome Mirrors, Adjustable deflectors, Triaxis handlebars, NVB Pegs, Bad Boy Airhorn... More to come 
-
Registered Users

 Ramps Ramps
By the way...where did you get the composite ramps at? They look lighter and easier to manuever than my heavy steel ones.
-
Active Member


 Originally Posted by GMAN9

By the way...where did you get the composite ramps at? They look lighter and easier to manuever than my heavy steel ones.
Wally World
 Originally Posted by Bob Denman

Is there any place along the right hand side of the swingarm, where you can see a lifting point? 
I'm assuming the lift point that I used "at the back of the chasis center beam" is still ok. The question is where do you rest the back on a stand?
So unless anyone says otherwise, I now believe my steps will be as follows:
LIFTING THE RT:
1. Drive the RT's front wheels up onto the ramps.
2. Set the Parking Brake and turn off the RT.
3. Lift the back of the RT by using a low profile jack; lifting at the back end of the chasis center beam.
4. Position a third ramp under the rear tire and lower the RT onto the ramp.
If you need to remove the rear wheel, after performing the above steps, follow the additional steps below:
5. About three inches fore of the rear of the chasis center beam, lift the RT just enough to scoot a jack stand under so that it rests at the rear of the chasis center beam, with enough room so that there is no danger in the stand slipping off the beam.
6. Scoot the stand into position as described in step 5.
7. Lower the RT onto the stand.
Last edited by Texas; 06-02-2014 at 02:18 PM.
-
Very Active Member

Happy and safe rydin' 
2014 Spyder RT Limited - January 2014, Cognac/Black Seat, #958, born on 1-8-14

-
Active Member


I'm surprised nobody noticed my RT-S is completely blacked out 
-
Registered Users

 Black-out and the gargage! Black-out and the gargage!
You just didn't give us enough time to notice the blacked-out parts. I noticed it right away - well right after I noticed that your garage looks more like a doctors office!
-
Active Member
 Very impressed with "Dr office garage"; rear shock bushing/bolt bends, need grade 8 Very impressed with "Dr office garage"; rear shock bushing/bolt bends, need grade 8
 Originally Posted by Texas

Thank you to everyone who replied. I didn't see any damage to the support after I lowered it. I did inspect it closely. However, I did notice what looks like two rubber bands crossed over that support. Part of each rubber band is jammed in between the support and bracket, and crosses over to the other side. They are both badly weathered (as a rubber band wasn't made for that environment), and I'm sure will fall apart any day. Does anyone know why there would be a couple of rubber bands here?
Also, the question to me remains; How/where do you jack up the rear and rest it on a stand?
Thank you for posting photos of raising up RT for repairs.
The rear stock shock bushing/bolt bends & bolt gets stuck in bushing.
That is one reason not to raise rear of RT using rear lower shock mount, or let it sit on jack stand.
I installed a grade 8 equivalent lower rear shock bolt to replace stock bolt that bends, 10m x 140m with self locking nylock nut.
I admire your high mileage you are getting on your 2014 RT!!
I enjoy the thrill of high speed cornering in mountain roads so get lower mileage, but 37 mpg even with a heavy throttle hand.
I do have a cat-delete exhaust pipe, and ceramic/reflective wrapped the exhaust pipe under the engine of 2014 RT.
So that is probably why I still get good mileage with those mods on (that lean out RT fuel ratio a little).
Are you considering putting a Kumho Ecsta AST 4 ply car tire on rear for better mileage?
I am installing the rear Kumho tire Thursday.
I jack up RT under rear section of frame, and put jack stand under forward part of swing arm pivot area.
I also use a 4" high rear tire ramp, to go with the front ramps raising RT up for easy access underneath.
Enjoy.
Jim
bent lower rear RT stock shock bolt bushing.jpglower rear shock bolt grade 8 hardness.jpg
Last edited by spyderyderjim; 06-02-2014 at 08:53 PM.
-
Active Member


Thanks for the extra info Jim. I'll keep the information about the bolt in case I see any future issues with it. By the way, did that happen after repeated lifts, or after only one lift? I'm not going to change the tire out until I need it. I'm curious to see what kind of mileage I can get, since so many people are reporting low mileage with them. When I do change it out, I know there are a few options, so I'm not sure which one I will change out to; but I'm almost certain it won't be the stocker. I haven't considered the cat-delete or ceramic wrap options, as I enjoy the quietness of the RT, and heat is a non-existent issue, so I haven't thought about wrapping the pipes either.
-
Active Member


 Originally Posted by Texas

Thanks for the extra info Jim. I'll keep the information about the bolt in case I see any future issues with it. By the way, did that happen after repeated lifts, or after only one lift? I'm not going to change the tire out until I need it. I'm curious to see what kind of mileage I can get, since so many people are reporting low mileage with them. When I do change it out, I know there are a few options, so I'm not sure which one I will change out to; but I'm almost certain it won't be the stocker. I haven't considered the cat-delete or ceramic wrap options, as I enjoy the quietness of the RT, and heat is a non-existent issue, so I haven't thought about wrapping the pipes either.
The lower rear stock shock bolt bent on my 2011 RT. If the stock shock bolt bends into the lower shock bushing, it is really difficult to remove when bent together.
Elka gave me a replacement bushing & I bought a grade 8 replacement bolt.
John at Elka said a lower rear stock 2013 RT shock bolt was already bent before they started testing Elka rear shock.
So it doesn't take much to bend lower rear stock shock bolt.
I wrapped the 2014 RT exhaust pipe to keep heat off underneath the engine cases because it is only about 3/8" clearance.
I will have exhaust pipe Jet-Hot Ceramic coated later this summer, as ceramic wrap is messy.
http://www.jet-hot.com/
Didn't mean to side track your post.
Enjoy your rides.
Jim
-
Active Member


I am so jealous of all the garage pictures,,, anyway I just reverse up on 3 ramps, as most of the work is accomplished at the front 3rd of the Spyder; no ramp parts get in the way. Now if I can get rid of all the ants in my backyard before my next oil change.
RAVENZCLAW
2011 RT-S SM5 Timeless Black
Baja Ron Bar
No Other Farkles
-
Active Member

 Originally Posted by Texas

I'm surprised nobody noticed my RT-S is completely blacked out 
I just saw this post and showed it to my wife right away, what did you use to get rid of the chrome? Nice ride!!
-
Registered Users


The rubber band keeps the shock bushings assembled on the shock during assembly of the spyder on the line. Makes sure the pieces stay in place and don't get dropped.
Sold my 14 RTS went back to 2 wheels.
2014 Kawasaki Vaquero SE

-

I stack three 2x12 in varied length. I then back all three wheels up the ramps at the same time. I did cut a 45 degree angle on the front of each the 2x12. I don't need to worry about them breaking, and also use them for my vehicles.
-
Active Member


 Originally Posted by dslim

I just saw this post and showed it to my wife right away, what did you use to get rid of the chrome? Nice ride!!
Thanks, I used Plasti Dip. It's a great product, as you can easily remove it whenever you want.
-
Active Member


just saw this thread. I have to also say that I love your garage. Shames me into spending time to organize and clean mine up thought vs riding! :-)
 Posting Permissions
- You may not post new threads
- You may not post replies
- You may not post attachments
- You may not edit your posts
-
Forum Rules
|


 Reply With Quote

 front wheels onto the ramps


