I was having a Farkle session today. I am installing a Baja Ron sway bar. And waiting for a set of Elka shocks to get here.
While pulling of the belly pans I noticed a some oil on the right side rear belly pan. I thought it might have been the recall
oil plug leaking. So I started removing panels. When I got enough of the panels removed to see the plug. It was not where
the oil was coming from. With a little more looking I found that the clutch cover oil drain plug was the leaker.
With that being figured out I will just change the oil early and replace the drain plug gasket. I have 1000 miles on the Spyder.
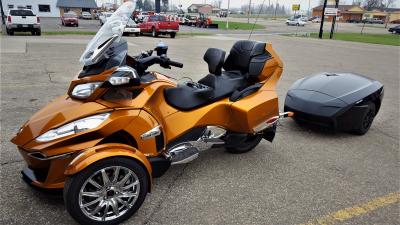
So I decided to remove more panels and take a look at the rest of the trike. I guess I got a little carried away!!!
It is a busy thing under the plastic!!! So while it is apart I gave is a good cleaning and waxed all the panels.
And I installed the sway bar and links. Very easy install thanks Ron.
2014 RTS SE6 White
BajaRon Swaybar
Elka front shocks supplied by Pitbull Power sports.
Aligned By Squared Away
Smooth Spyder belt tensioner
Sprderpops Bump skid
BRP TRI AXSIS Handle bars
Luggage rack
2013 STS SE5 Circuit Yellow. The Jenny Mobile!
I will be installing the Bajaron Sway Bar on my 2014 RT...had it on my 2012 and liked it. The 2012 was easy, how was the 2014? I understand you need to raise it up higher to clear the sway bar -- any comments or guidance would be appreciated! I started farkling my 2014 RT with the High Mount Rear Brake light, Bluetooth, etc.....
Thanks for the photo's....
Happy farkling.....
Last edited by Jim&Teresa; 02-19-2014 at 11:55 PM.
Happy and safe rydin'
2014 Spyder RT Limited - January 2014, Cognac/Black Seat, #958, born on 1-8-14
2014 RTS SE6 White
BajaRon Swaybar
Elka front shocks supplied by Pitbull Power sports.
Aligned By Squared Away
Smooth Spyder belt tensioner
Sprderpops Bump skid
BRP TRI AXSIS Handle bars
Luggage rack
2013 STS SE5 Circuit Yellow. The Jenny Mobile!
I will be installing the Bajaron Sway Bar on my 2014 RT...had it on my 2012 and liked it. The 2012 was easy, how was the 2014? I understand you need to raise it up higher to clear the sway bar -- any comments or guidance would be appreciated! I started farkling my 2014 RT with High Mount Brake light, Bluetooth, etc.....
Thanks for the photo's....
Happy farkling.....
Ron's instructions are very good. He says that you need to have the Spyder at least 22 inches
off the ground. He is rite!!! I did not have it high enough at first. Once I raised it up high enough the bar went rite in. The hardest part is getting all the belly pans out of the way to get at the nuts that hold the sway bar into the chassis. Do you have pics of the 3rd brake light.
Last edited by Nils888; 02-20-2014 at 12:01 AM.
2014 RTS SE6 White
BajaRon Swaybar
Elka front shocks supplied by Pitbull Power sports.
Aligned By Squared Away
Smooth Spyder belt tensioner
Sprderpops Bump skid
BRP TRI AXSIS Handle bars
Luggage rack
2013 STS SE5 Circuit Yellow. The Jenny Mobile!
Ron's instructions are very good. He says that you need to have the Spyder at least 22 inches
off the ground. He is rite!!! I did not have it high enough at first. Once I raised it up high enough the bar went rite in. The hardest part is getting all the belly pans out of the way to get at the nuts that hold the sway bar into the chassis. Do you have pics of the 3rd brake light.
Thanks...here's some pics of the HMT brake light -- we had one on our 2012 too and I think it reduces the risk of someone hitting you from behind as it's very bright and higher than the other brake lights. I did use the dual converter which has running lights in combo with the brake light. Custom Dynamics has a new light out called the integrated HMT which includes amber turn signals on each side -- I elected NOT to buy that as I want as much "red lights" to the rear for prevention of getting rear ended. I have the standard turn signals plus put some amber LED's on my RT mirrors....so if you proceed, you have a choice on your high mount rear brake light -- again, I went with the 36 bright red LED's to the rear instead of the new integrated HMT that has 18 red LED's and 18 amber LED's for the turn signals (9 a side).
Here's a few pics...still need to put some of the bike back together, i.e. rear panel, etc. Notice the snow shovel handle (with some weight on it) to push brake pedal down to get the brake light on -- LOL....I've used the shovel more than the bike this year.
Last edited by Jim&Teresa; 02-20-2014 at 12:46 AM.
Happy and safe rydin'
2014 Spyder RT Limited - January 2014, Cognac/Black Seat, #958, born on 1-8-14
I was having a Farkle session today. I am installing a Baja Ron sway bar. And waiting for a set of Elka shocks to get here.
While pulling of the belly pans I noticed a some oil on the right side rear belly pan. I thought it might have been the recall
oil plug leaking. So I started removing panels. When I got enough of the panels removed to see the plug. It was not where
the oil was coming from. With a little more looking I found that the clutch cover oil drain plug was the leaker.
With that being figured out I will just change the oil early and replace the drain plug gasket. I have 1000 miles on the Spyder.
So I decided to remove more panels and take a look at the rest of the trike. I guess I got a little carried away!!!
It is a busy thing under the plastic!!! So while it is apart I gave is a good cleaning and waxed all the panels.
And I installed the sway bar and links. Very easy install thanks Ron.
Wow you really got carried away!
Originally Posted by Nils888
Ron's instructions are very good. He says that you need to have the Spyder at least 22 inches
off the ground. He is rite!!! I did not have it high enough at first. Once I raised it up high enough the bar went rite in. The hardest part is getting all the belly pans out of the way to get at the nuts that hold the sway bar into the chassis. Do you have pics of the 3rd brake light.
Ron posted tonight that he is updating the instructions for the 2014. Send him an email and he will send you the updates
Originally Posted by JLSpyder2012
Thanks...here's some pics of the HMT brake light -- we had one on our 2012 too and I think it reduces the risk of someone hitting you from behind as it's very bright and higher than the other brake lights. I did use the dual converter which has running lights in combo with the brake light. Custom Dynamics has a new light out called the integrated HMT which includes amber turn signals on each side -- I elected NOT to buy that as I want as much "red lights" to the rear for prevention of getting rear ended. I have the standard turn signals plus put some amber LED's on my RT mirrors....so if you proceed, you have a choice on your high mount rear brake light -- again, I went with the 36 bright red LED's to the rear instead of the new integrated HMT that has 18 red LED's and 18 amber LED's for the turn signals (9 a side).
Here's a few pics...still need to put some of the bike back together, i.e. rear panel, etc. Notice the snow shovel handle (with some weight on it) to push brake pedal down to get the brake light on -- LOL....I've used the shovel more than the bike this year.
I ordered the same light and also chose not to get the one with the integrated turn signals. I did order the pulsing option for it. Now if I just would get the Spyder I could get started installing my lights and sway bar.
2017 F3T-SM6 Squared Away Mirror Wedgies & Alignment
2014 RTS-SM6 123,600 miles Sold 11/2017
2014 RTL-SE6 8,600 miles
2011 RTS-SM5 5,000 miles
2013 RTS-SM5 burned up with 13,200 miles in 13 weeks
2010 RTS-SM5 59,148 miles
2010 RT- 622
Thanks...here's some pics of the HMT brake light -- we had one on our 2012 too and I think it reduces the risk of someone hitting you from behind as it's very bright and higher than the other brake lights. I did use the dual converter which has running lights in combo with the brake light. Custom Dynamics has a new light out called the integrated HMT which includes amber turn signals on each side -- I elected NOT to buy that as I want as much "red lights" to the rear for prevention of getting rear ended. I have the standard turn signals plus put some amber LED's on my RT mirrors....so if you proceed, you have a choice on your high mount rear brake light -- again, I went with the 36 bright red LED's to the rear instead of the new integrated HMT that has 18 red LED's and 18 amber LED's for the turn signals (9 a side).
Here's a few pics...still need to put some of the bike back together, i.e. rear panel, etc. Notice the snow shovel handle (with some weight on it) to push brake pedal down to get the brake light on -- LOL....I've used the shovel more than the bike this year.
That looks nice. Have to add to Farkle list. Thanks for the pics.
2014 RTS SE6 White
BajaRon Swaybar
Elka front shocks supplied by Pitbull Power sports.
Aligned By Squared Away
Smooth Spyder belt tensioner
Sprderpops Bump skid
BRP TRI AXSIS Handle bars
Luggage rack
2013 STS SE5 Circuit Yellow. The Jenny Mobile!
Ron posted tonight that he is updating the instructions for the 2014. Send him an email and he will send you the updates
I ordered the same light and also chose not to get the one with the integrated turn signals. I did order the pulsing option for it. Now if I just would get the Spyder I could get started installing my lights and sway bar.
Hi Ann. Hoping the ELKA.s Show up today or tomorrow.
Should only take me a hour to put it back together. Still plan on being down in long beach for the Alignment party.
2014 RTS SE6 White
BajaRon Swaybar
Elka front shocks supplied by Pitbull Power sports.
Aligned By Squared Away
Smooth Spyder belt tensioner
Sprderpops Bump skid
BRP TRI AXSIS Handle bars
Luggage rack
2013 STS SE5 Circuit Yellow. The Jenny Mobile!
I hope you numbered all those parts so you will remember where they go
Good Job, looks great.
Cruzr Joe
I have had this problem since I was a kid. Got to take it apart and see what makes it tick!!!!!!
2014 RTS SE6 White
BajaRon Swaybar
Elka front shocks supplied by Pitbull Power sports.
Aligned By Squared Away
Smooth Spyder belt tensioner
Sprderpops Bump skid
BRP TRI AXSIS Handle bars
Luggage rack
2013 STS SE5 Circuit Yellow. The Jenny Mobile!


 Reply With Quote