|
-
Very Active Member
 How to install the Baja Ron Sway Bar on a 2010-12 RT How to install the Baja Ron Sway Bar on a 2010-12 RT
This is a little video I did on how to install the Baja Ron Sway Bar in a 2011 Spyder RT. 2010-12 is the same.
Sorry for the shaky video as the iPhone does not have optical jitter correction! It's the only camera I could use and get under the bike to film. But this video should explain all the steps to install the bar. Enjoy! I have to say, this was far easier than what I have read! Don't be afraid to do it. Just some simple tools is all that is needed.
Video is in 2 parts:
Enjoy,
Bob
2011 RT-S SM5 - Black
Bought June 2013 with 450 miles. 27K on 8-1-2017.
Farkles - DIY Trunk Break Light, HMT Break Light, DIY Mirror Turn Signal Lights, DIY Bluetooth Dongle, DIY iPod Setup, DIY Alarm System Install, Show Chrome front fender / rear saddle bag lights, 4th break light around the trunk, Vented Windshield, Baja Ron Sway Bar, DIY GPS setup, Smooth Spyder, BRP Chrome Mirrors, Adjustable deflectors, Triaxis handlebars, NVB Pegs, Bad Boy Airhorn... More to come 
-
Active Member


Thank you for your effort to film these videos and help those of us not mechanically inclined to overcome our doubts and start feeling more confident that we actually can do it ourselves. It does sound and looks quite doable. Thank you again. Great work!
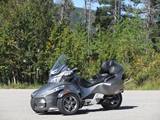 2012 RT-S SE5 2012 RT-S SE5 with Web Boards, custom graphics and battery tender leads
-
Active Member
Marilyn 2023 RTL Red
John 2023 RTL Black
previous:
2015 RTS SE6 Red
2015 F3S SE6 Silver
2011 RT SM5 Silver
2013 STS SM5 Silver
"common sense will prevail....but we see no sign of that"
-
SpyderLovers Sponsor
-

This is a very good video! The only thing I still find a little bit confusing is making sure that it is centered up or "even" on both heim joints. Are those still your stock heim joints?
-
Very Active Member


 Originally Posted by Ryblueyez

This is a very good video! The only thing I still find a little bit confusing is making sure that it is centered up or "even" on both heim joints. Are those still your stock heim joints?
Yes those are stock. When Ron gets the metal ones ready I will probably order some.
Bob
2011 RT-S SM5 - Black
Bought June 2013 with 450 miles. 27K on 8-1-2017.
Farkles - DIY Trunk Break Light, HMT Break Light, DIY Mirror Turn Signal Lights, DIY Bluetooth Dongle, DIY iPod Setup, DIY Alarm System Install, Show Chrome front fender / rear saddle bag lights, 4th break light around the trunk, Vented Windshield, Baja Ron Sway Bar, DIY GPS setup, Smooth Spyder, BRP Chrome Mirrors, Adjustable deflectors, Triaxis handlebars, NVB Pegs, Bad Boy Airhorn... More to come 
-

 Originally Posted by finless

Yes those are stock. When Ron gets the metal ones ready I will probably order some.
Bob
Are they installed the same way? Would that be double the work? Just curious...
-
Very Active Member


 Originally Posted by Ryblueyez

Are they installed the same way? Would that be double the work? Just curious...
Two more bolts and nuts to replace the heim links. You can see them in the segment of part 2 video where I show the link gaps to the frame and aligning the bar left and right.
Bob
2011 RT-S SM5 - Black
Bought June 2013 with 450 miles. 27K on 8-1-2017.
Farkles - DIY Trunk Break Light, HMT Break Light, DIY Mirror Turn Signal Lights, DIY Bluetooth Dongle, DIY iPod Setup, DIY Alarm System Install, Show Chrome front fender / rear saddle bag lights, 4th break light around the trunk, Vented Windshield, Baja Ron Sway Bar, DIY GPS setup, Smooth Spyder, BRP Chrome Mirrors, Adjustable deflectors, Triaxis handlebars, NVB Pegs, Bad Boy Airhorn... More to come 
-
Very Active Member
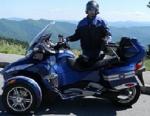

Excellent video! Thanks Bob!
-
Very Active Member

 Great..!! Great..!!
how to video..this will help a lot of folks on the fence..thanks..!! 
Gene and Ilana De Laney
Mt. Helix, California
 2012 RS sm5
2012 RS sm5 , 998cc V-Twin 106hp DIY brake and park brake Classic Black
-
Thinks out loud

-
Very Active Member


 Originally Posted by Jerbear

Bob, ever consider radio? You certainly have the voice for it. 
I have been told that before. At 54 I doubt I will be getting into radio. Would not even know where to start!
Bob
2011 RT-S SM5 - Black
Bought June 2013 with 450 miles. 27K on 8-1-2017.
Farkles - DIY Trunk Break Light, HMT Break Light, DIY Mirror Turn Signal Lights, DIY Bluetooth Dongle, DIY iPod Setup, DIY Alarm System Install, Show Chrome front fender / rear saddle bag lights, 4th break light around the trunk, Vented Windshield, Baja Ron Sway Bar, DIY GPS setup, Smooth Spyder, BRP Chrome Mirrors, Adjustable deflectors, Triaxis handlebars, NVB Pegs, Bad Boy Airhorn... More to come 
-
-
Very Active Member


FYI, anyone living near me that wants the bar installed, I will do it for you free. I can probably do it in 30 minutes now that I have done one. So just PM me and we can go from there for a meet up.
Bob
2011 RT-S SM5 - Black
Bought June 2013 with 450 miles. 27K on 8-1-2017.
Farkles - DIY Trunk Break Light, HMT Break Light, DIY Mirror Turn Signal Lights, DIY Bluetooth Dongle, DIY iPod Setup, DIY Alarm System Install, Show Chrome front fender / rear saddle bag lights, 4th break light around the trunk, Vented Windshield, Baja Ron Sway Bar, DIY GPS setup, Smooth Spyder, BRP Chrome Mirrors, Adjustable deflectors, Triaxis handlebars, NVB Pegs, Bad Boy Airhorn... More to come 
-
 Bar sway bar Bar sway bar
When are you going to be in Galveston, TX? Free room & board with great views.
 Originally Posted by finless

FYI, anyone living near me that wants the bar installed, I will do it for you free. I can probably do it in 30 minutes now that I have done one. So just PM me and we can go from there for a meet up.
Bob
-
SpyderLovers Sponsor

-

 Originally Posted by finless

FYI, anyone living near me that wants the bar installed, I will do it for you free. I can probably do it in 30 minutes now that I have done one. So just PM me and we can go from there for a meet up.
Bob
When are you coming to Charlotte, NC? Lol
-

 Originally Posted by BajaRon

The Pre-2013 RT install is really pretty easy. And the Pre-2013 RS/GS/RSS are even easier.
The 2013/14 isn't really hard. It's just that raising the front of the Spyder up about 18"~20" takes a bit of ingenuity. Once it's up, the rest is not difficult.
'Centering' the sway bar is understandably confusing to some. People naturally assume that centering has something to do with the center of the sway bar. I've even had some ask why I do not mark the center of the bar to help in this regard.
But 'Centering' has nothing to do with the center of the sway bar. Once we get beyond this assumption things go much easier.
I do not want to make this sound complicated or difficult, as it is very simple as long as you use the correct reference points for 'Centering'.
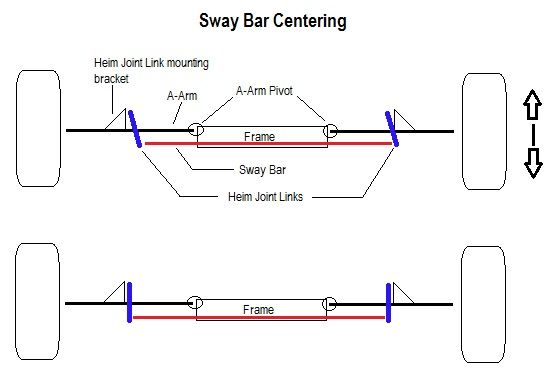
Below I have tried to depict what we are attempting to achieve with this 'Centering' process. The correct reference points are the distance from the outside of the Links to the inside of the link mounting bracket. This is the only reference and has nothing to do with where the sway bar is in relation to the center of the Spyder.
In a perfect world, the center of the Spyder and the centering of the sway bar would be one in the same. But experience has shown us that there are slight differences in location of each suspension component from Spyder to Spyder. This, coupled with the extremely tight space provided for the Sway Bar to work, means that equal clearance between the mounting brackets and links (as shown below) is most important, regardless of where this puts the sway bar in relationship to the center of the frame.
Remember, we are talking small distances of maybe 1/8" to 3/16" difference from Spyder to Spyder.
All of this becomes much more apparent when you do the install and you can see these component relationships for yourself.
The top picture is what you want to avoid. The bottom picture is a correct install with equal distance (whatever that may be) between the link and the bracket.
What exactly would cause this, Ron? Is there anything that you would suggest using as a spacer to center the sway bar?
-
Very Active Member


It's real easy to center the bar as my video shows under the Spyder and the plastic links and the spacing to the frame (link mounting brackets on the frame). You do not need to make this rocket science! I "felt" the gaps and even eye balling it is fine as my video shows. The point of doing this is so the links to not hit the brackets and break or damage them. If your off on one side my a little (small enough you cannot eye ball) I don't think that is a big deal. Again it's super easy to just eye ball them to be the same. It's really obvious once you get under the bike and look.
Bob
2011 RT-S SM5 - Black
Bought June 2013 with 450 miles. 27K on 8-1-2017.
Farkles - DIY Trunk Break Light, HMT Break Light, DIY Mirror Turn Signal Lights, DIY Bluetooth Dongle, DIY iPod Setup, DIY Alarm System Install, Show Chrome front fender / rear saddle bag lights, 4th break light around the trunk, Vented Windshield, Baja Ron Sway Bar, DIY GPS setup, Smooth Spyder, BRP Chrome Mirrors, Adjustable deflectors, Triaxis handlebars, NVB Pegs, Bad Boy Airhorn... More to come 
-
Very Active Member


 Originally Posted by Ryblueyez

When are you coming to Charlotte, NC? Lol
Actually I might be close to there early this year! I have a friend in Ashville NC 
Bob
2011 RT-S SM5 - Black
Bought June 2013 with 450 miles. 27K on 8-1-2017.
Farkles - DIY Trunk Break Light, HMT Break Light, DIY Mirror Turn Signal Lights, DIY Bluetooth Dongle, DIY iPod Setup, DIY Alarm System Install, Show Chrome front fender / rear saddle bag lights, 4th break light around the trunk, Vented Windshield, Baja Ron Sway Bar, DIY GPS setup, Smooth Spyder, BRP Chrome Mirrors, Adjustable deflectors, Triaxis handlebars, NVB Pegs, Bad Boy Airhorn... More to come 
-

[QUOTEless;717316]Actually I might be close to there early this year! I have a friend in Ashville NC 
Bob[/QUOTE]
Early this year is over! LOL. It's November.... Just giving you a hard time.
-
Very Active Member


Early this year is over! LOL. It's November.... Just giving you a hard time.
A crap.... OK early in 2014 
If you really want me to do it for you I am somewhat serious about doing it when I am out there. You might enjoy the ride to Ashville and my buddy has a list and all the tools needed.
Bob
2011 RT-S SM5 - Black
Bought June 2013 with 450 miles. 27K on 8-1-2017.
Farkles - DIY Trunk Break Light, HMT Break Light, DIY Mirror Turn Signal Lights, DIY Bluetooth Dongle, DIY iPod Setup, DIY Alarm System Install, Show Chrome front fender / rear saddle bag lights, 4th break light around the trunk, Vented Windshield, Baja Ron Sway Bar, DIY GPS setup, Smooth Spyder, BRP Chrome Mirrors, Adjustable deflectors, Triaxis handlebars, NVB Pegs, Bad Boy Airhorn... More to come 
-
Active Member


 Originally Posted by BajaRon

The top picture is what you want to avoid. The bottom picture is a correct install with equal distance (whatever that may be) between the link and the bracket.

While I like your picture, Ron (I really do!), the next post demonstrates that your drawing isn't sufficient without a picture of the actual thing and those gaps depicted on it:
 Originally Posted by Ryblueyez

What exactly would cause this, Ron? Is there anything that you would suggest using as a spacer to center the sway bar?
After watching the video, I think I understand what you meant, but it is obvious that your drawing doesn'r explain it to those of us who did not watch the video. So, the photo would definitely help.
 2012 RT-S SE5 2012 RT-S SE5 with Web Boards, custom graphics and battery tender leads
-
SpyderLovers Sponsor


 Originally Posted by Ryblueyez

What exactly would cause this, Ron? Is there anything that you would suggest using as a spacer to center the sway bar?
I am not sure how to answer your question except to guess that you're not grasping the concept here. It is extremely simple and you may be trying too hard. There isn't anything you can do or need to do other than get the spacing between the outside of the links to the inside of the mounting bracket equal.
 Originally Posted by finless

It's real easy to center the bar as my video shows under the Spyder and the plastic links and the spacing to the frame (link mounting brackets on the frame). You do not need to make this rocket science! I "felt" the gaps and even eye balling it is fine as my video shows. The point of doing this is so the links to not hit the brackets and break or damage them. If your off on one side my a little (small enough you cannot eye ball) I don't think that is a big deal. Again it's super easy to just eye ball them to be the same. It's really obvious once you get under the bike and look.
Bob
Exactly! Once you get under your Spyder and look at the components it becomes very clear.
 Originally Posted by Barlock

While I like your picture, Ron (I really do!), the next post demonstrates that your drawing isn't sufficient without a picture of the actual thing and those gaps depicted on it:
After watching the video, I think I understand what you meant, but it is obvious that your drawing doesn'r explain it to those of us who did not watch the video. So, the photo would definitely help.
Agreed, as the stick drawing was not designed to stand alone. Coupled with the video and looking at your own Spyder I am hoping it will clarify things somewhat.
I know I always risk making things seem more difficult than they are when I try to simplify them.... 
Last edited by BajaRon; 11-05-2013 at 09:59 PM.
Shop Ph: 423-609-7588 (M-F, 8-5, Eastern Time)
Only SLOW people have to leave on time...


-
Active Member


 Originally Posted by BajaRon

I am not sure how to answer your question except to guess that you're not grasping the concept here. It is extremely simple and you may be trying too hard. There isn't anything you can do or need to do other than get the spacing between the outside of the links to the inside of the mounting bracket equal.
That was exactly what I meant, but I did not want to be as straightforward as you were in your response. Now you can see that the actual picture of a link with a bar end attched to it and those spaces depicted would help IMHO.
 2012 RT-S SE5 2012 RT-S SE5 with Web Boards, custom graphics and battery tender leads
 Posting Permissions
- You may not post new threads
- You may not post replies
- You may not post attachments
- You may not edit your posts
-
Forum Rules
|


 Reply With Quote
 2012 RT-S SE5 with Web Boards, custom graphics and battery tender leads




 - to this


